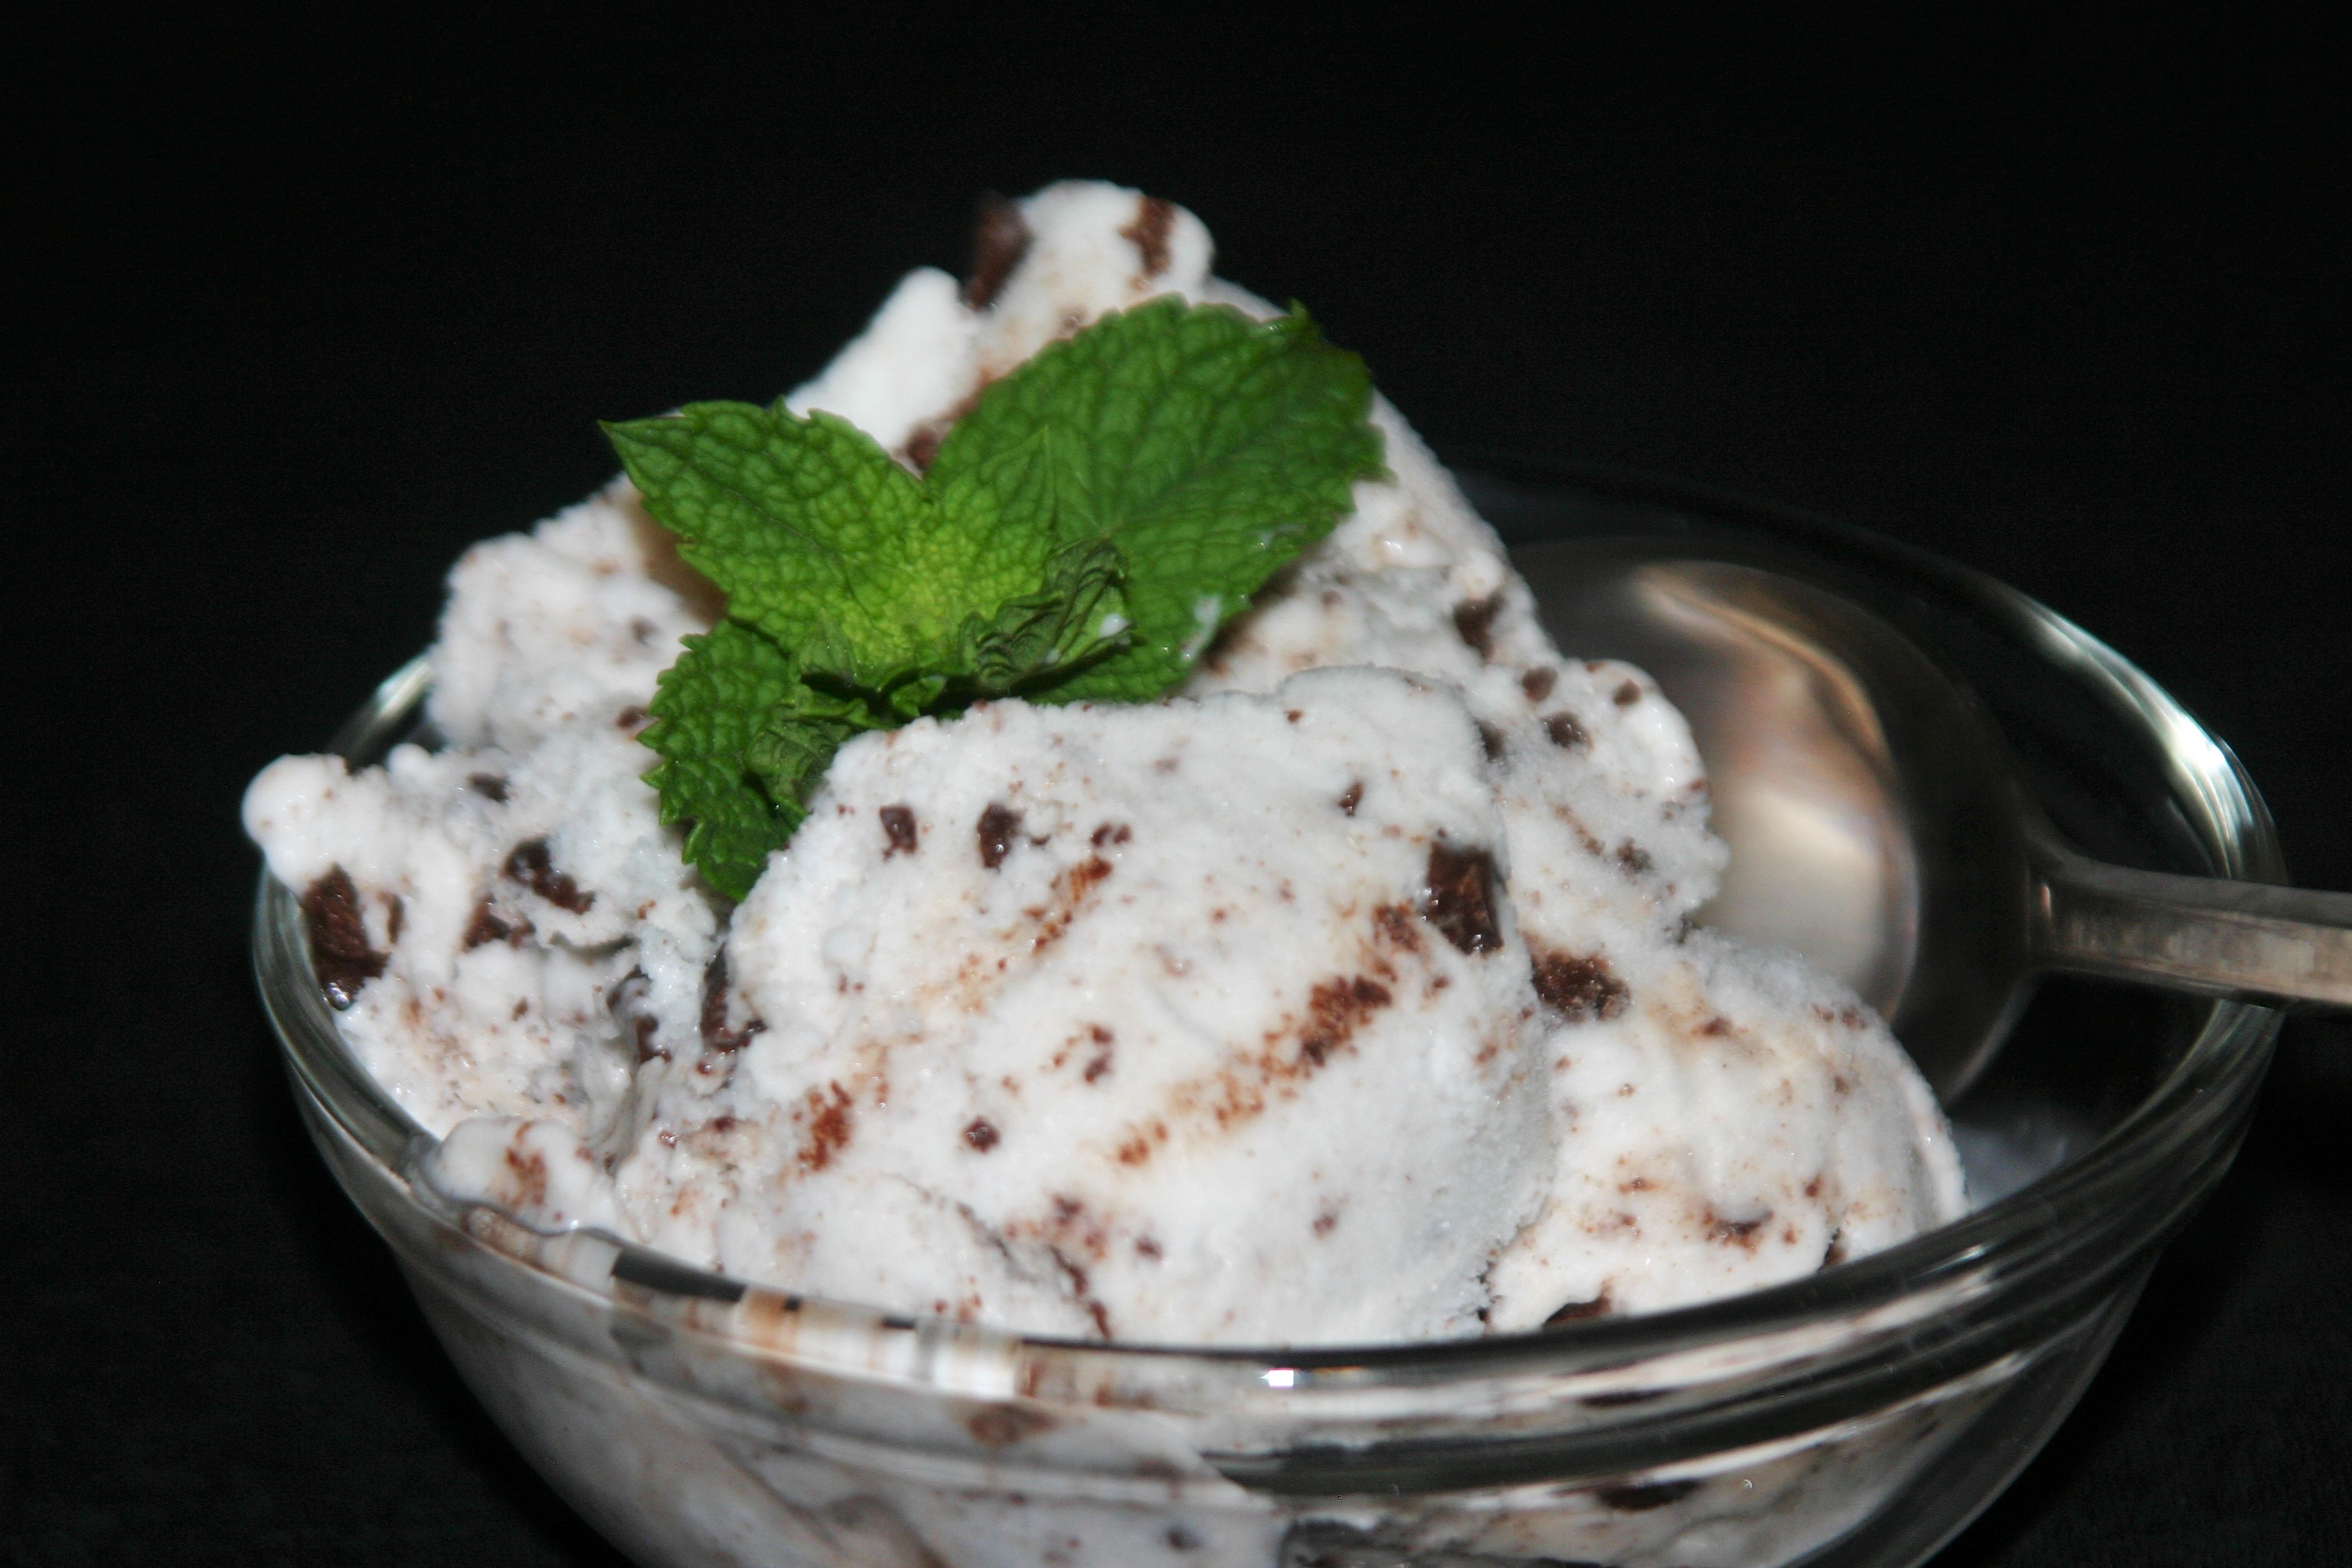
July 21st is National Ice Cream Day. As if we need another reason to eat ice cream. This is a delightful rendition of ice cream without the dairy. The mint in this dish lightens the coconut milk and gives the dish a bit of brightness making it an extra refreshing treat.
Vegan Mint Chocolate Chip Ice Cream
Ingredients
1 can (13.6oz) full fat coconut milk
3 TBL Rumple Minze or other peppermint schnapps
1 1/2 tsp peppermint extract
1/4 tsp pure vanilla extract
2-4 TBL sugar
dash salt
1/2 cup chocolate chips, chopped
Instructions
Blend all ingredients, except chocolate chips, until smooth.
Freeze ice cream in your ice cream maker according to manufactures instructions.
Stir in chocolate chips and place in your freezer until you are ready to enjoy.
Discussion:
Why I made the decisions I did:
I used Rumple Minze which is a 100 proof peppermint schnapps. I used the schnapps for three reasons, it is sweet, has the flavor of peppermint, and has a high alcohol content which prevents the ice cream from freezing fully giving it a creamy texture even when it has been frozen overnight. I decided to give it a bit more sugar so it was sweet enough to be ice cream. I also amped up the peppermint flavor with peppermint extract. The dash of salt opens your taste buds and highlights the other flavors in the ice cream. Adding the chocolate chips at the end allows the ice cream to freeze more consistently, then brings a bit of texture to the party.
Today is National Mojito Day! Here in the Northeast it is HOT today, and perfect for a delightful summer Morita. What is a Morita you ask? Well, a Morita is simply a margarita/mojito mix. This recipe development came when we had a huge garden with mint growing everywhere. We had fun experimenting with way of using the mint with this lovely drink becoming one of our favorites. Until today I have claimed to be unsure of how to make a Morita and always put my husband in charge. I think by writing a recipe for it I’m blowing my cover. I’m only willing to do this for the good of mankind. Enjoy responsibly.
Ingredients
1 lime
a large handful fresh mint, about 1 cup loosely packed
2oz white rum
2oz tequila
1oz triple sec
club soda
simple syrup
Instructions
Cut the lime in half lengthwise, then cut each half in quarters lengthwise.
Split the mint and lime wedges between two highball glass and muddle together.
Add the alcohol evenly between the glasses, fill the glass with ice, then top with club soda, and simple syrup to taste.
Give everything a quick stir, taste, adjust to your liking, and enjoy outside.
One of my husband’s favorite things to eat is burgers. He loves the real thing, but will also get down on a good vegan burger. He is actually the one that makes these most of the time. He is an expert and just throwing stuff in the food processor and coming out with a delicious dinner. This is recipe is for Vegan Chili Burgers using leftover chili. I put in a few options, but this is an easy, basic recipe to adapt to your needs. Instead of chili you could just use any variety of beans you have on hand.
Vegan Chili Burgers
Ingredients
1/2 cup rolled oats, ground/blended into a coarse meal (binder)
2 3/4 cup leftover or canned chili or cooked beans of your choice (base and flavor)
1/4 cup masa harina, cornmeal, flour, or vital wheat gluten, or more oats, plus more for coating (binder)
Oil for frying patties.
Instructions
Strain chili in fine mesh strainer mashing a bit to get as much liquid as possible out. Reserve liquid.
Place 2 cups of chili, oats, and masa harina in food processor, processing until combined.
Stir in remaining chili with a spoon.
Let mixture rest while you place reserved liquid in a small saucepan and heat over low heat until reduced to the consistency of ketchup, 5-10 minutes. Set aside to serve over patties.
After making the sauce shape mixture into patties, coat with more cornmeal, flour or masa harina.
Heat oil in cast iron skillet over medium high heat.
Fry patties until brown and crispy, about 3 minutes, flip, and fry other side until brown and crispy, about another 3 minutes.
Serve hot with toppings of choice ( I like the chili sauce and sauteed onions).
Discussion:
What is important for successful burgers?
Texture (size and combination of base, binder, and other stuff like veggies)
Base (beans, nuts, tofu, tempe, or grains or mixture of any)
Binder (beans, wheat gluten, bread crumbs, oats)
Flavor (salt, hot sauce, onions, garlic, spices)
Veggies and stuff (corn, peppers, other veggies)
How I decided on what to add for this recipe
This is a recipe adapted from a black bean burger recipe in . I have made a few changes for my taste. What works here is the base of the black beans, a bit of bread crumbs for the binder, and just enough veggies to keep it interesting. The flavors work well to create a southern burger that is perfect with a bit of BBQ sauce and sauteed onions.
How Does It All Work?
Texture
The most important thing with burgers is to make sure you don’t puree your ingredients. They should still have some texture to them. This is easier to do when mashing by hand, but a lot more work. I find that adding in nuts and grains helps with the textural element here. For this recipe I ask that you reserve some of the chili and stir it in after you have processed the rest to help with the texture aspect.
Base
For a base I almost always start with beans. Whatever I have in the fridge or pantry. They are all a little different, but super yummy. Try out the ones you like, or have leftover. I also like to add in grains. Making burgers is very much an end of the week clean out the fridge sort of adventure in our house. It is a great way to use up a half cup of this, a quarter cup of that. Here I am using leftover chili, but mix at match at will. Always drain your beans before using them in burgers to prevent a soupy mess.
Binder
Something to bind the burger together is important. A non-vegan recipe would use egg. For vegan burgers the overall consistency is important. You want the burger batter to be firm, and when you pat it into a burger you want it to hold its shape. This can be achieved simply through processing or mashing the beans and adding dry ingredients such as oats or bread crumbs until the desired consistency is reached. My husband loves to use vital wheat gluten (about 1/4 cup per 2 cups beans) for the binder as it makes a chewier finished texture.
Flavor
Obviously flavor is important. Pretty much always I use onions and garlic which I mince very finely with the food processor before I put in the other veggies. Spices are also a must using whatever combination sounds good at the time. I also love using fresh herbs such as cilantro and parsley when I have them on hand. This recipe does not add extra spices as the chili itself provides the flavor for the burger.
Other Stuff
Adding in veggies is totally acceptable here. Try out grating, chopping, and mincing them for the balance of flavor and texture you are looking for. Just look out that they aren’t huge chunks or they will fall out of your burger. These chili burgers have the vegetables from the chili in the base, so none are added.
Remember to balance the five tastes in your finished burger. You can take into account the burger itself, and any toppings you feel like adding. Also texture, adding a bit of something crunchy on the burger or on the side will round out the meal and leave you feeling more satisfied.
For more inspiration check out these recipes for patties/burgers and sausage.
I love nut butters. I have a long-standing obsession with peanut butter, and have slowly introduced all kinds of nut butters into my life. A limiting factor for me for a long time was the price, but I have indulged myself every so often with a tasty walnut or almond butter. When I was doing my elimination diet for Wolfie I had to get serious with cutting out peanut butter, and I started making my own nut butters. Once I started I wondered what had taken me so long! Making homemade nut butters is easy, quick, delicious, and can save you some money. My two favorites are almond butter and walnut butter. Now, for the super simple non-recipe
Ingredients
Nuts (almonds, walnuts, pecans, cashews…)
Salt to taste
Instructions
Heat a dry cast iron pan over medium heat.
When pan is hot add your nut or combination of nuts and toast, stirring frequently, until they start to brown, about 5-10 minutes depending on the nut.
Place toasted nuts in food processor and process until nuts turn to a creamy butter, about 5 minutes. Stop the food processor several times and scrape down the sides during processing time.
If you want crunchy nut butter add more nuts after the base has turned creamy and process to the desired consistency.
Add salt to taste.
Scrape nut butter into storage container and let cool before closing completely.
Discussion:
What is important for successful nut butter?
Toasting your nuts.
Adding salt.
Processing with something high powered enough so you don’t go insane.
How do I decide what to use?
I usually make a batch of almond butter and a batch of walnut butter in one day. I love almond butter for it’s perfect, slightly sweet, nutty, saltiness. I love walnut butter for its richness and almost bitter taste. I have also used a combination of nuts depending on what is in my house. At times I will add flavoring such as cinnamon, but rarely as I love the just the flavor of the nuts with a little salt.
I didn’t put any quantity because you can make as much or as little as you want. I toast one layer of nuts in my big cast iron pan and that is a batch for me. It makes about one pint jar.
How does it all work?
Well, your high powered food processor or blender just cuts the nuts to little pieces, releases the natural oils, and turns the whole thing into one creamy batch of deliciousness. If your blending apparatus is not high powered enough you might have to add some oil to the mix to allow it to blend. A food processor works perfectly and I don’t have to add anything but nuts.
Toasting Almonds
These are the almonds after toasting them.
Processing Almonds
These are the almonds partway through processing them.
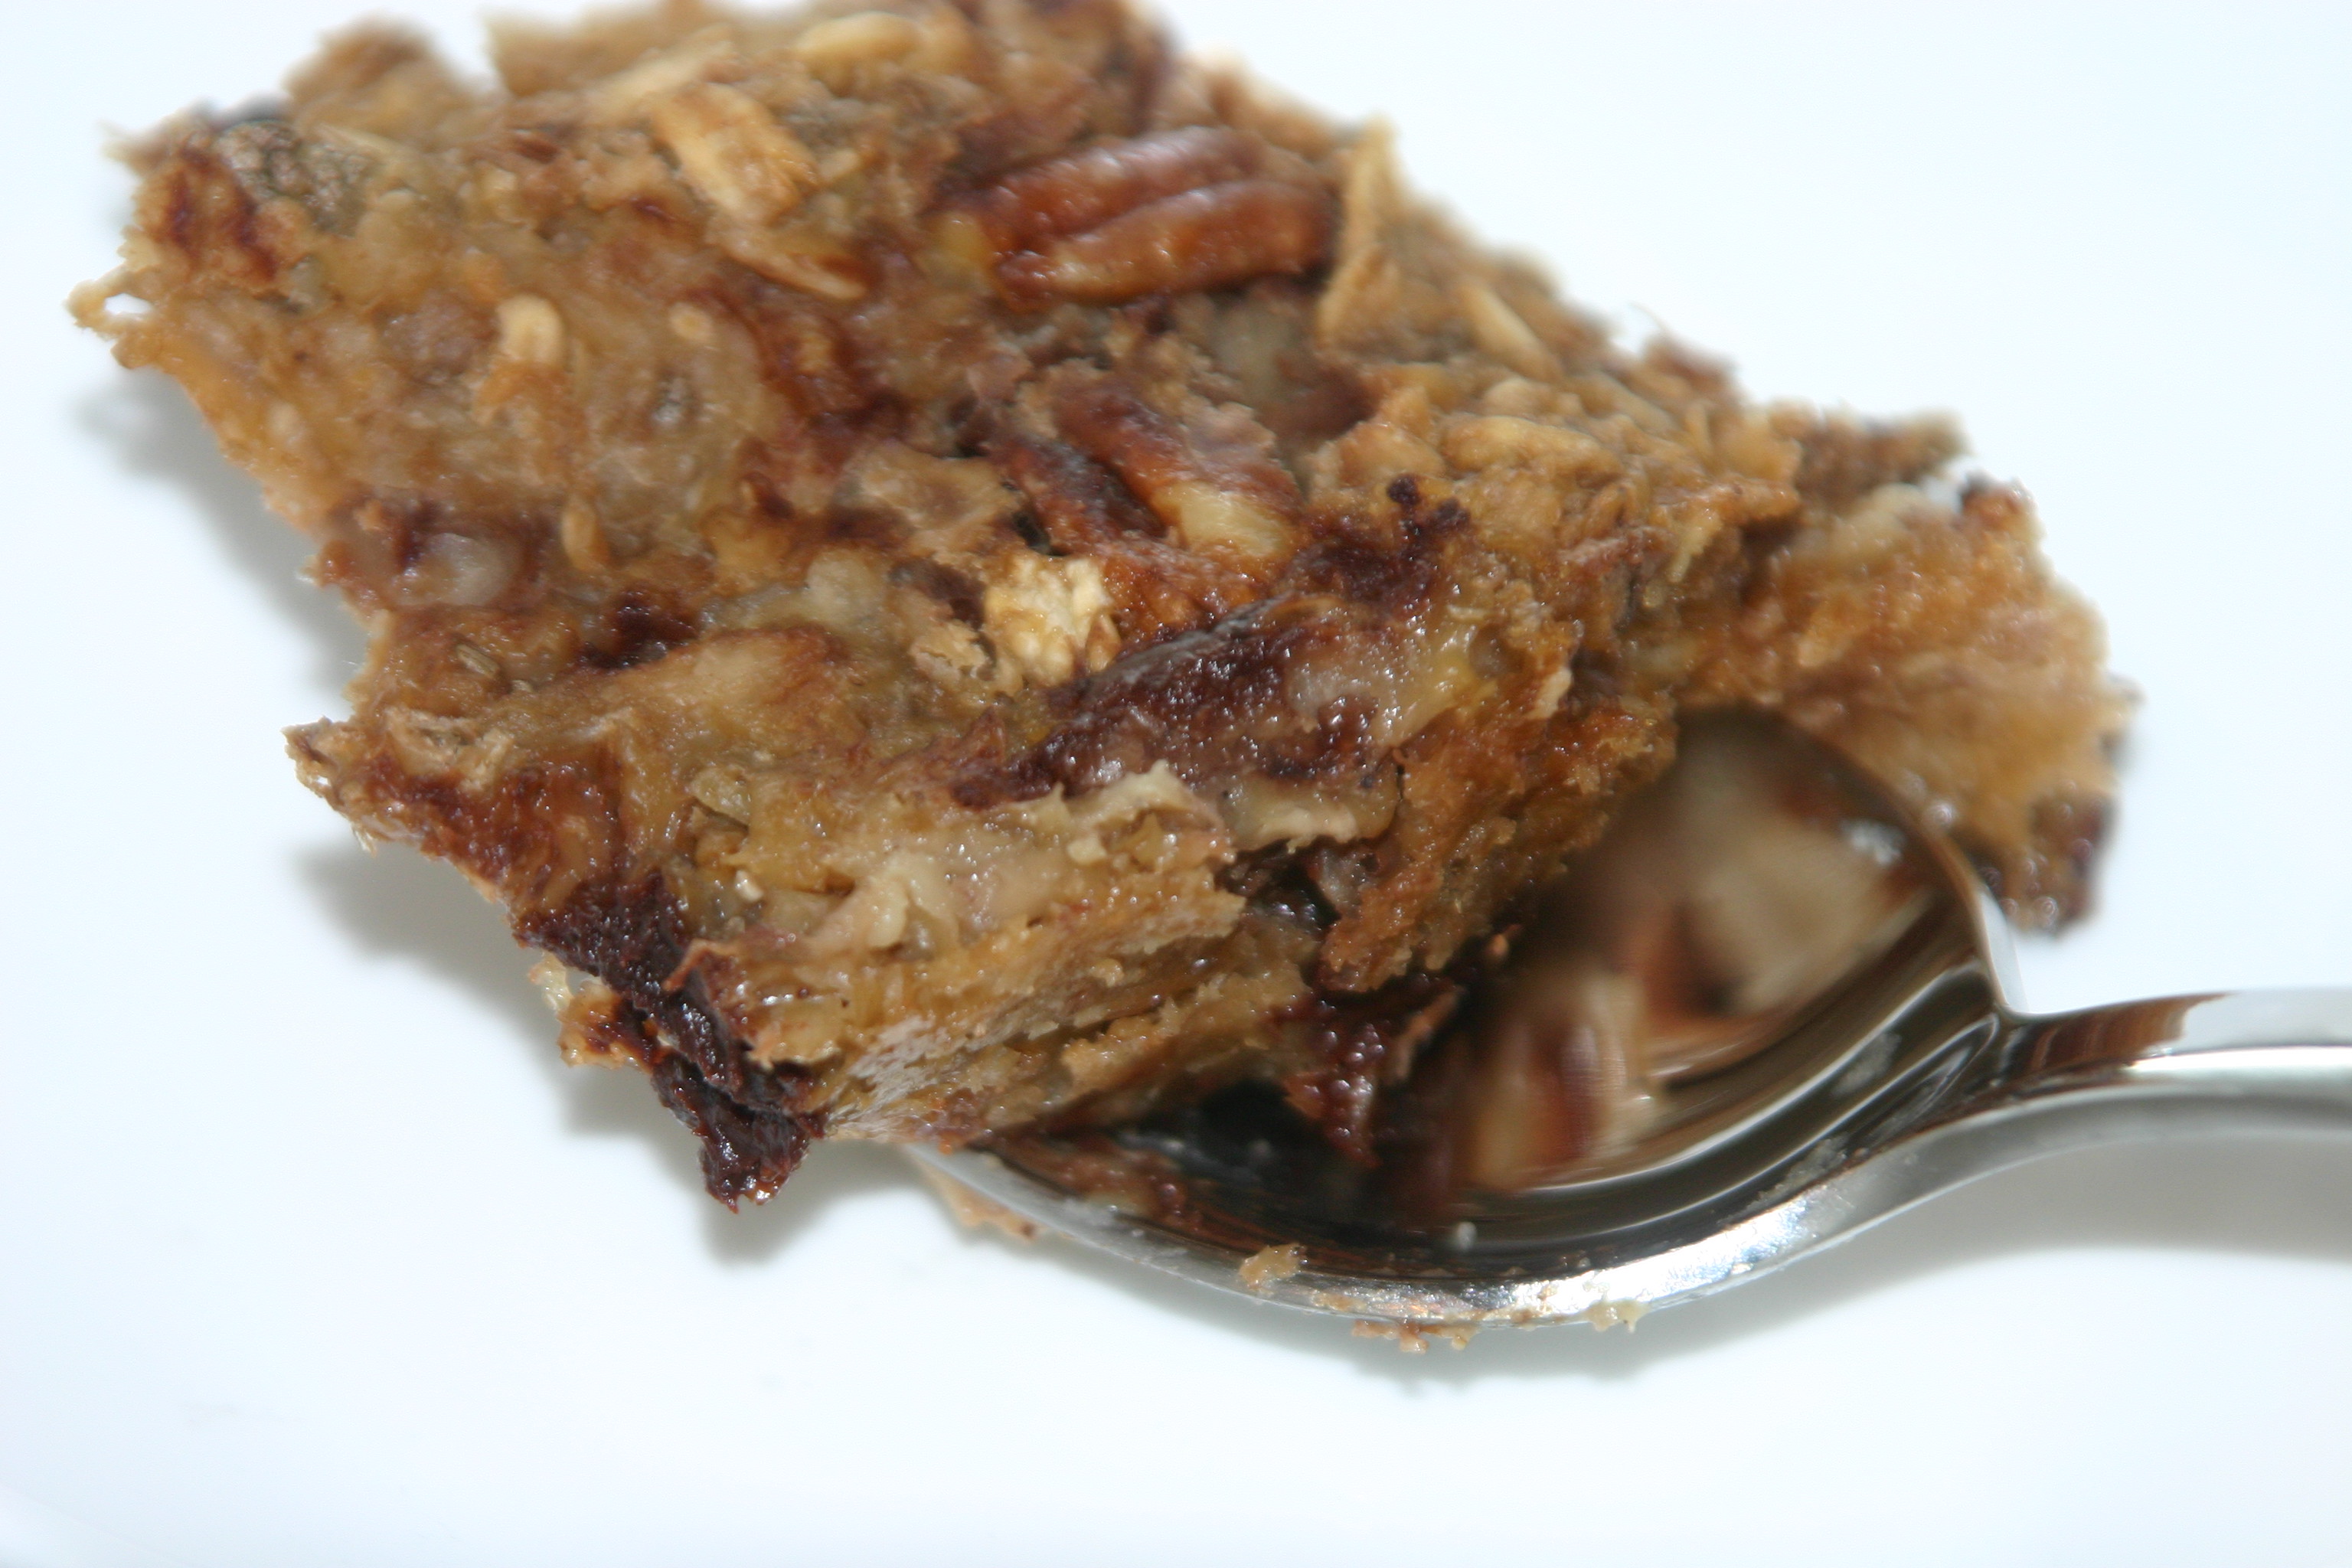
More oatmeal?!! Oh yes, more oatmeal! This one ventures into the land of baked oatmeal and it is so yummy!! This recipe is pretty darn close to this one from Vegan Yack Attack. It was so good when I made it I didn’t know how to improve it. A rare thing for me. It was also so good, I had to share it. This is a wonderful first vegan baked oatmeal. It holds together beautifully, is richly flavored, and makes you want more!
I’m just posting the recipe without a discussion this time as we have been over oatmeal in depth. This is a baked version which I am just starting to experiment with myself. Good luck and happy eating.
Banana Chocolate Walnut Baked Oatmeal
Ingredients
1 C. water
1 C. non-dairy milk, or more water
1 very ripe banana, mashed
¼ C. coconut or brown sugar
1 T. chia seeds
1½ tsp. pure vanilla extract
1/8-1/4 tsp salt
2 C. rolled oats
¼ C. walnuts, chopped
3 T. vegan chocolate chips
Instructions
Preheat oven to 350F.
Stir together water, non-dairy milk, banana, sugar, chia seeds, vanilla extract, and salt.
Mix in the oats, walnuts, and chocolate chips.
Pour the mixture into a high-walled, round, 7-8″ baking dish. (I greased mine with coconut oil)
Bake for 30-40 minutes, until the the top and edges are golden brown.
I ate mine with just a little cold almond milk and it was superb! If you like you could also add maple syrup, more banana, or really anything that makes you happy.
Building from the last post “pancakes without a recipe” this recipe is for gluten free pancakes. Gluten free pancakes are a bit more delicate than pancakes using wheat flour. For this gluten free recipe I used a combination of three gluten free flours to build structure. When using gluten free flours it is vital to use a combination of flour textures (buckwheat and rice) and a starch (arrowroot). The ratio here worked delightfully well, or you could use a pre-mixed gluten free baking mix.
Light and Fluffy Gluten Free Vegan Pancakes
Ingredients
1 TBL chia seeds
1/3 cup water
3/4 cup non-dairy milk
1 tsp apple cider vinegar
1 banana
3/4 cup buckwheat flour
1/2 cup brown rice flour
1/4 cup arrowroot starch
1 tsp baking soda
1/4 tsp salt
2 tsp pure vanilla extract
Coconut oil for cooking.
Instructions
Briefly mix chia seeds and water in a mixing bowl and set aside until the chia has jelled a little, about 5 minutes.
Mix the non-dairy milk and apple cider vinegar together and set aside to curdle, about 5 minutes.
Once the chia seeds have started to jell, mash in the banana and stir to combine.
Add buckwheat flour, brown rice flour, arrowroot starch, baking soda, and salt mixing to combine dry ingredients without working to hard to mix them with the banana and chia mix at the bottom of the bowl.
Add the curdled milk and vanilla whisking the ingredients until they are uniformly wet and combine.
Heat your favorite pancake pan over medium heat. I use a large cast iron pan.
Once your desired pan is hot melt a little coconut oil in the pan, I use about a teaspoon per batch, and pour the batter into the hot pan. I usually make one big pancake at a time, but you can also do smaller ones and do however many fit in your pan.
Cook on one side until the sides of the pancake are starting to look dry and the cooked side is turning a delightful golden brown, about 2 minutes.
Flip pancake and cook until the second side is also golden brown, about 1 more minute.
What is important for successful gluten free pancakes?
Texture (the ratio and combination of flours, and combination of wet and dry ingredients, a leavening agent, and other ingredients to add structure)
Flavor (Salt, vanilla, and banana in this recipe)
Toppings (maple syrup, molasses, butter, or other)
How I decided what to use for this recipe:
I wanted gluten free pancakes as Wolfie may or may not have a sensitivity. I also wanted a yummy pancake with light texture and just enough flavor to stand up to the butter and maple syrup. Texture was the most important thing here. I used three gluten free flours for a light texture, and both banana and chia seeds for structure.
I guess I’m on a breakfast kick; oatmeal, now pancakes! Breakfast is my favorite first meal of the day. Pancakes are a classic breakfast and are easily adaptable to whatever you have in the house and or dietary needs. They are also a wonderful comfort food. I have fond memories of pancake eating contests with my brothers when I was growing up. Yes, I won. Again we will do a simple recipe, then some variations and a discussion on how to make decisions when you are developing your signature pancake recipe.
Basic Pancakes Without a Recipe
Ingredients
4 parts flour (1 cup)
1 1/2 tsp baking powder or 1 tsp baking soda plus acid (apple cider vinegar 9mixed into liquid)
3 parts liquid (3/4 cup) + 1 tsp apple cider vinegar if using baking soda
Egg substitute (1 banana, mashed) or one Egg if you are not vegan
Flavor
1/8 tsp salt
1 tsp vanilla extract
1/2 tsp almond extract
Oil for cooking such as coconut or sunflower oil
Maple Syrup
Earth Balance Buttery Spread
Instructions
Mix flour, baking powder or soda, and salt, mixing to combine dry ingredients.
Add the curdled milk, mashed banana, and vanilla whisking the ingredients until they are uniformly wet and combine.
Heat your favorite pancake pan over medium heat. I use a large cast iron pan.
Once your desired pan is hot heat a little oil in the pan, I use about a teaspoon per batch, and pour the batter into the hot pan. I usually make one big pancake at a time, but you can also do smaller ones and do however many fit in your pan.
Cook on one side until the sides of the pancake are starting to look dry and bubbles are forming, popping, and not closing, and the cooked side is turning a delightful golden brown, about 2 minutes.
Flip pancake and cook until the second side is also golden brown, about 1 more minute.
Serve piping hot with topped with maple syrup and butter, or topping of your choice like this cinnamon roll topping.
Discussion:
What is important for successful pancakes?
Texture (the ratio, choice, and combination of wet and dry ingredients, a leavening agent, and other ingredients to add structure)
Flavor
Toppings
How does it all work
Flour. For a happy pancake you need to start with flour. I have only used grain based flours which is what I will talk about here. You can use any combination of flours that you have in the house. I usually use an all purpose wheat flour. I have also mixed in oat flour, cornmeal, whole what flour, buckwheat, and even bread flour when I ran out of all purpose. To be successful you will probably want the majority of your flour to be wheat flour to bring the texture you are seeking. I will post a gluten free recipe soon for those of you not into wheat.
Liquid. The flour to liquid ratio is important for the finished product. More liquid creates a runnier batter and a thinner pancake. Less liquid is a thick batter and a dense pancake. You need something that balances both for a light fluffy pancake. About 4 parts flour to 3 parts liquid seems to be a good ratio. This is something you can play with quite a bit. I no longer actually measure my liquid and just pour it in until it is the consistency I am looking for.
Egg Substitute. You need something for the egg in pancakes, either egg, or another ingredient to build structure in you pancake. Options I like include; egg, chia seeds (1 TBL chia seeds mixed with 1/3 cup water), banana, and egg replacer powder. You could simply take out the egg which would give you a thinner, floppier pancake. My go-to egg substitute in pancakes is banana and I always use them when I have them in the house. They give a wonderful touch of sweetness and good structure to the pancake.
Leavening agent. Either baking powder or baking soda. With baking soda you also need an acid. This creates the chemical reaction needed to give your pancakes lift. This is why I call for the apple cider vinegar if you are using baking soda. The baking soda and vinegar will give you a bit more of a buttermilk pancake taste.
Flavor. Salt, vanilla are added here for flavor. Other options include any extract you can think of, spices like cinnamon, cocoa powder, and zest from citrus.
Other. One of the delightful things about pancakes is the add-ins. We are all familiar with blueberry pancakes. Other options are any fruit you can think of, protein powder, cheese, chocolate chips, nuts and seeds, even vegetables like some grated carrot or zucchini. For most of these you want to add them into the pancake after you have poured the batter into the pan. This way your pancakes will look amazing, and you will be able to control how much goes into each pancake. You can also make toppings and go crazy with your combination. Maybe start with this cinnamon roll topping.
Sorry about the strange post yesterday. I had some trouble (baby, browser, touch screen, time anxieties) and the email was sent with half with the post I meant to use, and half this post. Dark Side Oats on the website is how it is supposed to be, as is this post.
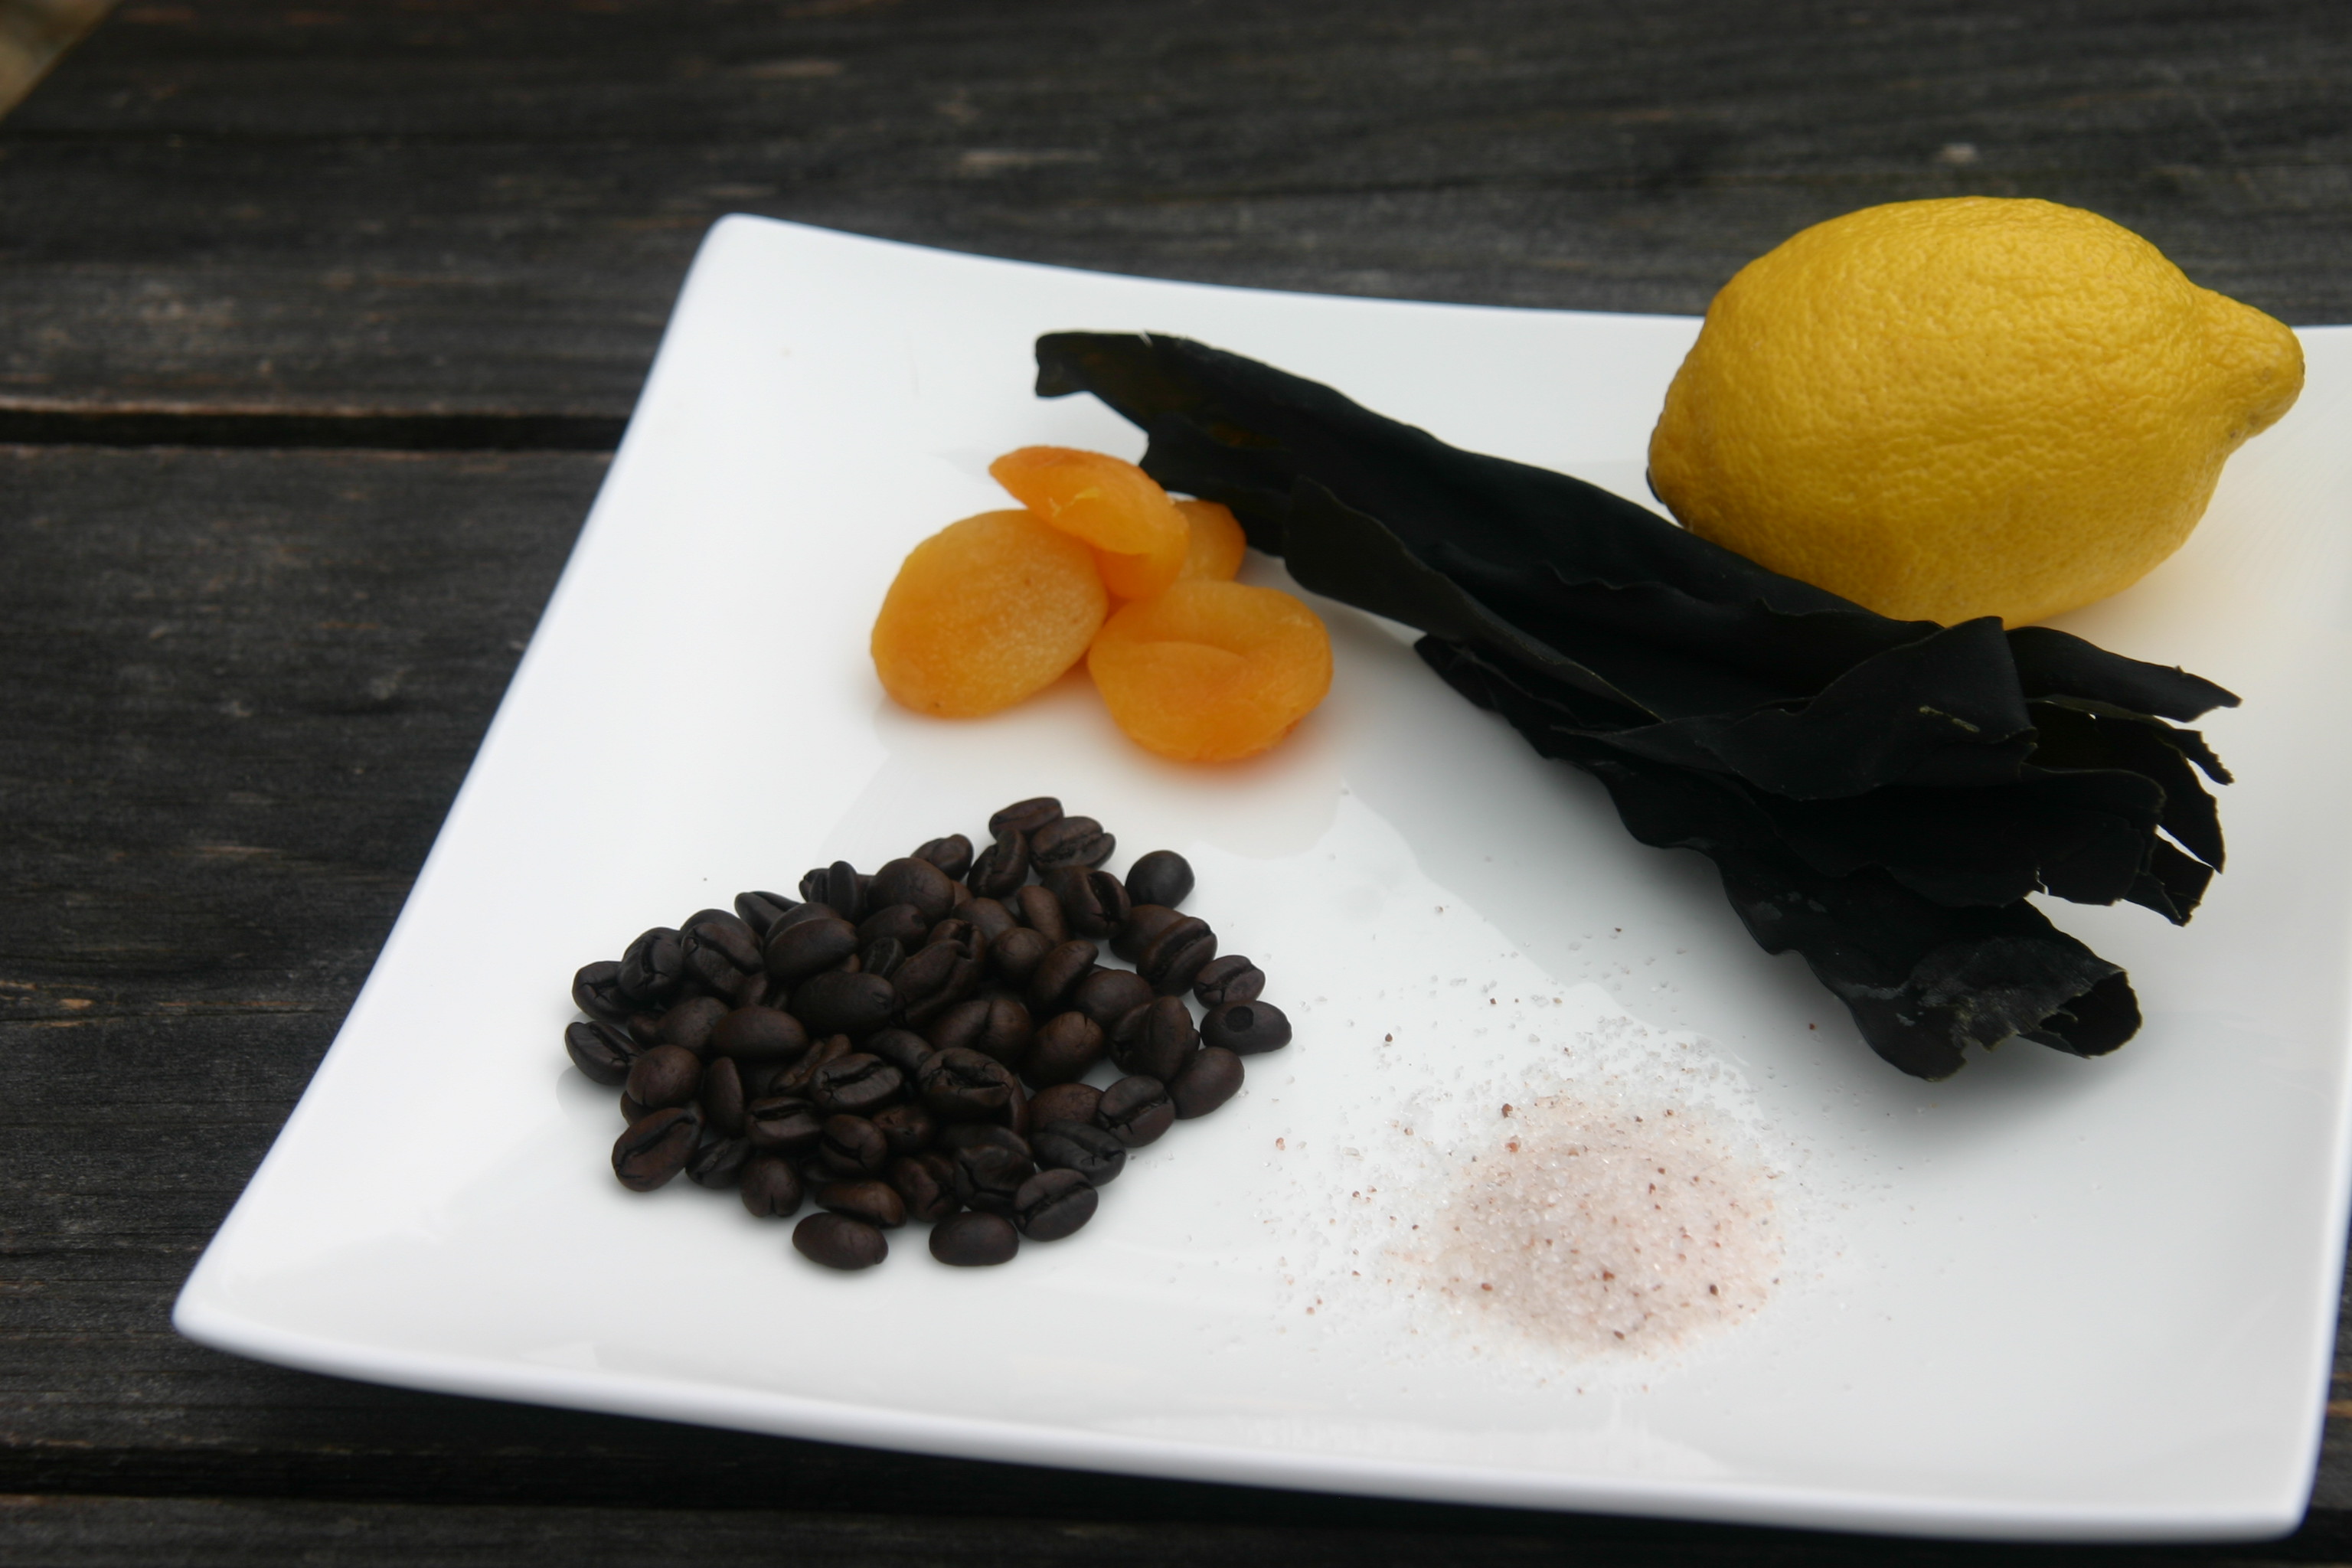
Writing the last few posts I have decided we need to build a foundation and a shared understanding of flavor development. The very basics of flavor development start with the five tastes and build from these concepts. This is a brief overview with just enough information to awaken your taste buds. From here we can use recipes to discuss how these tastes balance each other and can be used to build the flavor and feeling you are seeking in your dish.
The Five Tastes
There are five recognized tastes in American food language: Saltiness, Sweetness, Sourness, Bitterness, and Umami. While most of these are prevalent in vegan food, Umami can be hard to find, and define. Without the proper balance, and enough Umami a dish will “taste vegan.” That is one phrase I hate to hear. These are the building blocks to make that phrase nonexistent.
Saltiness:
I think we all know and understand salty. It is one of the most recognized flavors and everyone knows what it means. We all know that delightful feeling of a salty chip hitting your tongue, the pleasure, and then the desire for a drink of water or something sweet to play off the saltiness. Saltiness is easy to add with the most basic addition of salt. There are other ingredients to use for salt if a direct application is not appropriate, or you need another element to balance other aspects of your dish. Think soy sauce, salted nut butters, even pickles or olives.
Sweetness:
Sweetness is also an easy one. Think cake, cookies, fruit, and sweeteners such as sugar. Sweet is a taste we love in America, much to our detriment at times. It is also a taste that helps to balance and bring out other tastes in our food. If you have too much saltiness you could add a little sweetness for balance. Or, as is becoming more and more trendy; adding saltiness right to your sweetness to balance it out in one bite. Think salted caramel anything, or sea-salt chocolate bars. Sweetness can also balance bitterness (sugar in your coffee), and sourness (sweetener in lemon-aid).
Sourness:
Sourness and Bitterness can be confused, but are distinct. Sourness is citrus such as lemons or limes, and vinegar. There are other sour flavors, but those are the most common. Sourness adds brightness to dishes and starts to wake up your palate. It is a good addition when a dish is feeling a little dull.
Bitterness:
Bitterness is coffee, unsweetened chocolate, radicchio, or charred greens. Bitterness is a wonderful as accents, and can bring out other tastes, or be highlighted alone. Few people want a plate full of lemon slices or even unsweetened chocolate, but most appreciate bitter aspects in a dish. An example of how to tame bitterness comes from the things we add to coffee. If you want to tame the bitterness of coffee you add sugar, or cream, or both. Both have a bit of sweetness to them and mellows out the bitterness and makes it more palatable in large amounts. To balance bitterness you would add separate and distinct tastes. A good example is a salad with bitter greens. You will have the bite of the bitter green, but you don’t just want those. You want to add something sweet like fruit, and sourness like a vinaigrette. Your plan would be to get the three tastes in one bite, or at least close together for an exciting, yet balanced, dish.
Umami:
This is a word derived from two Japanese words meaning delicious and taste. With this meaning, it is directly apparent why we need this taste in our food. Umami is the rich taste that can often be missing in vegan food. It is actually surprisingly easy to add, but you have to think about it. When you taste a dish with Umami you want to go back for more, and it often draws an emotional response from you for the food. There is a lot to know about Umami, but the most important is that Umami is vital, and can be added using ingredients such as mushrooms, seaweed, some vegetables such as tomatoes, cabbage, onions, and avocado, nutritional yeast, soy sauce, and other fermented foods. Non-vegan foods high in Umami include meat, cheese, fish, and fish sauce.
Last week we started talking about how to cook without a recipe using oatmeal as the basis for discussion. This week I wanted to continue using oatmeal and illustrate how using combinations creates a totally different oatmeal. For this we are going to have dessert for breakfast, or Dark Side Oats, as my husband calls them. This is a delicious combination of chocolate, peanut butter, and a bit of milk to make a lovely balanced breakfast.
Chocolate Peanut Butter Oatmeal
Ingredients
2 cups water
1 tsp. vanilla extract
1/4 tsp. salt
1 cup rolled oats
2 TBL cocoa powder (Bitterness)
1-3 TBL coconut sugar or brown sugar (Sweetness)
1/4 cup crunchy salted peanut butter (Saltiness)
non-dairy milk for topping (Balance)
Instructions
Bring water, vanilla and salt to a low boil over medium heat.
Reduce heat to medium-low and add oats and cocoa powder stirring to combine.
Heat and cook stirring occasionally until mixture has thickened, about 5 minutes.
Stir in peanut butter and brown sugar.
Top with milk if using and serve immediately.
Discussion:
How I made decisions for this recipe:
I wanted a chocolate filled breakfast, but one that I could still call healthy without too much sugar. I also wanted something that balanced salty and sweet. I started with unsweetened chocolate which needs some sugar to balance it. This gave me bitterness and sweetness. I then wanted the salt factor and chose crunchy salted peanut butter. Crunchy peanut butter also gives the dish texture. Once all of these ingredients were combined the dish was delicious, but a bit dense. To lighten the dish I recommend serving cold milk over the top which will give balance to the finished product.
To recap, bitterness (chocolate) balanced with sweetness (sugar) balanced with salt (peanut butter), add texture (crunchy peanut butter), with a little lightness (milk). Done and done.
Here it is; the first post as Happy Food Ninja. Because today is Mother’s Day I have decided to make this first post the all important OATMEAL! I can feel the excitement. My mom came to stay with us when Wolfie was born and opened the world of oatmeal to me again. I had been eating oatmeal, but apparently I was eating it all wrong! I had been focusing on only the flavor instead of the all important texture. The texture makes such a difference in this basic dish. To achieve the correct texture you must heat the liquid before adding the oats.
Today we are starting with a recipe for Almond Apricot Oatmeal, then a brief discussion on how to make delicious oatmeal without a recipe. We will also go over how to create your own fabulous oatmeal flavors.
Almond Apricot Oatmeal
Ingredients
2/3 cup water
pinch of salt
5-6 dried apricots, chopped
1/3 cup rolled oats
1/4 tsp almond extract
maple syrup
vegan butter
a handful of roasted and salted almonds
Instructions
Heat water, salt, and apricots in a small saucepan over high heat until it starts to boil
Reduce heat to medium and stir in the oats and almond extract.
Cook over medium heat until the water is absorbed, about 5 minutes.
Scoop oatmeal into a bowl, stir in butter and syrup to your taste, and top with almonds. This makes one serving.
Discussion:
What is important for successful oatmeal?
The oat to liquid ratio: 2 parts liquid to 1 part oats
Heating the liquid to boiling before stirring in the oats.
The rest is up to you. You could make a sweet oatmeal like the recipe in this post, or a savory oatmeal like this recipe. Oatmeal is a bit like rice, in that it has a basic flavor of its own, but takes to other ingredients, and the flavor changes drastically depending on what you add. You could use any edible liquid as a base. I have used water, milk, tea, vegetable broth, juice, and combinations of those. You then add flavoring. Flavoring consists of extracts and spices. Finish the pot with your add-ins like fruit and nuts.
How I decided on what to add for this recipe
I got the idea from eating my car snack of almonds and apricots. A delicious combination for a snack. I happened to be thinking about breakfast while snacking (pretty common in my world to be thinking of my next meal while eating the current meal), that is where the idea started. The next morning I made my oats with apricots, and did a taste before adding sweetener and the almonds. I thought it needed a bit of something extra. I added almond extract to heighten the baked-good quality of the oats. I then added butter, maple syrup, and finished it with roasted, salted almonds. The whole dish brings me back to a scone I once had. That’s it. It started with an idea, and it grew bit by bit with me tasting along the way and adding things to develop the flavor I wanted. You can do the same with any flavor combination you can come up with.
How Does It All Work?
Liquid
Your first layer of flavor.
Milk. It will give you a creaminess, it will also start to add a touch of sweetness. If you are using a sweetened non-dairy milk like a vanilla soy milk it will be a very different, sweeter, oatmeal than if you used an unsweetened milk or water.
Water will let the oats shine through. You will have a basic oatmeal base that you can easily flavor with other ingredients.
Juice will start the sweetness and give a base of the flavor of the juice. Let’s say you use apple juice. You will have the start to apple oatmeal. You could then add apple pieces and cinnamon to make apple pie oatmeal.
Vegetable broth. As in my oatmeal with kale and walnuts vegetable broth is the base for a great savory application. It starts shifting oatmeal from sweet to savory from the start. The oats will soak up the flavor from the broth and become something reminiscent of risotto.
Flavoring
Adding a bit more flavor.
Extracts such as vanilla or almond give a hint of those flavors. You could really mix it up here depending on what you have hanging around. A little mint mixed with cocoa powder for mint chocolate oatmeal, some almond as in this recipe to give the oats backbone.
Spices. Ohh, now we are really getting into it. Remember that oatmeal can be sweet or savory. Frequently it is sweet and eaten for breakfast. A common spice to add is cinnamon. Easy and delicious. You could go crazy and try every spice in your cabinet one at a time. The would be a great way to get to know your spices, and the versatility of oatmeal:) If you are attempting to create oatmeal to mimic a recipe such as apple pie, look at that recipe and add those spices to your oatmeal. I like to add them at the same time as the oats.
Other. I was trying to come up with an other category and all I could think of was cocoa powder. I love to add cocoa powder, peanut butter, and top with non-dairy milk. Ohh, so good. If you can think of something else to add to this category let me know!
Add-ins (now we’re going crazy)
Adding texture and amping up the wow factor.
Nuts and seeds. I feel nuts and seeds are an important part of oatmeal. I like the textural difference of the crunch they add. I use both whole nuts or seeds as well as nut and seed butters depending on the day. Nuts, seeds and butters also add some needed protein and healthy fats to keep you full. Almonds, walnuts, pecans, cashews, pumpkin seeds, sunflower seeds, I could go on. Just add them.
Fruits and veggies. I frequently add fruit to my oatmeal, and every now and again will add a vegetable. My go-to is raisins, but the possibilities again seem endless. You can go fresh such as a little grated apple, or dried like the apricots here. Dates add sweetness and can be used to replace other sweetener like maple syrup in the finished product. Grated carrots for carrot cake oatmeal, apple for apple pie, raisins just because.
Butter or oil. Well why wouldn’t you add butter, or your version of butter. Often Earth Balance Buttery Spread for me. Butter adds salt and a bit of richness that I think oatmeal needs. I will add this to most every oatmeal recipe I make. For some you could also use an oil. I would use coconut oil to help boost the coconut flavor in a coconut almond oatmeal, or olive oil for a savory base.
Sweeteners. Most often your oatmeal is topped with something sweet like maple syrup or brown sugar. Both are awesome. Sometimes you don’t want to add sweetener for a variety of reasons. If you still want it sweet you could cook some chopped dates with the water and mashing them a bit before you add the oats. It will give a delightful natural sweetness. Also boosting the other flavors like the spices and extracts will reinforce flavor on your palate without the actual sugar.
Milk and yogurt. This is yet another way to add dimension to your bowl of plain oats. The milk can add a coolness that will excite your palate and totally change your dish. Yogurt will do the same. Dairy or non-dairy versions are both good here. You can, of course, stir them in, but you could also leave them a little loose on top. When you do this, and get a spoonful of hot oats with the cool creaminess, your mouth will wake to the sensation. The cream will also add balance to a rich oatmeal like the chocolate peanut butter deliciousness.
As I write this I feel I could go on and on, but I need to stop. Please comment with your favorite oatmeal combinations or ideas. Happy eating and Happy Mother’s Day!