Almond Cherry Breakfast Cookies – Vegan Gluten Free

I’ve been working out a lot lately. It’s been a few years, you know with having babies back to back and then not sleeping for three years. However, finally, life seems to be settling in. Both my girls are starting to sleep and I finally have the energy to work out again! It’s pretty awesome. I finally feel like myself again after three years! I’m so lucky to have such a supportive husband who is willing to do the early morning wake ups while I go work out. We also decided to train for our first triathlon together. We’re going to do a sprint triathlon at the end of June. All very exciting, but it all makes be EXTREMELY hungry!

When I get so hungry and I don’t have a plan I end up eating junk. I’m secretly a doughnut fiend and will find a way to work one into my week if I’m not careful. These little gems help a lot. I like to make them super small and eat one before my early morning workouts, and will often snack on one later if I’m searching for food but don’t know what to eat.

This is a super adaptable recipe. You can use any combination of nuts, seeds, and dried fruit, switch out the nut butter, add spices, you name it. This is a simple tasty version that I’m really digging right now.
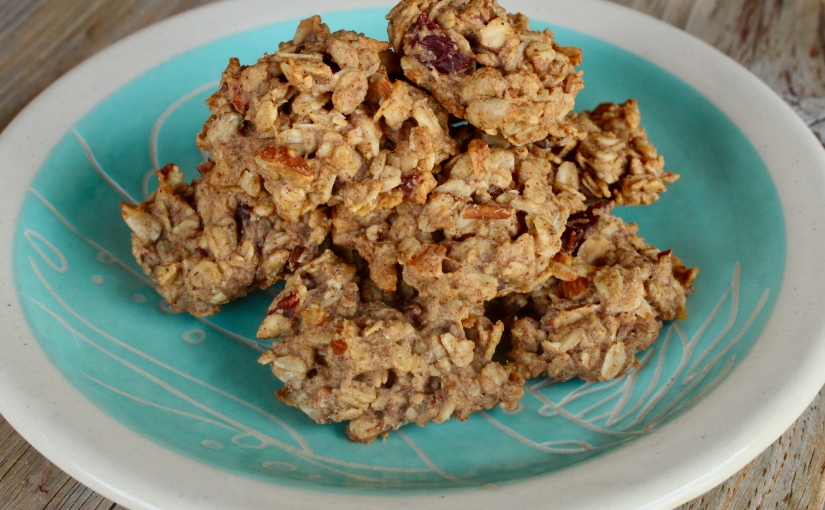
 Adapted from Leelalicious

Ingredients

  • 2 ripe bananas mashed
  • 3/4 cup almond butter – I used homemade salted, other nut butters also work great
  • 1/4 cup refined coconut oil melted (unrefined is also great, but will give more coconut taste)
  • 2 TBL agave nectar, warmed
  • 2 cups rolled oats
  • 1/3 cup dried cherries, chopped
  • 1/3 cup salted sunflower seeds
  • 1/3 cup chopped nuts – I like a mix of salted pecans and almonds
  • If you are using unsalted nut butter and nuts add some salt 1/4-/12 tsp

Instructions

  1. Preheat oven to 325F.
  2. Mash banana in a bowl and add nut butter, coconut oil and agave mixing until smooth. It helps to warm the nut butter, honey, and melt the coconut oil if you are doing this by hand.
  3. Add the oats, dried cherries, sunflower sees, and nuts mixing to combine.
  4. Prepare a baking sheet. I like to use a silicone mat here which keeps the cookies softer. If you want them crispy use parchment paper or leave cookie sheet bare. No oil needed.
  5. Drop 2 TBL sized scoops of the mixture onto a cookie sheet and flatten (cookies won’t spread while baking).
  6. Bake for about 13-16 minutes until edges are lightly browned.
  7. Let cookies cool on baking sheet before moving to an air-tight storage container.
  8. I store my in the freezer and pull them out one at a time when needed.


Advertisement

Vegan Falafel

Vegan Falafel
Vegan Falafel

I know Easter is tomorrow, but it just isn’t a food holiday for me. This year we won’t even be at home. We are taking my 3 year old skiing for the first time! I’m super excited. So instead, Falafel.

Falafel is one of the most perfect foods when done correctly; salty, herbaceous, crunchy on the outside, tender on the inside, delightful alone and outstanding with a few sauces. The important part of these falafels is that the chickpeas are not cooked, but simply soaked overnight. It takes a little more planning, but is work the effort. The texture is lighter and the flavor more fresh. Serve with your choice of toppings, or just snack on them as is.

Ingredients

  • 2 cup dried chickpeas
  • 1 large onion, roughly chopped (about 1 cup)
  • 1/3 cup roughly chopped fresh parsley
  • 1/3 cup roughly chopped fresh cilantro
  • 2 teaspoons fine sea salt
  • 1/2-1 teaspoon dried hot red pepper (optional)
  • 6 large cloves of garlic
  • 1/2 teaspoon ground coriander
  • 1 teaspoon ground cumin
  • 2 teaspoons baking powder
  • 1/3 cup all purpose flour or chickpea flour if gluten-free
  • Soybean or vegetable oil for frying
  • Toppings of choice.

Instructions

  1. Put the chickpeas in a large bowl and add enough cold water to cover them by at least 2 inches. Let soak overnight, then drain.
  2. Place the drained, uncooked chickpeas and the onions in the bowl of a food processor fitted with a steel blade. Add the parsley, cilantro, salt, hot pepper, garlic, and cumin. Process until blended but not pureed.
  3. Sprinkle in the baking powder and half of the flour, and pulse. Continue to add flour and pulse until the dough  easily forms a ball when shaped with your hands, and is no longer sticky.
  4. Once dough is the right consistency, cover it and place in the refrigerator for 1 hour to overnight. You can cook it right away, but the texture is better if you allow it to sit.
  5. When ready to use remove the dough from the refrigerator and form the mixture into balls about the size of a walnut.
  6. Heat 2 inches of oil to 375 degrees in a wide deep pot and fry 1 ball to test. If it falls apart, add a little flour and try again.  Then fry falafel balls in batches being careful not to overcrowd the pot. Fry until all sides are golden brown turning as needed.
  7. Drain on paper towels.
  8. I like my falafel best with baba ganouj and tahini sauce for dipping. Many like a sandwich in pita bread. Always serve with pickled or fermented something for that sour note.

Note:

For tahini sauce simply stir together tahini, water, lemon juice, salt and minced fresh garlic in proportions you like. I start with 2 TBL tahini, 2 TBL water, squeeze of lemon, one small clove of garlic, and a dash of salt. Minced fresh herbs go nicely here if you have extra parsley or cilantro.

Vegan Nacho Cheese Sauce

Vegan Nacho Cheese Sauce

My new obsession is nachos. Well, it isn’t that new, I think it was spring when I started to make these. It is all the fault of my friend; we were talking about lunch one day and she said she had been on a nacho kick. It was all over at that point. I came home that very day and started making nachos. It switched to taco salad for the summer, but as soon as it started to cool down again I’ve been back to nachos. I think the ingenious thing she said that made me “have” to try nachos that day was she was putting refried beans in the BOTTOM of the pan, then the chips on top. This, of course, makes the most sense ever as the chips get all crispy and warm, the beans warm up, and they don’t make everything soggy.

This recipe is just for the cheese sauce, but I’ll give you a quick run down of the rest. I heat my cast iron on the stove, saute a few cups of sliced veggies with a little salt and pepper, then dump them in a bowl. In the still hot pan I swirl a tablespoon of oil, then spread refried beans on the bottom. Top the beans with chips and pop it under the broiler for a few minutes until the chips are toasty brown and perfect. I then dump it on a plate, and pile on the veggies, nacho cheese sauce, and salsa. I then eat it all for lunch while watching my husband work out.

The cheese sauce. It is a variation of my cheese sauce from my cashew mac n cheese with some spice added. I made a nice big batch and freeze any I don’t use within a few days.

 Ingredients

  • 3/4 cup peeled and cubed russet potato (1 small)
  • 2 TBL sliced carrot (1 very small)
  • 1 tsp white vinegar
  • 1 tsp salt
  • 1/4 cup raw cashews
  • 3/4-1 cup reserved cooking water
  • 3 TBL nutritional yeast
  • 2 TBL tahini
  • 2 tsp dijon mustard
  • 1 1/2 tsp tomato paste
  • additional salt to taste
  • 1 small can diced green chilis
  • 1/2 tsp ground chipotle powder or one chipotle in adobo sauce

Instructions

  1. Place potato and carrot in a small saucepan and cover with cold water.
  2. Add the vinegar and 1 tsp salt to water, bring everything to a boil partially covered, and boil for about 10 minutes.
  3. Add the cashews and continue to cook until the potatoes and carrots are completely tender, about 5 minutes more. They are done when they slide off a fork that is inserted into a piece of potato or carrot.
  4. Drain potatoes and carrots reserving at least 1 cup of the cooking water.
  5. Transfer potatoes, carrots, cashew, and 3/4 cup cooking water to a blender.
  6. Add nutritional yeast, tahini, mustard, and tomato paste and blend until smooth.
  7. Add more cooking water if you want the sauce to thin out a bit.
  8. Add green chilis and chipotle and pulse to combine.
  9. Taste, and adjust salt as needed.

Easy Vegan Gravy Without a Recipe-Thinking Thanksgiving

Vegan Gravy
Vegan Gravy

Thanksgiving is coming!! I can’t wait! I love a holiday dedicated to food, especially comfort food. A necessary addition to any Thanksgiving table is gravy. Creamy, umami filled, and delightfully full of vegetables it is the perfect addition to your table, Thanksgiving or otherwise.

Some people think that gravy can be tricky, but it doesn’t have to be. It can me a simple process, and one that is easily adapted to various dietary needs such as vegan or gluten free. It is also something that is so very quick to make and delivers flavor as if you have been slaving for hours. When we have just odds and ends in the house I’ll make gravy to top biscuits for breakfast, or to finish potatoes or other fall vegetables for a quick and hearty dinner.

Discussion:

What is important for successful gravy?

  1. Creamy texture
  2. Flavor
  3. Add-ins

I I like to think of gravy as a beautiful vegetable filled umami bomb. It is a versatile vehicle for bringing vegetables and protein, a way to round out a meal, and the perfect sauce. It is an easy process to make gravy and you can easily change things up to fit your mood and your pantry.


How Does It All Work? 

The Texture 

Balancing ingredients for the proper texture.

  1. The ratio of flour to liquid above has worked well for me, however, feel free to adjust it to your preference. The ratio will also be slightly different if you are using different flour such as garbanzo bean flour. Start with the ratio I have listed, then add more flour to make it thicker, or more liquid to thin it out. Make sure to cook the gravy before attempting to make it thicker as cooking with thicken the texture.
  2. To incorporate the flour you can either mix it with cold liquid until smooth, then whisk into the hot pan, or you can sprinkle the flour into hot fat, suck as oil (equal parts flour and fat) and cook while whisking until it starts to brown and begins to smell fragrant. Then add liquid.
  3. Vegetables are optional, so are beans. The will affect the overall texture so think about how you want them cooked before adding them.

Flavor

Optional additions for flavor

  1. I pretty much always use a mixture of non-dairy milk and vegetable broth (or water and vegetable broth powder), however, I have used just water when I’m out of milk. The balance of these will affect the flavor.  Just water makes it a little less cream and less rich. More milk can make it taste more like the milk you are using, just be sure to have a type of milk you want to eat in gravy. If you use sweetened vanilla almond milk it will taste like a nasty vanilla flavored gravy,
  2. Herbs are your friend. If you are using dried herbs, add them in the beginning. If you are using fresh, add them at the end. I love thyme, sage, and black pepper for a fall gravy. I might leave out the sage and add smoked paprika and vegan sausage for a breakfast gravy, or just salt and pepper with lots of vegetable broth for a lighter version.
  3. Nutritional yeast, lemon, and Dijon mustard are some of my favorite other additions to boost flavor.
  4. The vegetables you choose to add in will also affect the flavor. I nearly always use onions, often mushrooms and kale. Celery, onions, and carrots would lean toward a more traditional chickeny flavor.
  5. Don’t forget the salt!


Add-ins

More flavor, more texture, and all the fun

  1. Your gravy can be as simple as the vegetable broth that has been thickened and a few herbs and spices, but feel free to add anything else you like.
  2. Protein- I love adding cooked brown lentils to my gravy. The texture is fun and it adds a big punch of nutrients. Other options are garbanzo beans which I like to mash a bit and/or pre-made veggies sausage or other fake meat products.
  3. Vegetables- as in this recipe I usually use onions, mushrooms, and kale. The combination is delicious. Other options are anything in your fridge. I do a breakfast gravy with carrots, celery, red peppers and lentils. My daughter loves the addition of peas. Try things out as you have them available.

Quick and Easy Vegan Garbanzo Bean “Tuna” Salad

Vegan Garbanzo Bean "Tuna" Salad
Vegan Garbanzo Bean “Tuna” Salad

This has been my go-to lunch throughout this pregnancy. It seems to be perfectly satisfying, and easy enough that I can make it even when I’m already hungry. I usually make just enough for one meal, which is what this recipe is for. Sometimes, when I’m feeling the need to do so, I will reduce the fat in this recipe by halving the mayo used and subbing in the same amount of aquafaba (liquid from the can of beans). The flavor is almost as good, and during this pregnancy the lower fat is better every now and again.

Makes 1 serving

 Ingredients

  • 1/3 cooked garbanzo beans
  • 1 TBL vegan mayonnaise
  • 1 tsp sweet pickle relish
  • squeeze of lemon juice
  • salt and pepper to taste
  • 1 tsp each minced sweet onion and celery (optional)

Instructions

  1. Mash garbanzo beans in a small bowl with a fork.
  2. Stir in the mayo, pickle relish, lemon juice, salt and pepper.
  3. Add the onion and celery if using and stir to combine.
  4. Taste and adjust seasoning to your preference.
  5. Serve on bread, or with crackers, sliced veggies, or however you desire.