Vegan Aquafaba Chocolate Mousse that is lighter than air

Vegan Aquafaba Chocolate Mousse

I’m in a very celebratory mood. Thanksgiving has just finished, my daughter’s first birthday was Thursday, and Christmas and New Years are right around the corner. The celebration and the holidays mean food and family to me. I am ever so lucky to be home in Wisconsin with my family right now. We get to do a birthday celebration, and a second Thanksgiving. I also get to be around people who love food as much as I do!! My mom, my little brother, my dad (though he doesn’t really cook), and my best friend from forever (she drove five hours with two small children to come see me for a few days, that’s love!) So this week I’ll get to talk about food, eat food, and celebrate with some of my favorite people. I’m very happy to be home.

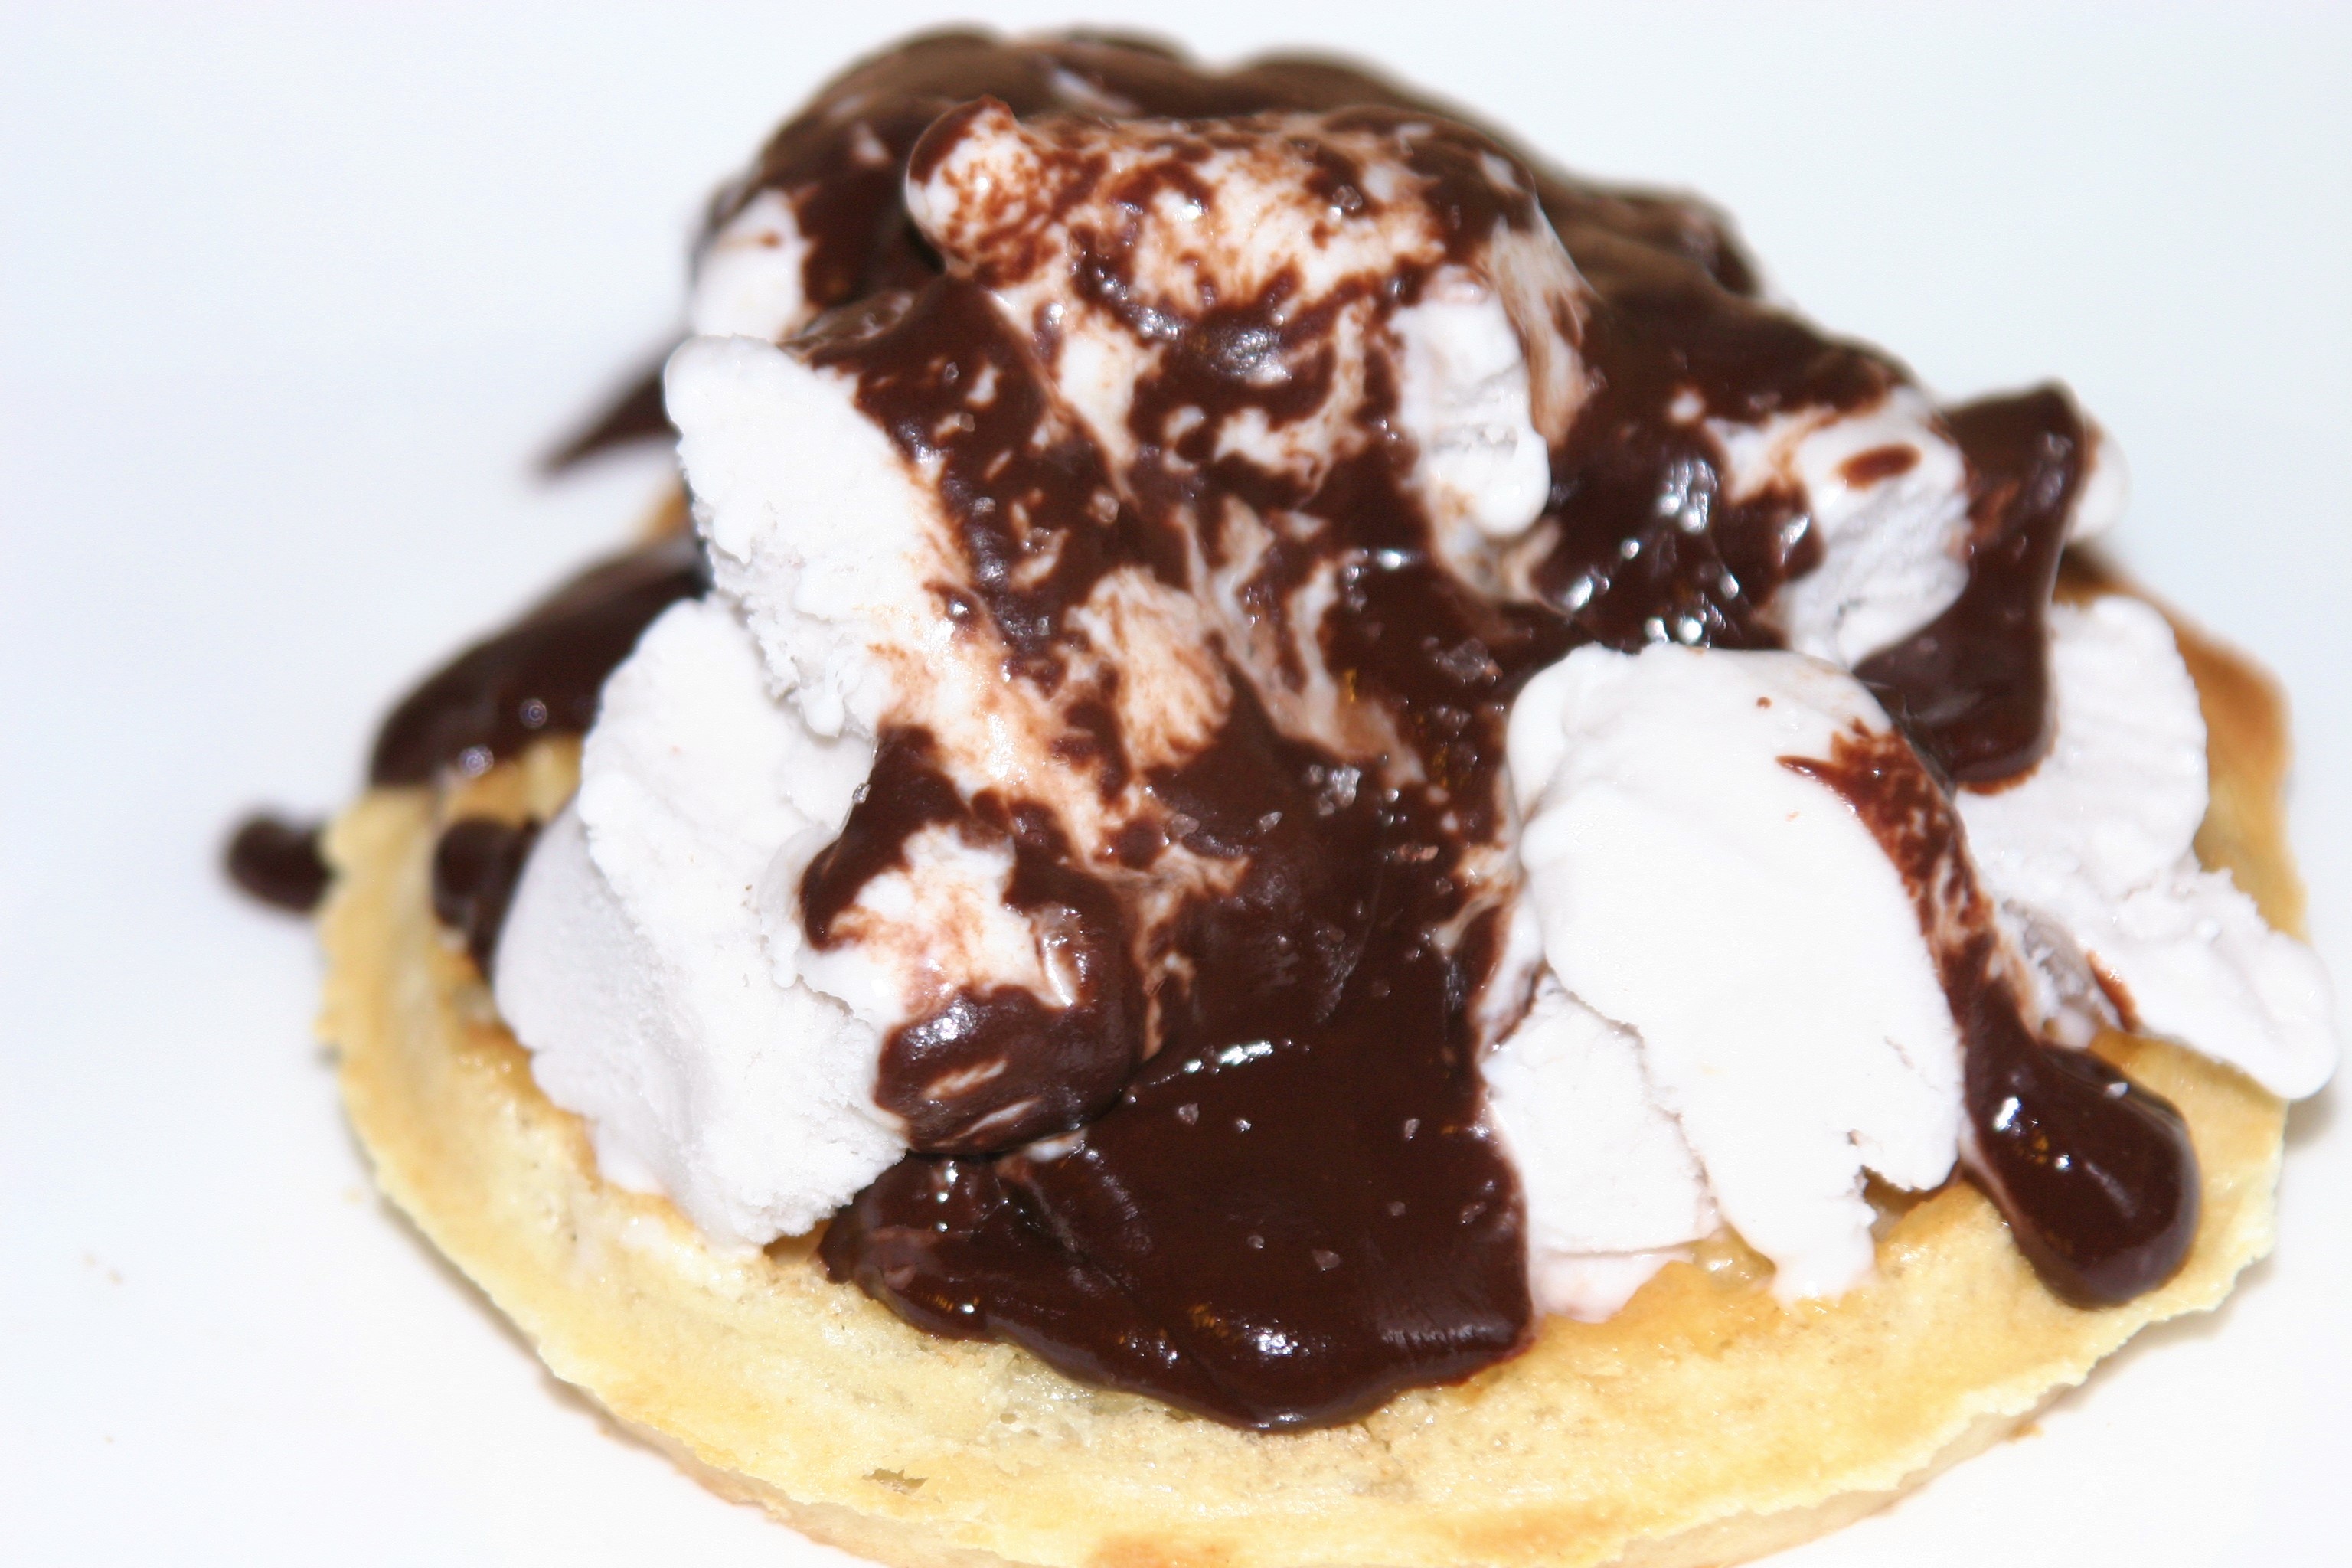
To get these celebrations off on the right track I’m sharing my first aquafaba recipe. Aquafaba is simply the juice you drain from a can of garbonzo or white beans, or the cooking liquid if you make your own. You know, the stuff you usually pour down the drain. Well, if you save it, and whip it, the texture is exactly that of whipped egg whites. It’s an amazing trick. This chocolate mousse it lighter than air, it simply melts on your tongue, is richly, deeply, chocolate, and well, pretty amazing. This is a great recipe to start with for aquafaba as it is super simple, and the texture will blow your mind. For more information on aquafaba, and other ideas visit the official aquafaba website.

 Ingredients

  • 1/3 cup semi-sweet chocolate chips, or chopped chocolate
  • 2 TBL non-dairy milk
  • 1 tsp pure vanilla extract
  • dash of salt
  • 1/2 cup aquafaba (the liquid drained from a can of from white or garbanzo beans)

Instructions

  1. Mix the chocolate chips, milk, vanilla, and salt in a small metal or glass bowl.
  2. Place the bowl over a pot of boiling water and stir until the chocolate is just melted.
  3. Remove the bowl from the pan, and set aside to cool to room temperature.
  4. Meanwhile whip the aquafaba with an electric mixer on high speed until stiff peaks form 5-10 minutes. It will look like whipped egg whites.
  5. Once the chocolate has cooled to room temperature gently fold it into the whipped aquafaba until the mousse is a uniform color.
  6. Set the mousse in the refrigerator and allow to cool. You can eat it right away, but I like it pretty well chilled. Overnight is great and it will last a few days.


What To Eat For A Vegan Thanksgiving

Happy Thanksgiving
Happy Thanksgiving

Are you vegan or vegetarian, or have you invited someone who is to your Thanksgiving meal? All the choices for what to make can be overwhelming. If this isn’t your usual diet you might feel restricted. Don’t worry; you can make anything you want! You have the choice to make your favorite traditional dishes using vegan or vegetarian ingredients, or to develop new dishes and traditions. One of my favorite Thanksgivings it was just me and my husband (we had just moved and didn’t even have friends yet), and we made a full Indian meal for Thanksgiving. We cooked all day, ate ourselves silly, and took a nap. Pretty traditional if you ask me:)

In case you’re struggling with ideas for what to make I’ve giving you this lovely list of delicious dishes I have scoured the internet, and my own site, for.

Happy Thanksgiving!!

Vegan Thanksgiving Recipe Ideas

Appetizers: 

Vegan Smoky Bean DipSmoky Bean Dip from me (is there a trend here with the smokiness)

Chili Cheese Dip from me. -This is actually a tradition on my husband’s side, not vegan, but the chili cheese dip.

Vegan Tempe Bacon Stuffed Mushrooms from Connoisseurus Veg. -I haven’t actually made these, but holy yum do they sound good!

Homemade Vegan Sushi from Minimalist Baker -A tradition in my family

Hummus a video from me -easy to make, versatile, and delicious.

Entrees: 

This picture is from the Vegetarian Times Website


Vegan Pot Pie from me. – Full of fall vegetables, savory, impressive, and a true comfort food.

Pumpkin Ravioli with Brown Butter Sage Sauce from me. -Could this be any more fall?

Bell Pepper and Tomato Rice from me. -I have requested this from my mother on a few Thanksgivings. I love it! Non-traditional for sure, but oh so delicious, rather easy, and the leftovers are fantastic!

Lasagna with Roasted Vegetables and Cauliflower Alfredo Sauce. -This isn’t actually a full recipe, but you could use the sauce, some roasted veggies, and layer it all together for an amazing fall lasagna.

Vegetarian Wellington with Seitan, Roasted Mushroom & Kale from Veggie Belly -I haven’t tried this either, but it looks super impressive. There are suggestions for making it vegan so no worries there.

PUFF PASTRY WRAPPED LENTIL LOAF from It Doesn’t Taste Like Chicken. Lentil Loaf + Puff Pastry = Thanksgiving.

Sides:

Vegan Corn and Potato Chowder

Vegan Corn and Potato Chowder from me – Super easy to throw in the slow cooker and let it do it’s thing while you make something time consuming for the main dish.

Cranberry Orange Relish from me. -Cranberry something is necessary for Thanksgiving. Trust me and make this relish for your cranberry side.

Mashed Potatoes – You don’t need a recipe for this. Just cook potatoes, add earth balance, salt, and maybe a little nutritional yeast or coconut milk. Mash and eat. Yum.

Vegan Green Bean Casserole from Minimalist Baker. This version is totally homemade, not a can of cream of mystery in sight.

Vegan Pakoras from Veg Recipes of India

Butternut Bruschetta with Caramelized Onions from Chef Chloe.

Dessert:

Vegan Apple Pie
Vegan Apple Pie

Mom’s Apple Pie from my mom -It’s Thanksgiving a perfect pie has it’s place.

Vegan French Silk Pie from me -Rich, decedent, chocolaty. Need I say more?

Vegan Apple Spice Cake from me- The title says it all.

 Vegan Tiramisu Cupcakes from me -Impressive, creamy, adult yet playful, and quite lovely.

 Vegan Chocolate Bourbon Caramel Cake with Chocolate Ganache from me. Yup, chocolate cake. Why not?

Mom’s Apple Pie (vegan)

Vegan Apple Pie
Vegan Apple Pie

My mom’s apple pie. I really don’t know if there is anything better. I think this apple pie is my second favorite dessert, with chocolate cake coming in first. It might actually be my favorite since it is also good for breakfast and snacks, not just dessert. I like them so much I had my mom make pies for my wedding. She made 12 amazing pies that everyone talked about for weeks after the event.

As much as I love this pie, I don’t really love all apple pie, just  my mom’s. Most lack flavor, have a poor crust, are too sweet, or are just boring. This pie is perfect. The apples are just a little tart and hold their shape while swimming in a perfectly sweet sauce that just holds everything together. It is fragrant with cinnamon, and the crust is flaky with a hint of salt and simply melts in your mouth. The smell as it bakes smells like everything a home should be; warm, sweet, spicy, and welcoming.

I wanted to post this in time for Thanksgiving so you could have the perfect pie to impress you family. Just watch the video of my mom making the crust, and this one of her making the pie, and you are good as gold.

 Ingredients
  • Prepared pie crust (top and bottom crust, uncooked)
  • 6 apples cut into bite-sized chunks (mix of granny smith, cortland, gala, or whatever you like)
  • 1 cup white sugar
  • 2 tsp cinnamon
  • 1/2 tsp salt
  • 2 TBL all purpose flour
  • 1 1/2 TBL earth balance buttery sticks

Instructions

  1. Place apple chunks in a large bowl.
  2. In a small bowl mix together the sugar, cinnamon, salt, and flour.
  3. Sprinkle the cinnamon sugar mixture over the apples and stir until the apples are well coated in the sugar mixture.
  4. Place the bottom crust in a large pie plate and pour the apple mixture into the crust (it should be overflowing).
  5. Dot the apples with small pieces of earth balance spaced evenly over the apples.
  6. Roll the top crust over the apples, rolling and crimping the edges.
  7. Cut steam vents in top crust.
  8. Place pie in pre-heated 425 degree oven for 15 minutes.
  9. Keeping the pie in the oven, reduce the heat to 350 and continue cooking until the crust is golden, and the juices are oozing out the steam vents, about 40-50 more minutes.
  10. Allow the pie to cool for at least a half hour before serving.

Vegan Chocolate Peanut butter Cup/Swirl in Vanilla Ice Cream

Vegan Chocolate Peanut Butter Cup Ice Cream

I know summer is officially over, but its 70 degrees here in Cambridge, MA!! 70!! I also might have an overload of extra Halloween candy because I over-estimated how many trick or treaters I would have. This delightful ice cream celebrates the last of the summer weather, because it’s ice cream, and also uses up that extra candy.

I made this ice cream flavor for my husband. His favorite is vanilla ice cream with chocolate peanut butter cups, and chocolate and peanut butter swirl. It is hard to find in general, and impossible if you are looking for vegan ice cream. Most chocolate peanut butter ice cream has a chocolate ice cream base, this does not. Every time I make this we eat it all in way too short amount of time, then my husband will come home, look in the freezer and ask “oh, is the ice cream gone?” Always with a hopeful expression. There is nothing I can do but make more for him.

I didn’t think this was going to be the ice cream for me due to my love of extreme chocolate, but it is one of my favorites as well. It is like eating a perfectly balanced ice cream sundae without having to make one. The creamy vanilla is set off with the deep chocolate fudgy goodness, and the salty, crunchy peanut butter, YUM! This is a vegan ice cream to impress.

 Ingredients

Instructions

  1. Make vanilla ice cream and freeze for 2-4 hours, just enough so it doesn’t start to melt when you stir everything in.
  2. Meanwhile, heat the chocolate chips, milk, vanilla, and maple syrup together over low heat stirring to combine. (Or microwave for about 20 seconds, then stir together.)
  3. Place the chopped peanut butter cups in the freezer as well during this time.
  4. Once you have stirred the chocolate mixture until smooth, place it uncovered in the refrigerator to cool completely.
  5. Once the ice cream has frozen for a few hours and the chocolate sauce and peanut butter cups are chilled remove the ice cream from the freezer.
  6. Drizzle the chocolate sauce/scoop gobs of it onto the ice cream, drizzle the peanut butter, sprinkle on the peanut butter cups and fold together.
  7. Re-freeze the mixture until you are ready to serve it, but at least another hour.


Vegan Apple Spice Cake for a Perfect Fall Day

Vegan Apple Spice Cake

It’s Halloween! One of my favorite holidays. I love costumes and dressing up, and the general fun that Halloween brings. It’s a day when it’s ok to be silly, to take life a little less seriously, and be playful. It’s also a chance to try out different aspects of your personality and play them up in the spirit of Halloween. Even with my love of Halloween we haven’t been able to celebrate much the last few years:( Also my husband doesn’t love Halloween and I really have to push him to do anything that involves costumes. That being said, this year is different! This year we have an adorable child to dress up, and even my husband is excited. He is so excited, he came up with joint costume for he and my daughter, it’s a T-Rex. So cute. Anyway, Grammy made the costumes and I can’t wait to dress Wolfie up!

Is this post about food? Maybe… When I was growing up we used to have super fun time on Halloween. My brothers and I would make haunted houses, we would make our own costumes, carve pumpkins, and my mom would make a big pot of chili and a camp fire. She would sit by the fire and hand out candy while my brothers and I went Trick or Treating, then we would come home and sit by the fire eating chili and the 5 pieces of candy she allowed us to have on the actual day. Side note: this rule was developed after my brothers made themselves throwing up sick on candy by trying to consume it all in one sitting. Silly boys.

This year I’ll probably make chili because of tradition, and I’ll round it out with this apple cake. The base of this cake is my great-grandmother’s spice cake with some apples tossed in. This is a great way to use up apples that are maybe not as crisp as they once were. It is full of warming spices, has the delightful bits of apples that caramelize as the cake cooks, and is exactly what you want on a chilly fall day (plus it smells amazing as it cooks). So Throw you chili in the crock pot, bake this cake, and have a happy Halloween.

Apple Spice Cake 

Ingredients

  • 1 cup non-dairy milk
  • 1 tsp. vinegar
  • 1 cup sugar
  • 1 TBL vegetable shortening
  • 1 tsp. chia seeds or psyllium husks mixed with 2 TBL water, or an egg if you aren’t vegan
  • 1 cup flour
  • 1 tsp. baking soda
  • 1 tsp. cinnamon
  • 1/2 tsp. nutmeg
  • 1/2 tsp. cloves
  • 1/2 tsp. salt
  • 1 large, or 2 small apples peeled, seeded, and chopped

Instructions

  1. Preheat oven to 370F.
  2. Add vinegar to milk and set aside.
  3. Cream together sugar and shortening until smooth.
  4. Add the chia seed/water mixture to sugar and mix together.
  5. In a separate bowl mix together the flour, baking soda, cinnamon, nutmeg, cloves, and salt.
  6. Alternate between adding flour mixture and milk to the shortening, mixing thoroughly between additions.
  7. Stir in the apple.
  8. Pour batter into a greased 9×9 cake pan and bake for 30-35 minutes, or until cake pulls away from the edges of the pan.
  9. Great for dessert, breakfast, or a snack!


A Video of My Mom Making Pie Crust

Making vegan pie crust

I usually just post a link to my videos in the post that they relate to, but this one is special. My mom came to visit last week and I convinced her to go on camera and make her famous pie crust! Not only is my mom sweet and wonderful, she is also an incredible cook and baker. She is the original “happy food ninja”. The pie crust she makes is basically the one she was taught by her grandmother (we just substitute vegetable shortening for lard). My mom is sharing some super fun tips and letting you in on the secrets to the perfect crust. I hope you enjoy!

Perfect Homemade Vegan Pie Crust

Perfect Homemade Pie Crust
Crimping the Edges of Perfect Homemade Pie Crust

My mom always said “you only make homemade pie crust for people you love.” This is a true statement as pie crust is a labor of love. It really isn’t hard, but it does take a little time, effort, and mess to make. My mom always made pretty much everything from scratch and I have many memories of her rolling out the dough for pie crust. Pie was her favorite, and her specialty. Every holiday in our house was celebrated with pie. Thanksgiving was really a time to rejoice as she spent DAYS making pie. We would have apple, pumpkin, pecan, and french silk every Thanksgiving. It was amazing! The heart of her pie started with this simple crust.

The perfect pie crust is light, flaky, a bit salty, and falls in crispy pieces when you take a bite. This crust has always been vegan, the accidental vegan thing, and lives up to the perfect crust. I have added a few tips and tricks from my mom for a perfect crust which I am sharing after the recipe.

I had a lot of fun with this post and I didn’t even have to make the pie! My mom is here for a visit and she joined me for a video  and made me an amazing apple pie with her perfect crust. I got to help:) It was a perfect rainy day of baking and hanging out with my mom and filming the video with her while Wolfie took a super long nap. I don’t get much better than that!

Makes 2 crusts, or one two crust pie (Such as apple)

 Ingredients
  • 2 1/2 cups all purpose flour-plus extra to roll crust
  • 1 tsp. salt
  • 10 TBL vegetable shortening
  • 4-6 TBL very cold water-add an ice cube while making the recipe

Instructions

  1. Mix the flour and salt together in a medium bowl, or in your food processor.
  2. Cut in the shortening with a pastry cutter, fork, or with short pulses in your food processor.
  3. Mixing with a fork, rubber spatula add just enough of the water to hold the crust together in a ball with no large cracks when you press it together with your hands or the spatula.
  4. On a clean dry flat area sprinkle flour in a shape larger than you want your crust.
  5. Split the dough in half and make each half in to a ball.
  6. Place the dough ball in the middle of the floured area and sprinkle more flour on the dough as well as on a rolling pin.
  7. Role the crust starting in the center of the ball and working toward the edges. -touch the dough as little as possible.
  8. When the crust is rolled to the size you desire pick it up using the rolling pin and place in pie plate.
  9. The second half can be used for a top crust or another bottom crust.
  10. Use the crust to make anything that requires a perfect pie crust.

Tips and Tricks:

  • The less you touch and play with your crust the better it will be.
    • The more you work with a wheat crust the more the gluten in the wheat develops. When gluten develops it makes the product chewy; perfect for bread, not perfect for pie crust.
    • A food processor works great, just do quick pulses until it looks right.
  • Start with cold ingredients.
    • Cold vegetable shortening can be hard to work with, but it is worth it in the end. Flakes in pie crust occur when the little pieces of fat melt and leave air pockets as the crust bakes. (Check out Food Lab for the real story)
  • Measuring is not exact, go by look and feel.
    • The consistency of the crust will change based on the type and brand of flour, and how you measure your ingredients. A scale is much more exact, I don’t use one so my measurements are a place to start. Check out this video to see each stage.
  • If your crust just isn’t working, put the broken mess on a baking sheet, sprinkle with cinnamon and sugar, bake for about 10 minutes at 375 until the crust is golden brown, and eat them right up. Start a new crust while these are baking
  • Never make crust when you are in a hurry.
    • It just won’t work. One of those things. Take your time, at least until you have it down.
  • You can use fats other than vegetable shortening, but my mom says it’s the best, so why even go there?
Cutting the shortening in. This is how it should look right before adding water.
The dough with water, before rolling it out.
Vegan Pie Crust
Vegan Pie Crust
Perfect Homemade Pie Crust

Coconut Whipped Cream

 Ingredients
  • 15 oz can full fat coconut milk (without an emulsifier as an ingredient. I find Thai Kitchen Organic, and Trader Joe’s Coconut Cream work wonderfully)
  • 1/2-1 tsp pure vanilla extract
  • 2 tsp maple syrup, or other sweetener (optional)

Instructions

  1. Chill can of coconut milk overnight in the refrigerator.
  2. The next day, pour off the liquid still in the can and scoop the thick coconut cream into a chilled bowl.
  3. Whip the chilled coconut cream on high with an electric mixer until light and fluffy, about 1-2 minutes.
  4. Add the vanilla and sugar if using and continue to whip for another 30 seconds or so.
  5. Scoop generously into coffee, eat with a spoon, or use in your favorite recipe.

Vegan Vanilla Ice Cream and Vegan Ice Cream Without a Recipe

Vegan Vanilla Ice Cream

I have been working super hard on developing a vegan ice cream non-recipe for you. I have eaten countess batches of ice cream, and tried several flavors (you have been privy to a few). I am now sharing the basic vanilla and giving you basics that I have learned through my experimentation. I hope you get to make a few batches before the end of summer.

 Ingredients

Instructions

  1. Combine the coconut milk and scraped vanilla pods in a small saucepan over low heat.
  2. Heat gently for about 15 minutes to steep the vanilla pods, then remove from heat and allow the milk to cool to at least room temperature.
  3. Once cool discard the vanilla pods and combine the coconut milk, beans you scraped from the vanilla pods, vanilla extract, agave nectar, and salt  and blend together briefly.
  4. Freeze in ice cream maker according to manufacturers instructions.
  5. Scoop ice cream into freezer friendly container and freeze for at least 2 hours before serving.

Discussion:

What is important for successful ice cream?

  1. Texture (the combination of several ingredients to form the perfect creamy base)
  2. Flavor (what you add to make the finished product)

How does it all work 

Texture. For the perfect creamy texture you need several things: a creamy base (full fat coconut milk), a sweet syrup (agave nectar, maple syrup, or if you must, corn syrup), and, if you like, a bit of alcohol to prevent the ice cream from freezing fully.

Ratio: I have found the ratio to be one can of coconut milk (13.66oz) I have been using Thai Kitchen Organic Coconut milk at room temperature, 3 tablespoons of agave nectar, and one tablespoon of alcohol per batch.

Blending: I like to blend the mixture before freezing as it adds air which makes a lighter, creamier, easier to scoop finished product.

Coconut milk: There are a few important things to know when using coconut milk.

  • You HAVE to use full fat. You need the fat to make the ice cream creamy, and that is what ice cream is supposed to be.
  • You also need to make sure the coconut milk is fully liquid. Many brands contain emulsifiers that keep the coconut milk from separating. If you are using an organic brand, or one that separates make sure it is fully smooth. You might need to heat it to melt an combine any solid pieces.
  • I also recommend blending everything briefly. This makes sure the solids are combined, and also give the mixture a little extra air making the final product a bit lighter and fluffier.

   Alcohol:

  • A little bit of alcohol keeps the mixture from freezing fully if it sits in the freezer overnight. You can simply omit it if you do not use alcohol, but the texture will be a bit different.
  • I like to use alcohol as the flavor, or part of the flavor in many recipes. In this recipe I used homemade vanilla extract which is simply vanilla bean pods steeped in vodka for a few months. In essence, I am using unsweetened vanilla vodka.

   Agave Nectar/Syrup/Sweetener: 

  • You need something to make everything stick together and be creamy, and also to sweeten the ice cream. I use agave nectar for this, or maple syrup if you want a maple flavor. I have read you could use corn syrup, but I haven’t tried it yet. I use 3 tablespoons per can of coconut milk. You can use more, I just don’t like it super sweet.

Flavor. Obviously flavor is important when making ice cream. This recipe is vanilla because it is basic. You can see from my mint chocolate chip and amaretto ice cream different ways to add flavor while keeping the same basic base.

Flavoring agents:

  • Cocoa powder
  • Extracts
  • Alcohol
  • Herbs and Spices
  • Tea bags
  • Candy
  • Salt
  • Chunks of stuff / add ins(chocolate chips, Oreo’s, fruit, nuts, peanut butter)

You can add flavor in a few ways; you can simply dump stuff in like the extracts and alcohol, or you can steep things in the coconut milk as you warm it gently before freezing it. The steeping method would be good for tea bags, vanilla bean pods, or something you want to melt.

You can also add things in after the ice cream has frozen in the machine, but before putting it into the freezer. You would add pieces of cookie, peanut butter, any chunks of stuff at this time. You do this so the ice cream freezes consistently in the machine. You do want to keep  in mind that even though you are adding these in at the end, they will affect the flavor.

I want to address salt for a minute. I call for a pinch of salt in all my ice cream recipes. Salt opens up your taste buds and allows the other flavors to shine. You do want to add it, but just a pinch. It shouldn’t be a flavor you can identify in the finished product.

Ice cream maker

I use a Kitchenaid attachment ice cream maker. It is the only one I have used. If you use something else I would love feedback on how they work and if you need to make adjustments to the recipe for other machines.

Vegan Amaretto Ice Cream

Vegan Amaretto Ice Cream

I’m going full speed into ice cream land. I have made ice cream several times a week for a few weeks now. It is HOT in the Northeast and ice cream is the only way to happiness right now. This is a delicious amaretto flavored vegan ice cream. For a change I decided to serve it over a toasted, buttered, toaster waffle, and topped it with chocolate sauce and finishing salt. YUM!

 Ingredients
  • 1 can (13.6oz) full fat coconut milk
  • 3 TBL agave nectar
  • 3 TBL amaretto liquor
  • 1 1/2 tsp almond extract
  • 1/2 tsp vanilla extract
  • dash salt

Instructions

  1. Whisk or blend all ingredients together until smooth.
  2. Add to ice cream maker of your choice and freeze according manufactures directions.
  3. Transfer ice cream to a freezer-happy container and freeze for a minimum of 2 hours before serving for the best texture.
  4. Serve over buttered toaster waffle and topped with chocolate sauce., or just in a bowl if that’s what you have.