Vegan Nacho Cheese Sauce and Guacamole

Vegan Nachos with Cashew Cheese and Guacamole

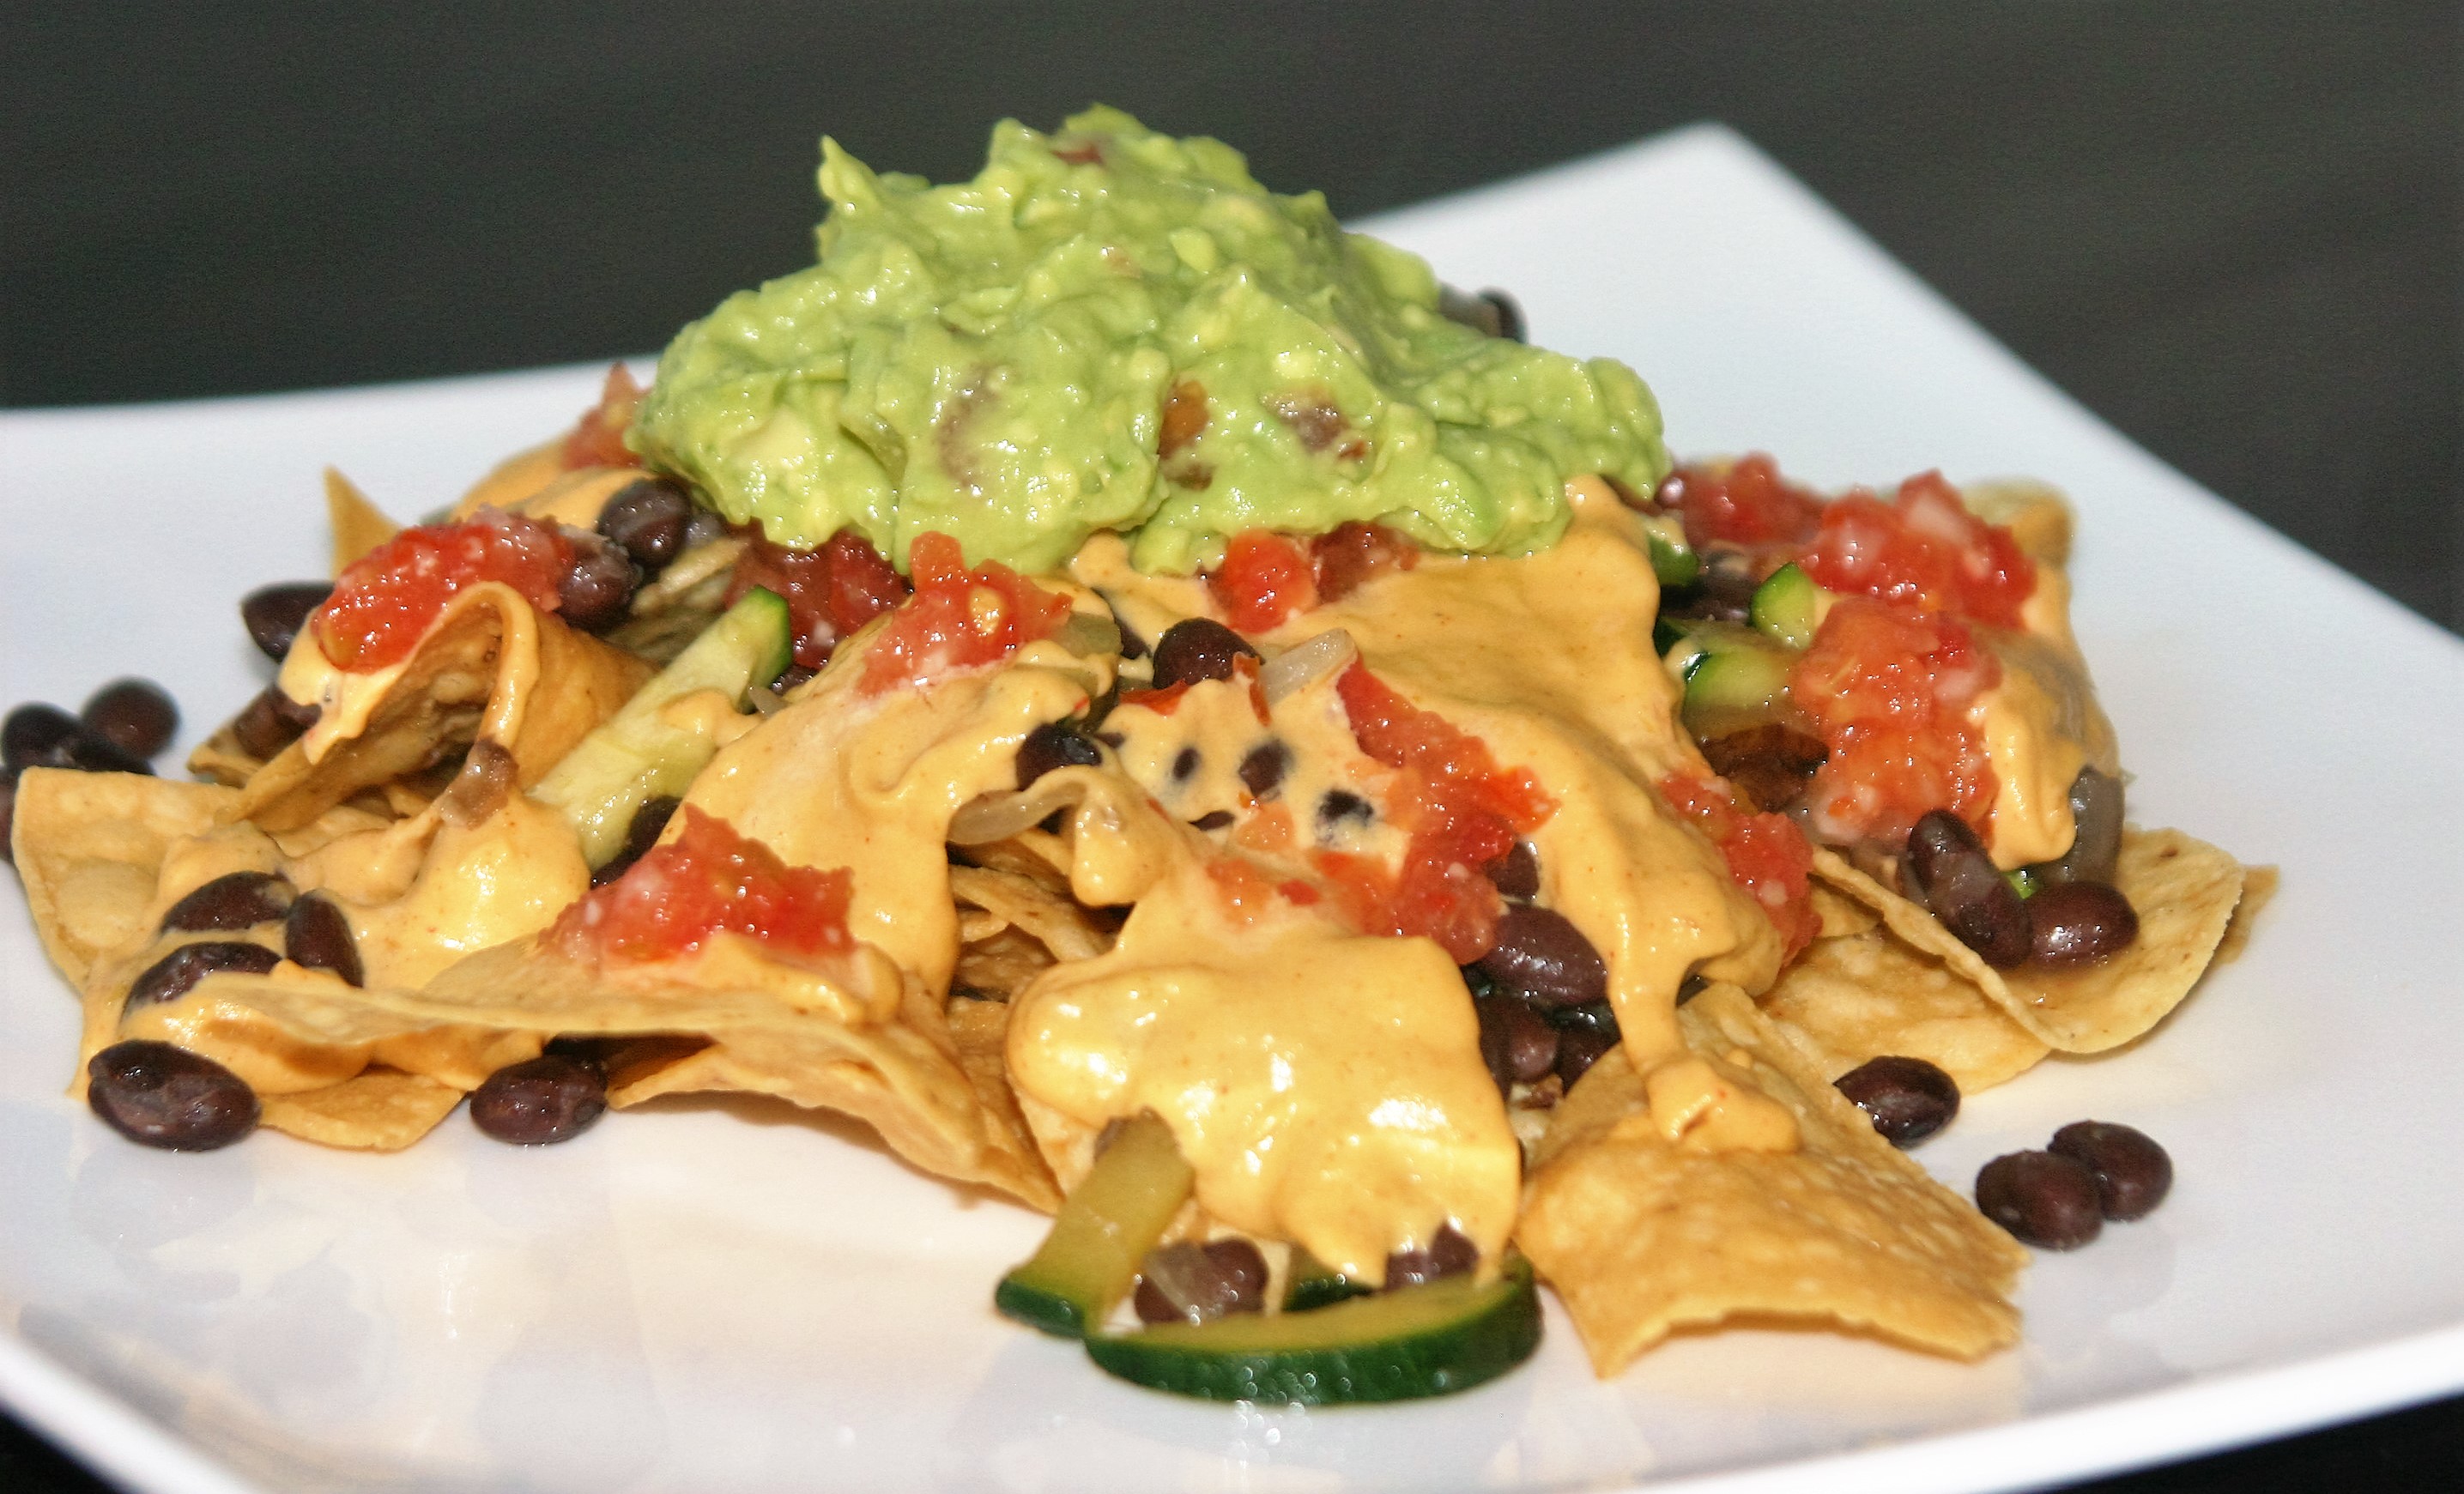
I had nachos for dinner and they were delicious! I highly recommend that you try a big plate yourself sometime soon. These were topped with a delicious vegan nacho cheese sauce from Serious Eats with a few minimal changes to reduce the spice level for my pregnant self. I also added a saute of onions, mushrooms, and black beans, some perfect homemade guacamole, and a touch of salsa. My only regret is that I am too full for dessert.

By far the most time consuming part of these nachos is the sauce. It is well worth the effort. I am giving you the recipe for the nacho cheese sauce and guacamole. What else you want to add is up to you. I do strongly suggest that you heat your tortilla chips in the oven until warm and crispy (350 for 5-7 minutes watching them carefully so they don’t burn). I heated my chips, then piled them on a plate with my toppings. I find if you heat your toppings on the chips the chips get soggy. So, heat chips, pile with stuff, top with vegan nacho cheese and guacamole. Sit and eat in delighted silence.

Originally from Serious Eats with some modifications by me.

 Ingredients

  • 6 tablespoons vegetable shortening
  • 1 small onion, thinly sliced
  • 2 medium cloves garlic, thinly sliced
  • 1/2 teaspoon ground cumin
  • 1 teaspoon ground paprika
  • 1/2 teaspoon granulated garlic powder
  • 4 ounces russet potato (about 1/2 medium), peeled and thinly sliced
  • 4 ounces roasted cashews (about 1 cup)
  • 1/2 cup water
  • 1/2 cup unsweetened, unflavored nondairy milk
  • 1 teaspoon hot sauce (such as Frank’s)
  • 1 4 oz can fire roasted green chiles
  • Kosher salt to taste

Instructions

  1. Melt shortening in a medium skillet over medium heat. Add onion and garlic and cook, stirring, until completely softened but not browned, about 4 minutes. Add cumin, paprika, and garlic powder, Cook, stirring, until fragrant and mixture starts to sizzle, about 1 minute.
  2. Add potatoes and cashews and cook, stirring, until cashews are lightly toasted, about 2 minutes. Add water and nondairy milk. Bring to a boil, reduce to a bare simmer, and cook, stirring frequently, until potatoes are fully tender, about 10 minutes.
  3. Transfer mixture to the jar of a high-powered blender. Add hot sauce, 1/2 the green chilies, and a pinch of salt. Start on low speed and slowly increase speed to high. Blend on high speed until completely smooth, about 2 minutes, adding water a few drops at a time as necessary to thin to desired consistency. Season to taste with more salt.
  4. Add the other half of the chilies and pulse to combine leaving some pieces of chili. If you like your sauce smooth feel free to blend to your heart’s content.
  5. Cheese sauce can be stored in the refrigerator in a sealed container for up to 1 week. To reheat, microwave in 30 second increments, stirring in between, or reheat in a small pan on the stovetop, stirring constantly, and adding extra water to loosen sauce as necessary.

 Ingredients

  • 2 large perfectly ripe avocados
  • 2 small to medium cloves garlic, finely minced
  • 2 TBL red finely minced red or yellow onion
  • half a small jalapeno, finely minced, about 1 tsp. (optional)
  • 1 TBL minced fresh cilantro (optional)
  • 3 TBL minced fresh tomato (optional)
  • juice from half a small lime
  • salt to taste

Instructions

  1. Scoop out the flesh of the avocado and mash in a bowl large enough to give you some room to work.
  2. After the avocado is mashed to the consistency you desire mix in the rest of the ingredients. Start small with the lime and salt, and add more if you like.
  3. Try to refrain from eating it all before moving it to the table.

Vegan Peanut Noodles with Tempeh Croutons

Vegan Peanut Noodle Salad

As the weather gets warmer I want to have cooler foods. I especially love pasta salads. I will not argue the nutritional value of pasta, but just say it is delicious! This is a simple noodle salad topped with tempeh croutons and it gets better after a day or two in the fridge. It is also perfect for a pot luck as it is best served room temperature. This comes together quickly, and is perfect for lunch on the go, or a quick dinner. Serve with a yummy fresh salad to really brighten your meal.

Ingredients

  • 1 package Tempeh cut into 1″ cubes
  • 2 TBL olive oil
  • 2 TBL tamari
  • 1 tsp chili powder
  • Udon noodles cooked according to package directions, drained, and cooled to room temperature
  • 1/3 cup peanut butter
  • 2 TBL lime juice
  • 2 TBL brown sugar
  • 2 TBL tamari
  • 1/4 tsp red pepper flakes

Instructions

  1. Heat a large case iron skillet over medium high heat.
  2. Add oil, swirl to coat the bottom of the pan, and add the tempeh.
  3. Cook, stirring occasionally until golden brown on all sides, 5-7 minutes.
  4. Turn off the heat and drizzle the tamari over the tempeh, stir, and sprinkle the chili powder over the tempeh, stir and set aside.
  5. In a large bowl combine the peanut butter, lime juice, brown sugar, tamari, and red pepper flakes whisking to combine.
  6. Add the cooked noodles and toss to coat with dressing.
  7. Top with tempeh croutons.

Mother’s Day Chocolate Parfait with Aquafaba Mousse

Aquafaba Chocolate Mousse Parfait

Mother’s Day is on Sunday, yes, this Sunday. I know you want to make something special for the mother in your life, and since she is vegan it can be hard. This will be the perfect fix. Super easy to make as long as you have an electric mixer, looks fantastic, and will leave your both in the best of food comas. It can also be a mix and match to fit her taste buds allowing you to choose the toppings and extras of your choice. You will also impress her with your aquafaba chocolate mousse as aquafaba has just hit the mainstream in the last few weeks. You are on the cutting edge of vegan culinary delights!! Go you!

note: If you happen to be planning ahead the mousse is best made the night before-if not, don’t worry, make it now and it will still take perfect, it just won’t be as firm.

 Ingredients

Instructions

  1. Start with a tall glass or parfait dish (does anyone actually have one of these?)
  2. Layer as you desire starting with the cake.
  3. If you are using liqueur drizzle a small amount (1 tsp) on each layer of cake.
  4. Top with extras, then mousse. Your choice if you want to add some whipped cream to the layers of save it for the top.
  5. Layer on until you reach the top of the dish and finish with a heap of whipped cream.

A Vegan Cinco de Mayo

Homemade Refried Beans

I love Mexican food, and there is no better excuse for eating it than the 5th of May. There is a common misconception in the US that Cinco de Mayo is the Mexican independence day which is actually celebrated on September 16th. Cinso de Mayo actually celebrates the Mexican victory over French troops at the battle of  Puebla on May 5, 1862. As I said though, it is just a wonderful reason to thank Mexico for their delicious food and celebrate when spring actually comes to the East Coast.  It also happens to be my husbands, and my father-in-law’s birthday. It’s really just a wonderful and special day for me overall.

In case you want to celebrate I have a few recipes for you to choose from, or build a buffet of this holiday. Happy Cinco de Mayo and I hope the day is beautiful.

Vegan Mexican and Mexican Inspired Dishes

vegan refried beans
vegan refried beans

Refried Beans


Homemade vegan tortillas

Homemade Corn Tortillas


Black bean stew with Soyrizo

Soyrizo and Black Bean Stew


Vegan Lentil Tacos with Homemade Refried Beans

Lentil Tacos


Pizza Burrito
Pizza Burrito

Pizza Burrito


National Mojito Day Morita

Morita – a Margarita/Mojito 


Vegan and Sugar Free Glorious Morning Muffins

Vegan and Sugar Free Glorious Morning Muffins

I’m on a muffin kick. After last week’s Lemon Blueberry Muffins I was inspired to post more yummy, toddler friendly muffins. These are also sweetened with dates, so no added sugar. They also boast a bunch of veggies and have tons of fragrant spices. You could also add nuts and dried fruit if you are into that sort of thing. You could also mix up the veggies and use only carrots, or only zucchini, or even sub in some sweet potato or summer squash. These are a perfect school snack for my daughter as they are pretty much allergen free in addition to being pretty nutritious.

 Ingredients

  • 1 1/2 cups chopped, pitted, dates
  • 3/4 cup just boiled water
  • 1 3/4 cup whole wheat flour
  • 1/4 cup chickpea flour or more whole wheat
  • 3 TBL chia seeds
  • 2 tsp baking powder
  • 1 tsp baking soda
  • 1/2 tsp salt
  • 2 tsp cinnamon
  • 1 tsp nutmeg
  • 1/2 tsp ground ginger
  • 1 cup grated zucchini
  • 1 cup grated carrot
  • 1/2 cup sunflower seed oil
  • 2 tsp pure vanilla extract
  • 1 TBL apple cider vinegar

Instructions

  1. Prepare a 12 cup muffin pan with paper liners or a light coating of oil and preheat oven to 375.
  2. Place the chopped dates in a heatproof bowl or measuring cup and pour the boiling water over the dates. Cover and set aside until soft, 10-20 minutes
  3. In a medium bowl combine the flours, chia seeds, baking powder, baking soda, salt, cinnamon, nutmeg, and ginger. Stir briefly.
  4. Add the zucchini and carrots stirring until the are coated in flour.
  5. When the dates are soft mash them with a fork until relatively smooth (no big pieces).
  6. Add the date mixture, oil, and vanilla and apple cider vinegar to the flour, vegetable mixture and stir until just combined.
  7. Divide batter evenly into muffin cups and bake for 20-23 minutes until a toothpick inserted in the center comes out clean.
  8. Remove from pan to cool as long as you can wait before eating.

Refined Sugar Free Vegan Lemon Blueberry Muffins

Refined sugar free vegan lemon blueberry muffins

My daughter loves muffins, well, she loves glorious morning muffins, and I wanted blueberry muffins. I am refraining from giving her any refined sugar for as long as possible, so I needed to develop a recipe for blueberry muffins that would make everyone happy. Light and fluffy for me, and fairly healthy for her. These are a good balance. The dates give them plenty of sweetness, that combination of flours keep them light, with just enough whole wheat I didn’t feel too terrible. The lemon zest gives the muffins a hint of spring and they are bursting with blueberries. I highly recommend these for second breakfast on the go.

 Ingredients

  • 1 1/2 cups, pitted, chopped dates.
  • 3/4 cup boiling water
  • 1 1/2 cups unbleached all purpose flour
  • 1/2 cup whole wheat flour
  • 2 tsp baking powder
  • 1 tsp baking soda
  • 1/2 tsp salt
  • zest from one small lemon (about 1 tsp)
  • 1/2 cup sunflower oil
  • 1/4 cup non-dairy milk
  • 1 TBL apple cider vinegar
  • 2 tsp pure vanilla extract
  • 1/4 tsp pure almond extract
  • 1 cup fresh or frozen (not thawed) blueberries

Instructions

  1. Prepare a 12 cup muffin pan with paper liners or a light coating of oil and preheat oven to 375.
  2. Place the chopped dates in a heatproof bowl or measuring cup and pour the boiling water over the dates. Cover and set aside until soft, 10-20 minutes.
  3. Combine the flour, baking powder, baking soda, and salt in a large bowl stirring briefly.
  4. When the dates are soft mash them with a fork until relatively smooth (no big pieces), then add them to the flour mixture.
  5. Add the lemon zest, sunflower oil, non-dairy milk, vinegar, vanilla, and almond stirring to combine.
  6. Add the blueberries and stir to distribute evenly throughout the batter.
  7. Divide batter evenly into 12 muffin cups and bake 20-24 minutes until golden brown and a toothpick inserted in the center of a muffin comes out clean.
  8. Allow to cool at least 10 minutes before eating.

Easy Pasta with Soyrizo and Garlic

Garlic and Soyrizo Pasta

This is the last of the soyrizo recipes, at least for now… I did take a break for a bit for all the holidays, and now we need a quick throw together meal to make up for all the hardcore cooking. You might notice it is pretty similar to the topping for the baked potato from a few weeks ago. This pasta actually came first, and started the idea for the baked potato. This is also just a few things I usually have in my refrigerator and pantry just waiting to be used for a quick weekend lunch. This is one of my husband’s favorite throw together meals and he is always scraping the skillet for the last little bites. It is a hearty, satisfying, just a bit spicy, quick meal.

 Ingredients

  • 2 TBL olive oil
  • 1 medium yellow onion, sliced
  • 1 cup chopped kale, spinach, or whatever greens you have around (optional)
  • 5 small cloves garlic, minced
  • 1/2 package soyrizo
  • 1/2 cup vegetable broth or cooking water from pasta
  • 2 TBL vegan cream cheese
  • 2 TBL nutritional yeast
  • 1/2-1 cup tomato based pasta sauce, or tomato sauce from a can, or a few tablespoons tomato paste and 1/2 cup more vegetable broth.
  • 1/2 lb pasta of your choice cooked according to package directions

Instructions

  1. Heat oil in a large skillet.
  2. Add the onion and kale and cook, stirring occasionally until the onion and kale are soft, about 5 minutes.
  3. Add the garlic and saute for a few seconds making sure not to let it brown.
  4. Add the soyrizo, vegetable brother, cream cheese, nutritional yeast, and tomato sauce of choice and cook while stirring just until heated through.
  5. Add your cooked pasta to the skillet and toss together serving immediately.

Wordless Wednesday 3/31/16

IMG_0464 (2) IMG_0460 (2)

Vegan Tofu and Avocado Benedict With Vegan Hollandaise Sauce

 adapted from “How It All Vegan”

 Ingredients

For the Tofu

  • 1lb extra firm tofu, drained and cut into 8 slices
  • 3 TBL olive oil
  • 1 tsp salt
  • 3 TBL apple cider vinegar

For the Hollandaise Sauce

  • 1/2 cup nutritional yeast
  • 2 TBL all purpose flour
  • 1/2 tsp salt
  • 1 cup water
  • 2 tsp dijon mustard
  • 1 tsp lemon juice

The rest

  • 4 English muffins, split and toasted
  • 1 large avocado thinly sliced
  • paprika for finishing

Instructions

  1. Heat your largest skillet over medium-high heat until very hot. I use my use huge cast iron.
  2. While it is preheating whisk together the nutritional yeast, flour and salt in a small saucepan.
  3. Slowly drizzle the water into the nutritional yeast mixture whisking until smooth and set aside.
  4. Once your pan is hot (droplets of water sprinkled in the pan immediately sizzle and evaporate), add your oil and heat for a few seconds while swirling to coat the bottom of the pan.
  5. Place the tofu in the pan in a single layer (be careful as the oil will spatter when the wet tofu is added).
  6. Cook the tofu until golden brown on one side, 2-3 minutes, then flip and continue cooking on the second side until also golden brown, another 2 minutes or so.
  7. Once both sides are cooked remove the tofu from the heat, sprinkle the salt over the tofu, and drizzle the apple cider vinegar over everything. The heat from the pan will encourage evaporation. Set this aside in the hot pan to stay warm while you finish the hollandaise sauce.
  8. If you are a multi-tasker start this step right after you have flipped your tofu. If not, just do it after the tofu is done as it will be fine, but the sauce needs some attention.
  9. Put your nutritional yeast mixture on the stove and heat over medium-low heat whisking frequently until it has thickened to your desired consistency, about 3 minutes. When it is as thick as you would like, remove from heat and stir in the mustard and lemon juice.
  10. Place your toasted English muffins on your plates, top with slices of avocado, then the tofu, and drizzle the hollandaise over everything. Sprinkle a dash of paprika over the top for color if you like and serve immediately.

Wordless Wednesday 3/23/16

20160311_193002604_iOS (2)20160311_193013512_iOS (2)