Vegan Chocolate Aquafaba Brownies with Cheesecake Swirl
I saw this lovely recipe on the Aquafaba facebook page and had to try it out. Of course, I couldn’t leave well enough along and had to change things up just a bit. The brownie recipe is from Fried Dandelions ( I just reduced the sugar and added more chocolate) and the inspiration and cheesecake recipe is from Vegan Lass (I added a bit more flavor from extracts). I arranged my fruit into a flag just for Memorial Day. This part is optional, eating these brownies is not. I can’t even describe how amazingly fudgy these are. The cheesecake and fruit is just enough to balance the chocolate so you want to keep eating them. I especially recommend them at room temperature as that is when the fudge really stands out. Any fruit will do here as long as you like the combination of the fruit with the chocolate.
Vegan Chocolate Aquafaba Brownies with Cheesecake Swirl
Ingredients
For the Brownies
1/4 cup coconut or mild oil, plus extra for greasing the pan
1/2 cup semi sweet chocolate chips
1/3 cup brown sugar
1/4 cup maple syrup
1/4 tsp salt
1/2 cup aquafaba -liquid from a can of beans (white, garbonzo or black beans all work)
2 tsp vanilla
1/4 cup cocoa powder
3/4 c flour
For the Cheesecake Swirl
4 oz vegan cream cheese
1/4 cup unsweetened soy or almond milk
1 tsp good-quality vanilla extract
1/2 tsp bourbon
1/2 tsp almond extract
1 tbsp granulated sugar
A squeeze of fresh lemon juice (about 1/2 tsp)
1/4 cup sliced strawberries, or whole raspberries
1/4 cup blueberries
Instructions
Preheat your oven to 350 degrees. Grease an 8×6 or 8×8 inch baking pan and set aside. I used parchment paper also, but that is optional.
In a medium sauce pan over medium-low heat, melt the chocolate chips and oil together. When melted, remove from heat. Add in brown sugar, maple syrup and the salt and whisk together.
Whisk the black bean liquid in the measuring cup for about 1 minute until slightly foamy (bubble all around). Pour into the chocolate mix and whisk together. Add vanilla, cocoa powder and whisk to incorporate.
Add the flour to the chocolate mixture and mix well.
Pour the brownie batter into the prepared pan and set aside.
In a bowl beat the cream cheese until smooth with an electric mixer.
Add the milk, vanilla, almond, and bourbon, and lemon juice and beat until light and smooth.
Dot the brownie batter with spoonfuls of the cheesecake mixture.
Gently swirl the mixtures together using a knife or similar.
Distribute the fruit according to your plan, then place in the preheated oven for 35-45 minutes. The brownies should be mostly firm, with just a slight wobble in the middle when shaken.
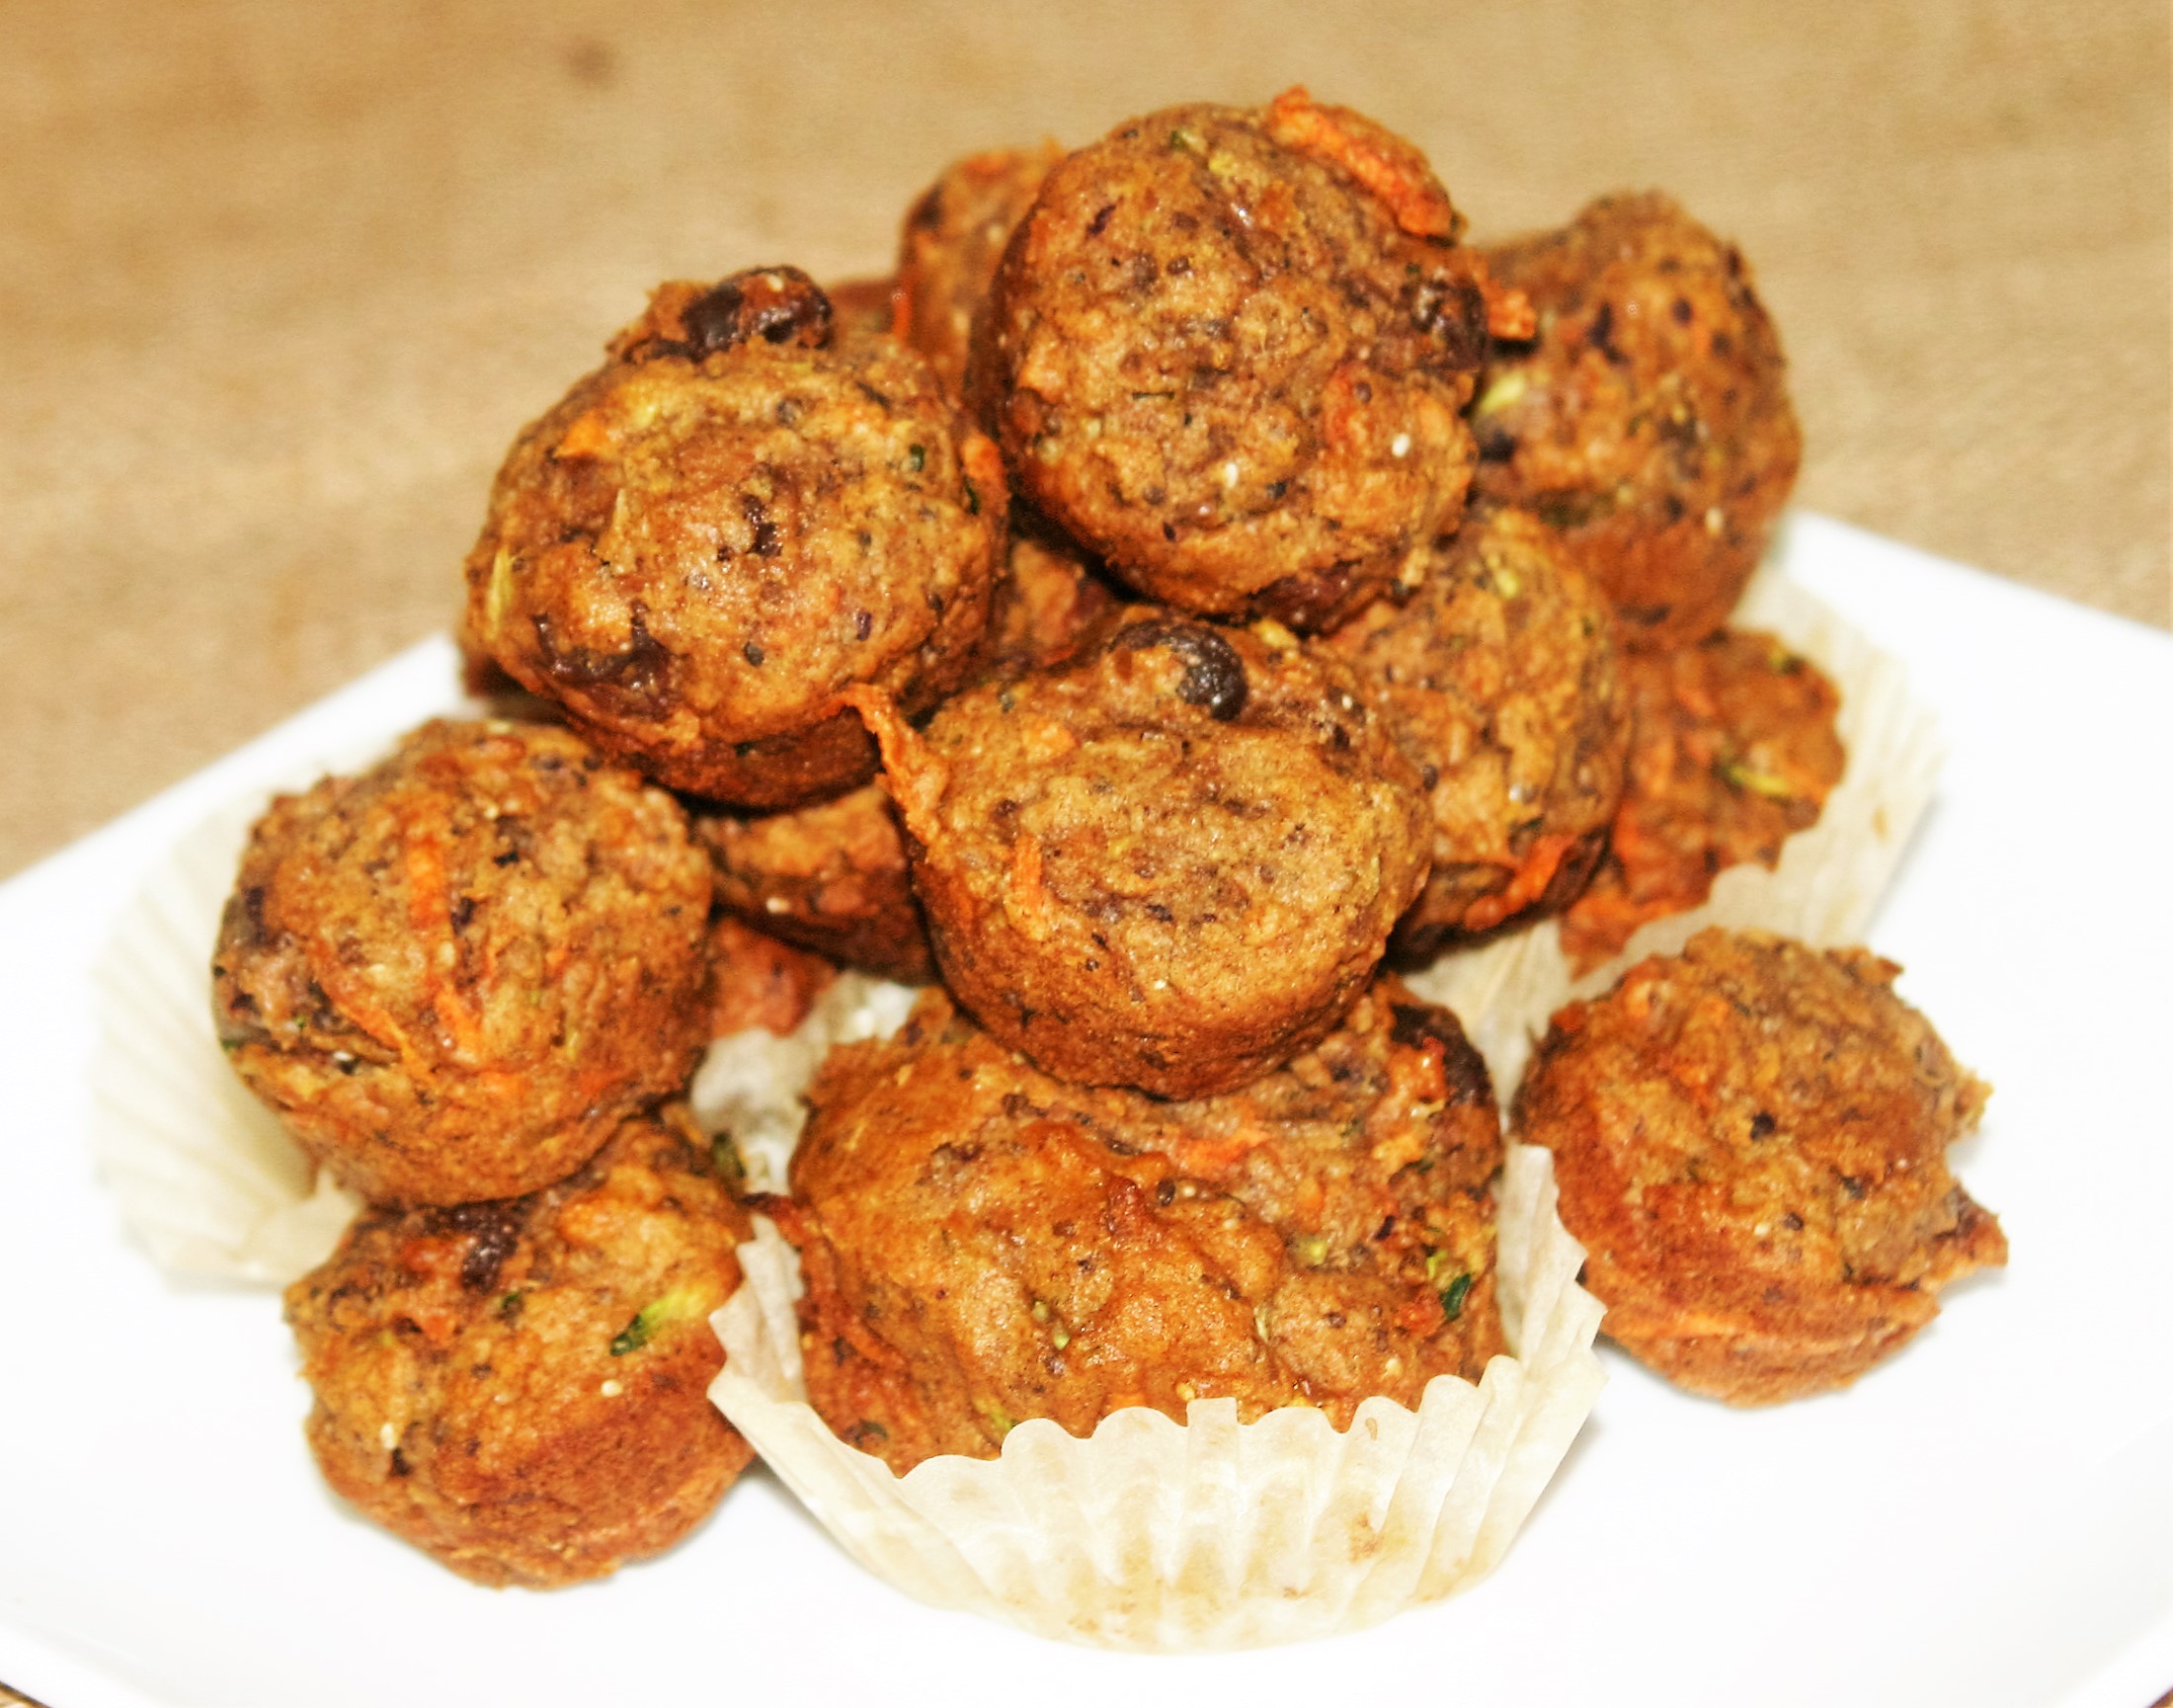
I’m on a muffin kick. After last week’s Lemon Blueberry Muffins I was inspired to post more yummy, toddler friendly muffins. These are also sweetened with dates, so no added sugar. They also boast a bunch of veggies and have tons of fragrant spices. You could also add nuts and dried fruit if you are into that sort of thing. You could also mix up the veggies and use only carrots, or only zucchini, or even sub in some sweet potato or summer squash. These are a perfect school snack for my daughter as they are pretty much allergen free in addition to being pretty nutritious.
Glorious Morning Muffins
Ingredients
1 1/2 cups chopped, pitted, dates
3/4 cup just boiled water
1 3/4 cup whole wheat flour
1/4 cup chickpea flour or more whole wheat
3 TBL chia seeds
2 tsp baking powder
1 tsp baking soda
1/2 tsp salt
2 tsp cinnamon
1 tsp nutmeg
1/2 tsp ground ginger
1 cup grated zucchini
1 cup grated carrot
1/2 cup sunflower seed oil
2 tsp pure vanilla extract
1 TBL apple cider vinegar
Instructions
Prepare a 12 cup muffin pan with paper liners or a light coating of oil and preheat oven to 375.
Place the chopped dates in a heatproof bowl or measuring cup and pour the boiling water over the dates. Cover and set aside until soft, 10-20 minutes
In a medium bowl combine the flours, chia seeds, baking powder, baking soda, salt, cinnamon, nutmeg, and ginger. Stir briefly.
Add the zucchini and carrots stirring until the are coated in flour.
When the dates are soft mash them with a fork until relatively smooth (no big pieces).
Add the date mixture, oil, and vanilla and apple cider vinegar to the flour, vegetable mixture and stir until just combined.
Divide batter evenly into muffin cups and bake for 20-23 minutes until a toothpick inserted in the center comes out clean.
Remove from pan to cool as long as you can wait before eating.
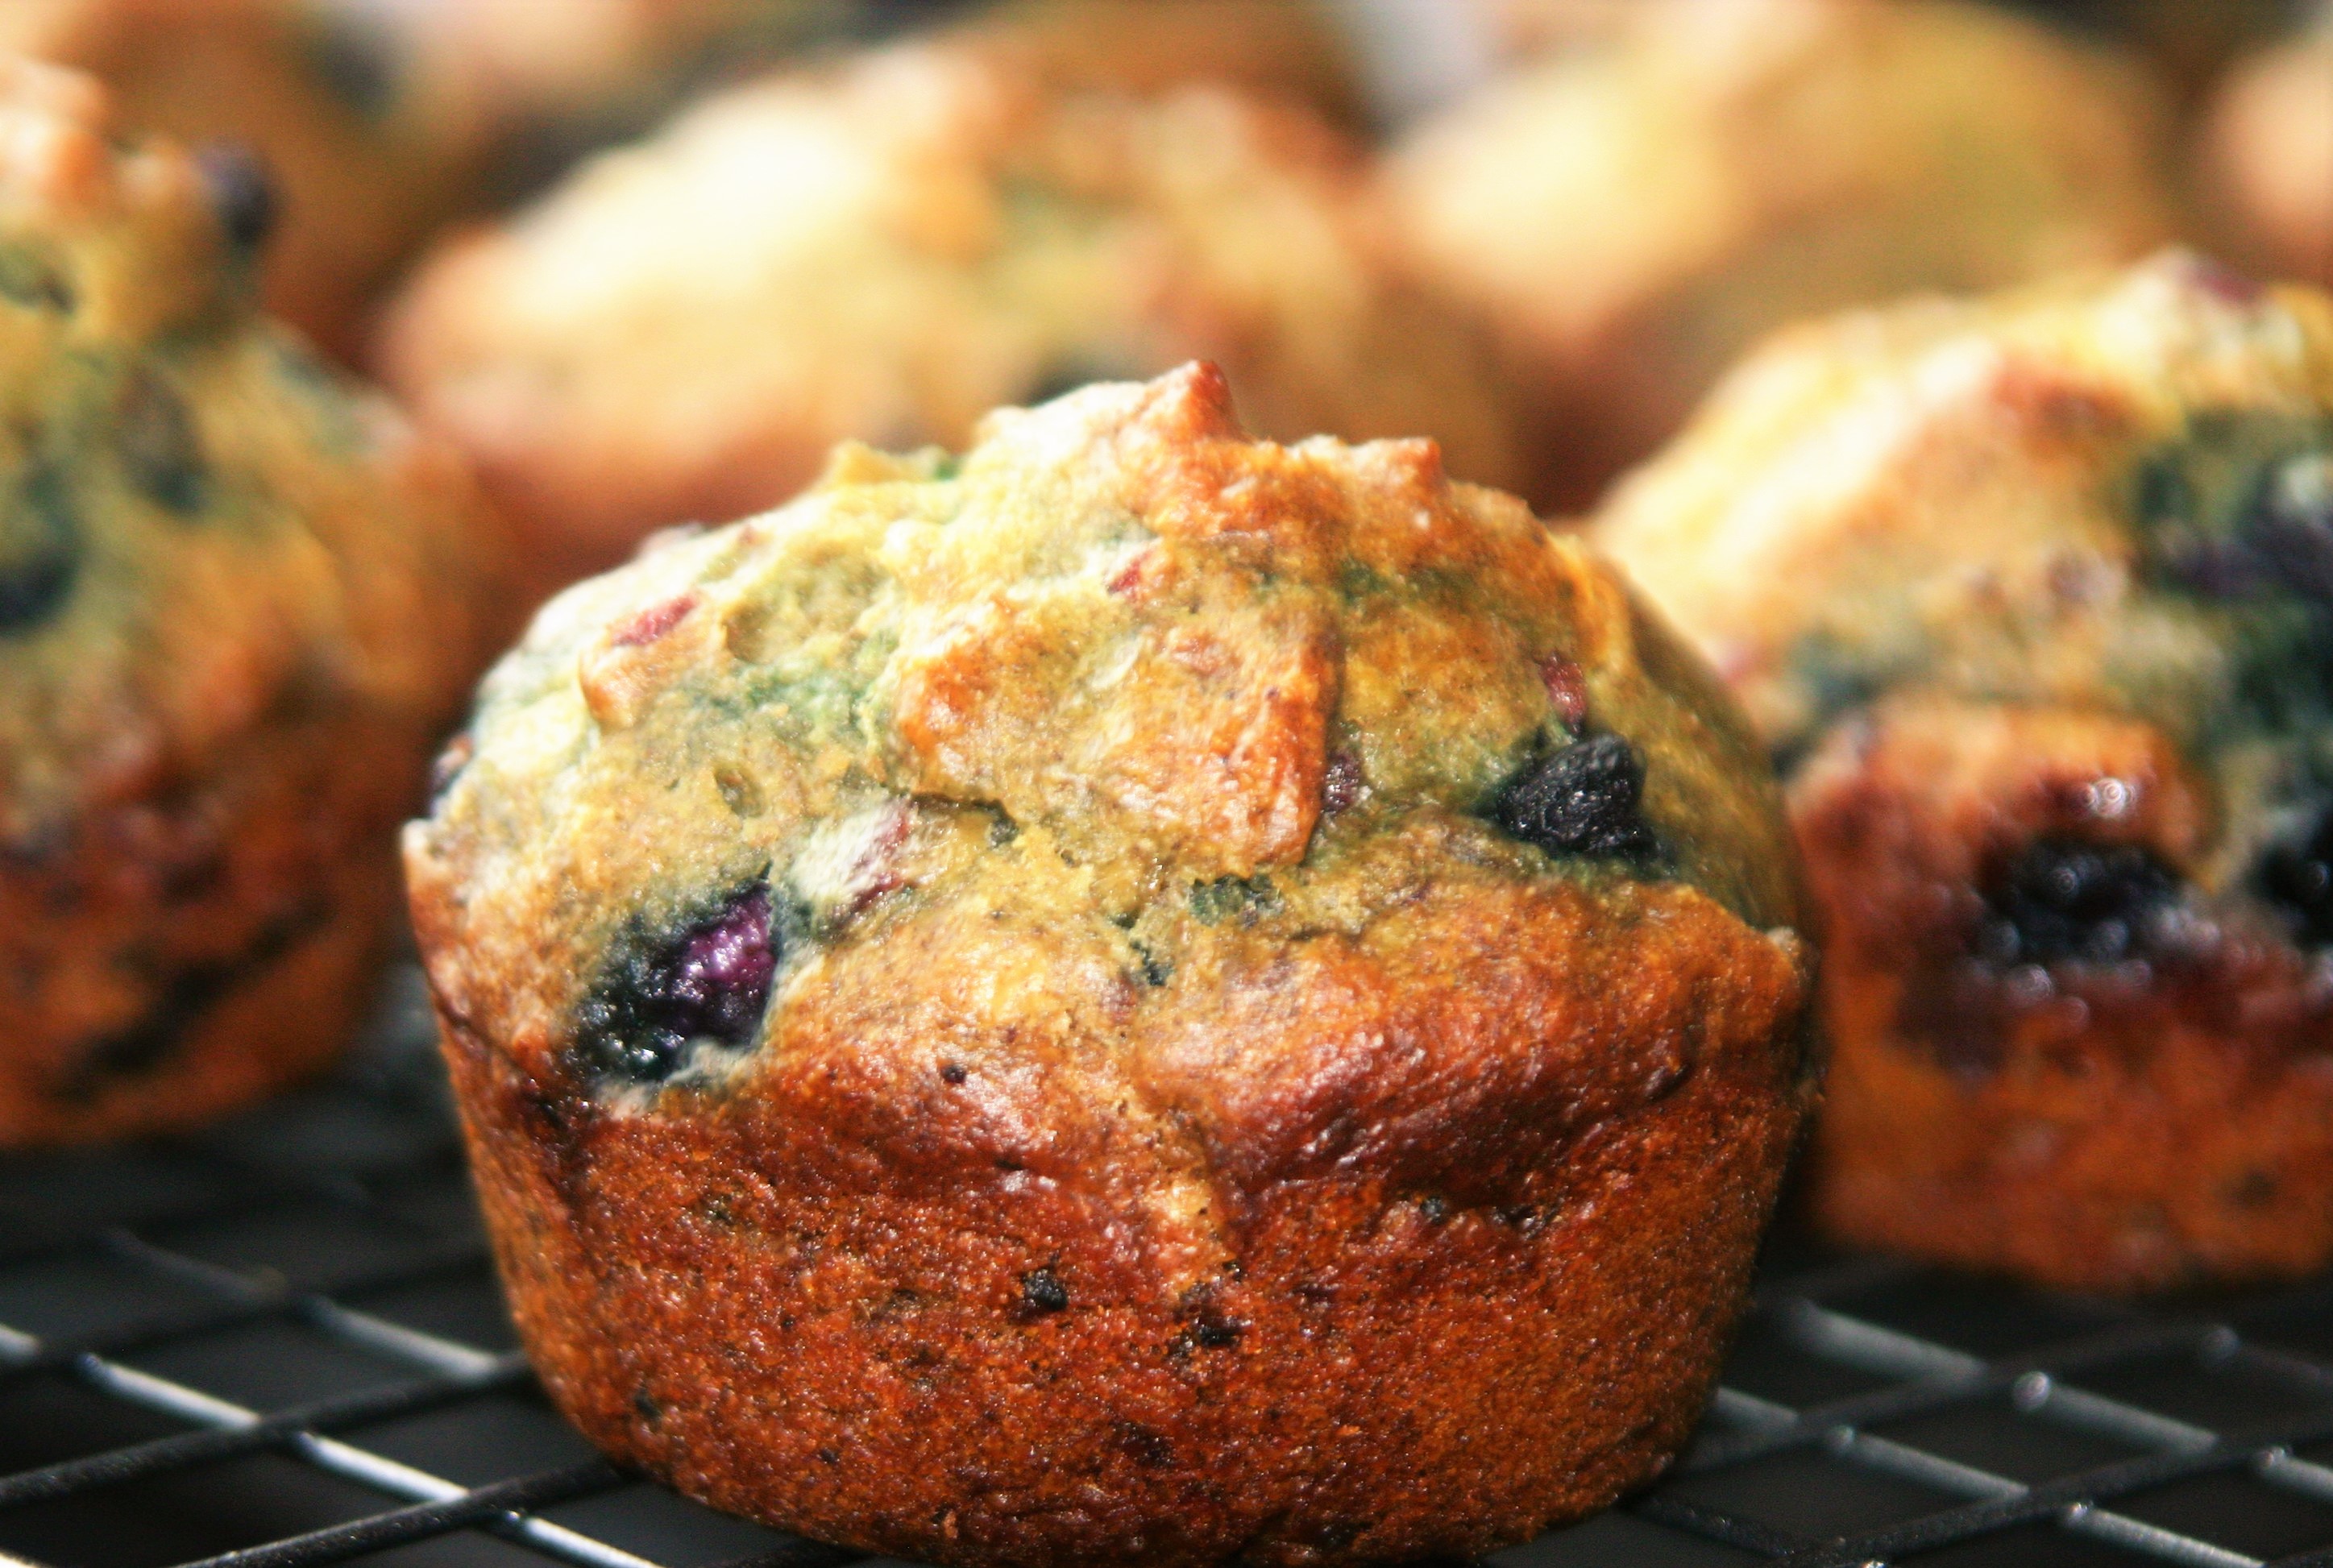
My daughter loves muffins, well, she loves glorious morning muffins, and I wanted blueberry muffins. I am refraining from giving her any refined sugar for as long as possible, so I needed to develop a recipe for blueberry muffins that would make everyone happy. Light and fluffy for me, and fairly healthy for her. These are a good balance. The dates give them plenty of sweetness, that combination of flours keep them light, with just enough whole wheat I didn’t feel too terrible. The lemon zest gives the muffins a hint of spring and they are bursting with blueberries. I highly recommend these for second breakfast on the go.
Refined Sugar Free Vegan Lemon Blueberry Muffins
Ingredients
1 1/2 cups, pitted, chopped dates.
3/4 cup boiling water
1 1/2 cups unbleached all purpose flour
1/2 cup whole wheat flour
2 tsp baking powder
1 tsp baking soda
1/2 tsp salt
zest from one small lemon (about 1 tsp)
1/2 cup sunflower oil
1/4 cup non-dairy milk
1 TBL apple cider vinegar
2 tsp pure vanilla extract
1/4 tsp pure almond extract
1 cup fresh or frozen (not thawed) blueberries
Instructions
Prepare a 12 cup muffin pan with paper liners or a light coating of oil and preheat oven to 375.
Place the chopped dates in a heatproof bowl or measuring cup and pour the boiling water over the dates. Cover and set aside until soft, 10-20 minutes.
Combine the flour, baking powder, baking soda, and salt in a large bowl stirring briefly.
When the dates are soft mash them with a fork until relatively smooth (no big pieces), then add them to the flour mixture.
Add the lemon zest, sunflower oil, non-dairy milk, vinegar, vanilla, and almond stirring to combine.
Add the blueberries and stir to distribute evenly throughout the batter.
Divide batter evenly into 12 muffin cups and bake 20-24 minutes until golden brown and a toothpick inserted in the center of a muffin comes out clean.
Easter is just over a week away! This year I’m trying to be a little bit proactive and give you a list of what to make early so you can make plans. Easter for me is a perfect day for brunch. I love brunch, and I really love to have people over for brunch. It is late enough to get all the cooking done, especially if you plan ahead, but early enough you get a good part of your day for other things, or for continuing to hang out with everyone you invited over and you still get a good night’s sleep! Brunch has to have a few savory items in my opinion, but is really just a late breakfast. My list includes everything I would like on one brunch table, but I would probably have to pick and choose a few of these if I was doing all the cooking myself. Good luck making your plans and happy eating!
Today is my favorite silly holiday, Pi Day!! I mean, who doesn’t love to celebrate being a nerd and pie all at the same time? This girl can’t pass up the opportunity. Last year I celebrated with a savory vegan pot pie, this year it is one of my other favorite pies, lemon meringue! This is very much not vegan. I know you can make it vegan in all kinds of ways, but I haven’t really tried since I eat eggs these days. My husband did make me a vegan lemon meringue for my birthday a few years ago, but the meringue was a very funny texture. Now that I know about aquafaba that wouldn’t be a problem, so maybe one day I’ll experiment. For now, the real stuff! This is my mom’s recipe that was her mom’s.
This version of lemon meringue is tart, perfectly balanced with the sweet meringue, and all lovingly placed a the perfect homemade crust. If lemon meringue isn’t to your liking, or if you’re vegan, then please check out my mom’s apple pie, or this vegan french silk.
Lemon Meringue Pie
Lemon Meringue Pie
Ingredients
1 1/2 cups granulated sugar
1/3 cup + 1 TBL corn starch
1 1/2 cup water
3 eggs, separated
3 TBL butter or Earth Balance
2 tsp lemon zest
1/2 cup lemon juice
1/4 tsp cream of tarter
6 TBL granulated sugar
1/2 tsp pure vanilla extract
1 9″ Prepared and pre-baked pie crust
Instructions
Preheat oven to 400 degrees.
In a medium saucepan mix together 1 1/2 cups sugar and the corn starch.
Slowly whisk in the water and cook over medium heat until boiling stirring constantly.
Continue to cook and stir while boiling for one more minute.
Remove from heat.
Whisk egg yolks briefly in a medium bowl.
Slowly pour half hot sugar/water mixture into the egg yolks while whisking constantly.
Pour the mixed egg/sugar/water mixture slowly back into the remainder of the sugar/water in the pan whisking constantly.
Return to the burner and stir constantly over medium heat until boiling, then boil and cook one minute.
Remove from heat and stir in the butter, lemon zest, and lemon juice and pour in the pre-baked pie crust.
To make the meringue put the egg whites and cream of tarter in a large bowl and beat with an electric mixer on high until foamy.
Continue beating and add 6 TBL of sugar one TBL at a time beating between additions.
Add the vanilla extract and beat until stiff and glossy.
Pour meringue over lemon mixture in the pie crust and spread evenly to the edges sealing it to the crust.
Bake in pre-heated 400 oven until golden brown and beautiful.
Cool completely before serving.
Store in the refrigerator if you happen to have leftovers.
Vegan Chocolate Cupcake With Vegan Chocolate Buttercream
I woke up a few mornings ago thinking about chocolate cupcakes with chocolate frosting. Waking up thinking about food is not unusual for me, thinking about frosting is. In general I’m not a huge frosting fan, but something triggered a need and I had no choice. I made cupcakes with chocolate buttercream frosting. They were delicious.
Both recipes are from Vegan Cupcakes Take Over the World. A perfect cupcake book, and one you should own. In case you don’t, I’ll share the wonderful recipe here. These cupcakes are ultra light, tender, and moist, with a slightly dense frosting that is perfectly chocolatey, creamy, and seductive. Speaking of seductive, you should make these for your sweetheart on Valentine’s Day.
After the recipe I’m including a short tutorial on measuring. I know measuring seems simple enough, but when it comes to baking, the way you measure can make or break the finished product. I hope it helps turn your cupcake dreams into reality.
Chocolate Cupcakes
Ingredients
1 cup non-dairy milk
1 tsp. apple cider or white vinegar
3/4 cup granulated sugar
1/3 cup sunflower oil, canola oil, or other mild flavored oil
1 1/2 tsp. pure vanilla extract
1/2 tsp pure almond extract
1 cup unbleached all-purpose flour
1/3 cup cocoa powder
3/4 tsp. baking soda
1/2 tsp. baking powder
1/4 tsp salt
Instructions
Preheat oven to 350 F. and line muffin pan with paper liners.
Briefly stir non-dairy milk and vinegar in a large bowl and set aside to curdle.
In a separate bowl sift together flour, cocoa powder, baking soda, baking powder and salt.
Once the milk and vinegar has curdled add the sugar, oil and extracts.
Beat together until foamy.
Add dry ingredients to the wet and mix just until combined.
Pour batter into prepared cupcake liners filling 3/4 of the way full.
Bake for 18-20 minutes until a toothpick inserted in the middle of the tallest cupcake comes out clean.
Remove cupcakes from pan and cool on a cooling rack.
Do not frost until completely cool.
Vegan Chocolate Buttercream Frosting
Ingredients
1/4 cup Earth Balance buttery spread, softened to room temperature
1/4 vegetable shortening, softened to room temperature
1/2 cup unsweetened cocoa powder
2 1/2 cups powdered sugar
3 TBL non-dairy milk
1 1/2 tsp. pure vanilla extract
Instructions
Cream together the butter and shortening until thoroughly combined.
Add the cocoa powder, beating until combined.
Add the powdered sugar in three additions followed by a tablespoon of non-dairy milk after each addition.
Once all the sugar is incorporated add the vanilla extract, and beat until everything is light and fluffy.
How to Measure
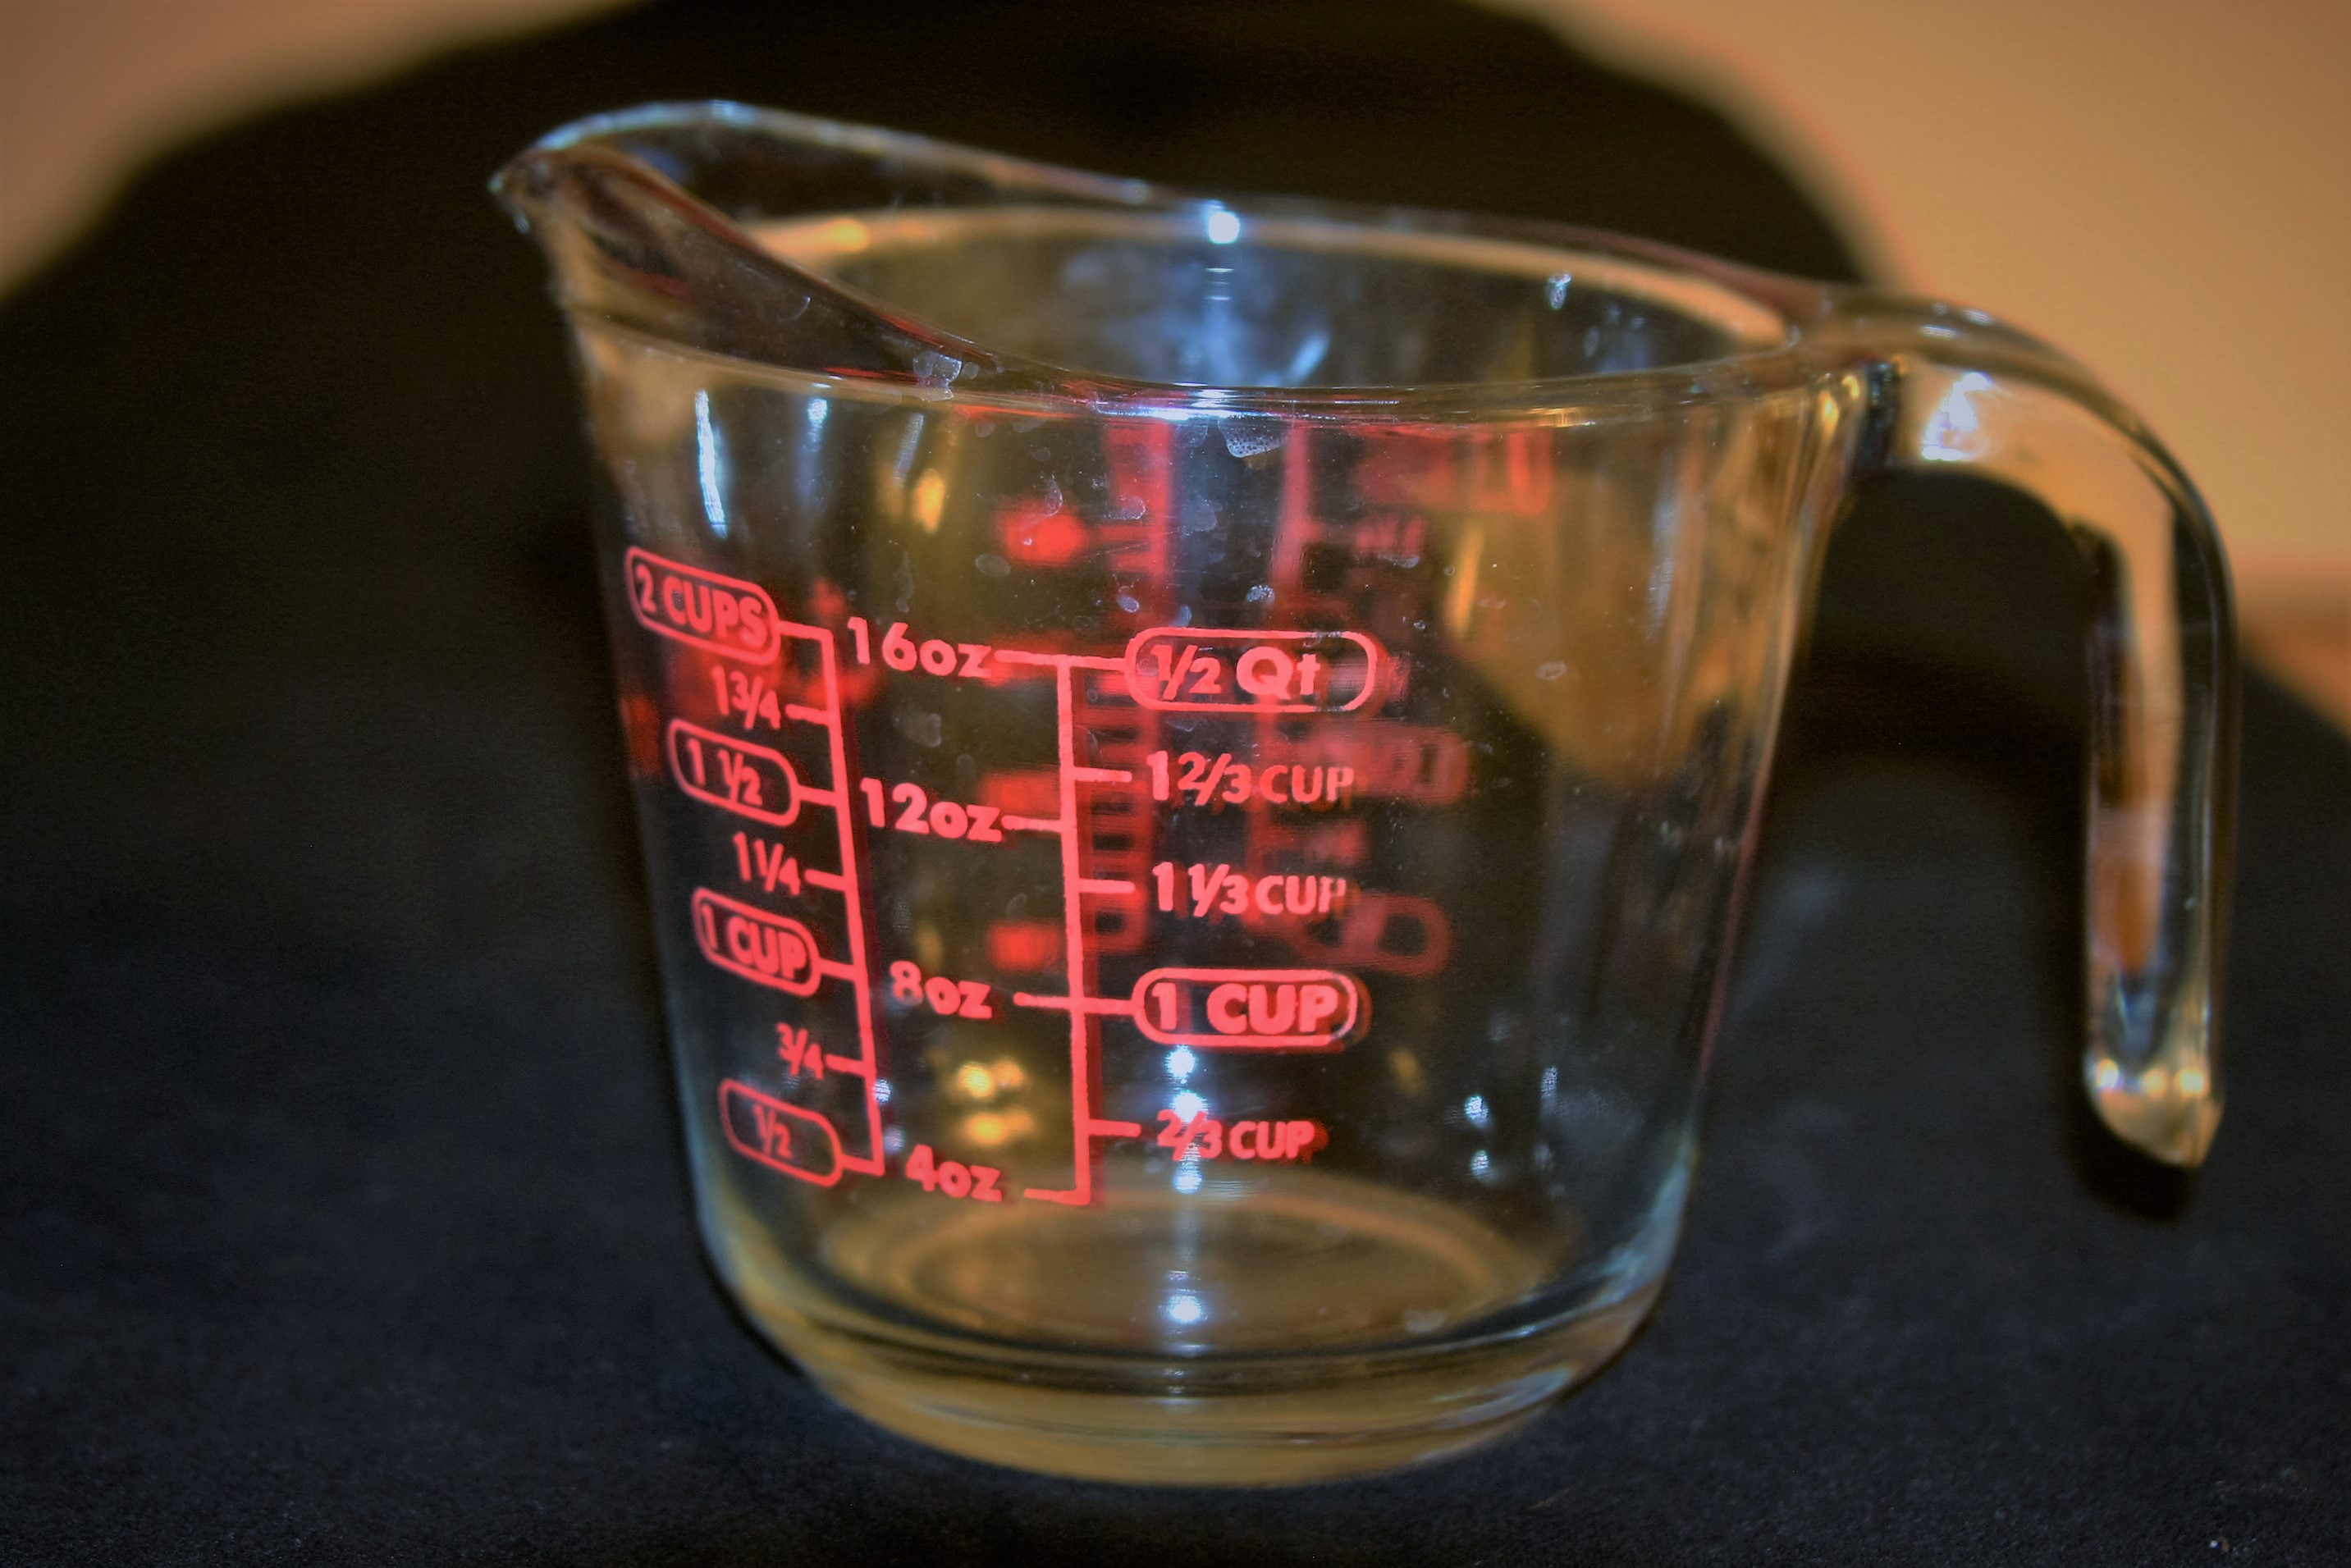
First off there are two kinds of measuring cups: those for wet ingredients, and those for dry ingredients.
Measuring cup for wet ingredients
Measuring cups for dry ingredients
You can use the dry ingredient cups for wet, but please, please, do NOT use the wet ingredient measuring cups for dry ingredients. Why you might ask? Simply; because you cannot get a precise measurement of dry ingredients. You might try, but then you will end up shaking or tapping the cup to level the ingredients, then they will become packed down, and you will have heavy, dense, yucky baked goods.
Another important thing to remember when measuring dry ingredients into a dryingredient measuring cup, is to never ever scoop with the measuring cup. Again, this results in too much of whatever you are measuring. You always want to scoopup your ingredient with a separate cup, scoop, or spoon, and sprinkle it into the correct size measuring cup. You overfill the cup, and level it off before adding your ingredient to your recipe. Please see this video of my mom measuring flour for a good example (she starts measuring flour at 24 seconds).
Sifting… I don’t always sift my dry ingredients when I bake, but I do find it important in most cakes. It removes any lumps from your dry ingredients and adds air creating a light, more tender finished product. So, when I do say sift, I really am suggesting you sift.
My mom’s apple pie. I really don’t know if there is anything better. I think this apple pie is my second favorite dessert, with chocolate cake coming in first. It might actually be my favorite since it is also good for breakfast and snacks, not just dessert. I like them so much I had my mom make pies for my wedding. She made 12 amazing pies that everyone talked about for weeks after the event.
As much as I love this pie, I don’t really love all apple pie, just my mom’s. Most lack flavor, have a poor crust, are too sweet, or are just boring. This pie is perfect. The apples are just a little tart and hold their shape while swimming in a perfectly sweet sauce that just holds everything together. It is fragrant with cinnamon, and the crust is flaky with a hint of salt and simply melts in your mouth. The smell as it bakes smells like everything a home should be; warm, sweet, spicy, and welcoming.
I wanted to post this in time for Thanksgiving so you could have the perfect pie to impress you family. Just watch the video of my mom making the crust, and this one of her making the pie, and you are good as gold.
Apple Pie
Ingredients
Prepared pie crust (top and bottom crust, uncooked)
6 apples cut into bite-sized chunks (mix of granny smith, cortland, gala, or whatever you like)
1 cup white sugar
2 tsp cinnamon
1/2 tsp salt
2 TBL all purpose flour
1 1/2 TBL earth balance buttery sticks
Instructions
Place apple chunks in a large bowl.
In a small bowl mix together the sugar, cinnamon, salt, and flour.
Sprinkle the cinnamon sugar mixture over the apples and stir until the apples are well coated in the sugar mixture.
Place the bottom crust in a large pie plate and pour the apple mixture into the crust (it should be overflowing).
Dot the apples with small pieces of earth balance spaced evenly over the apples.
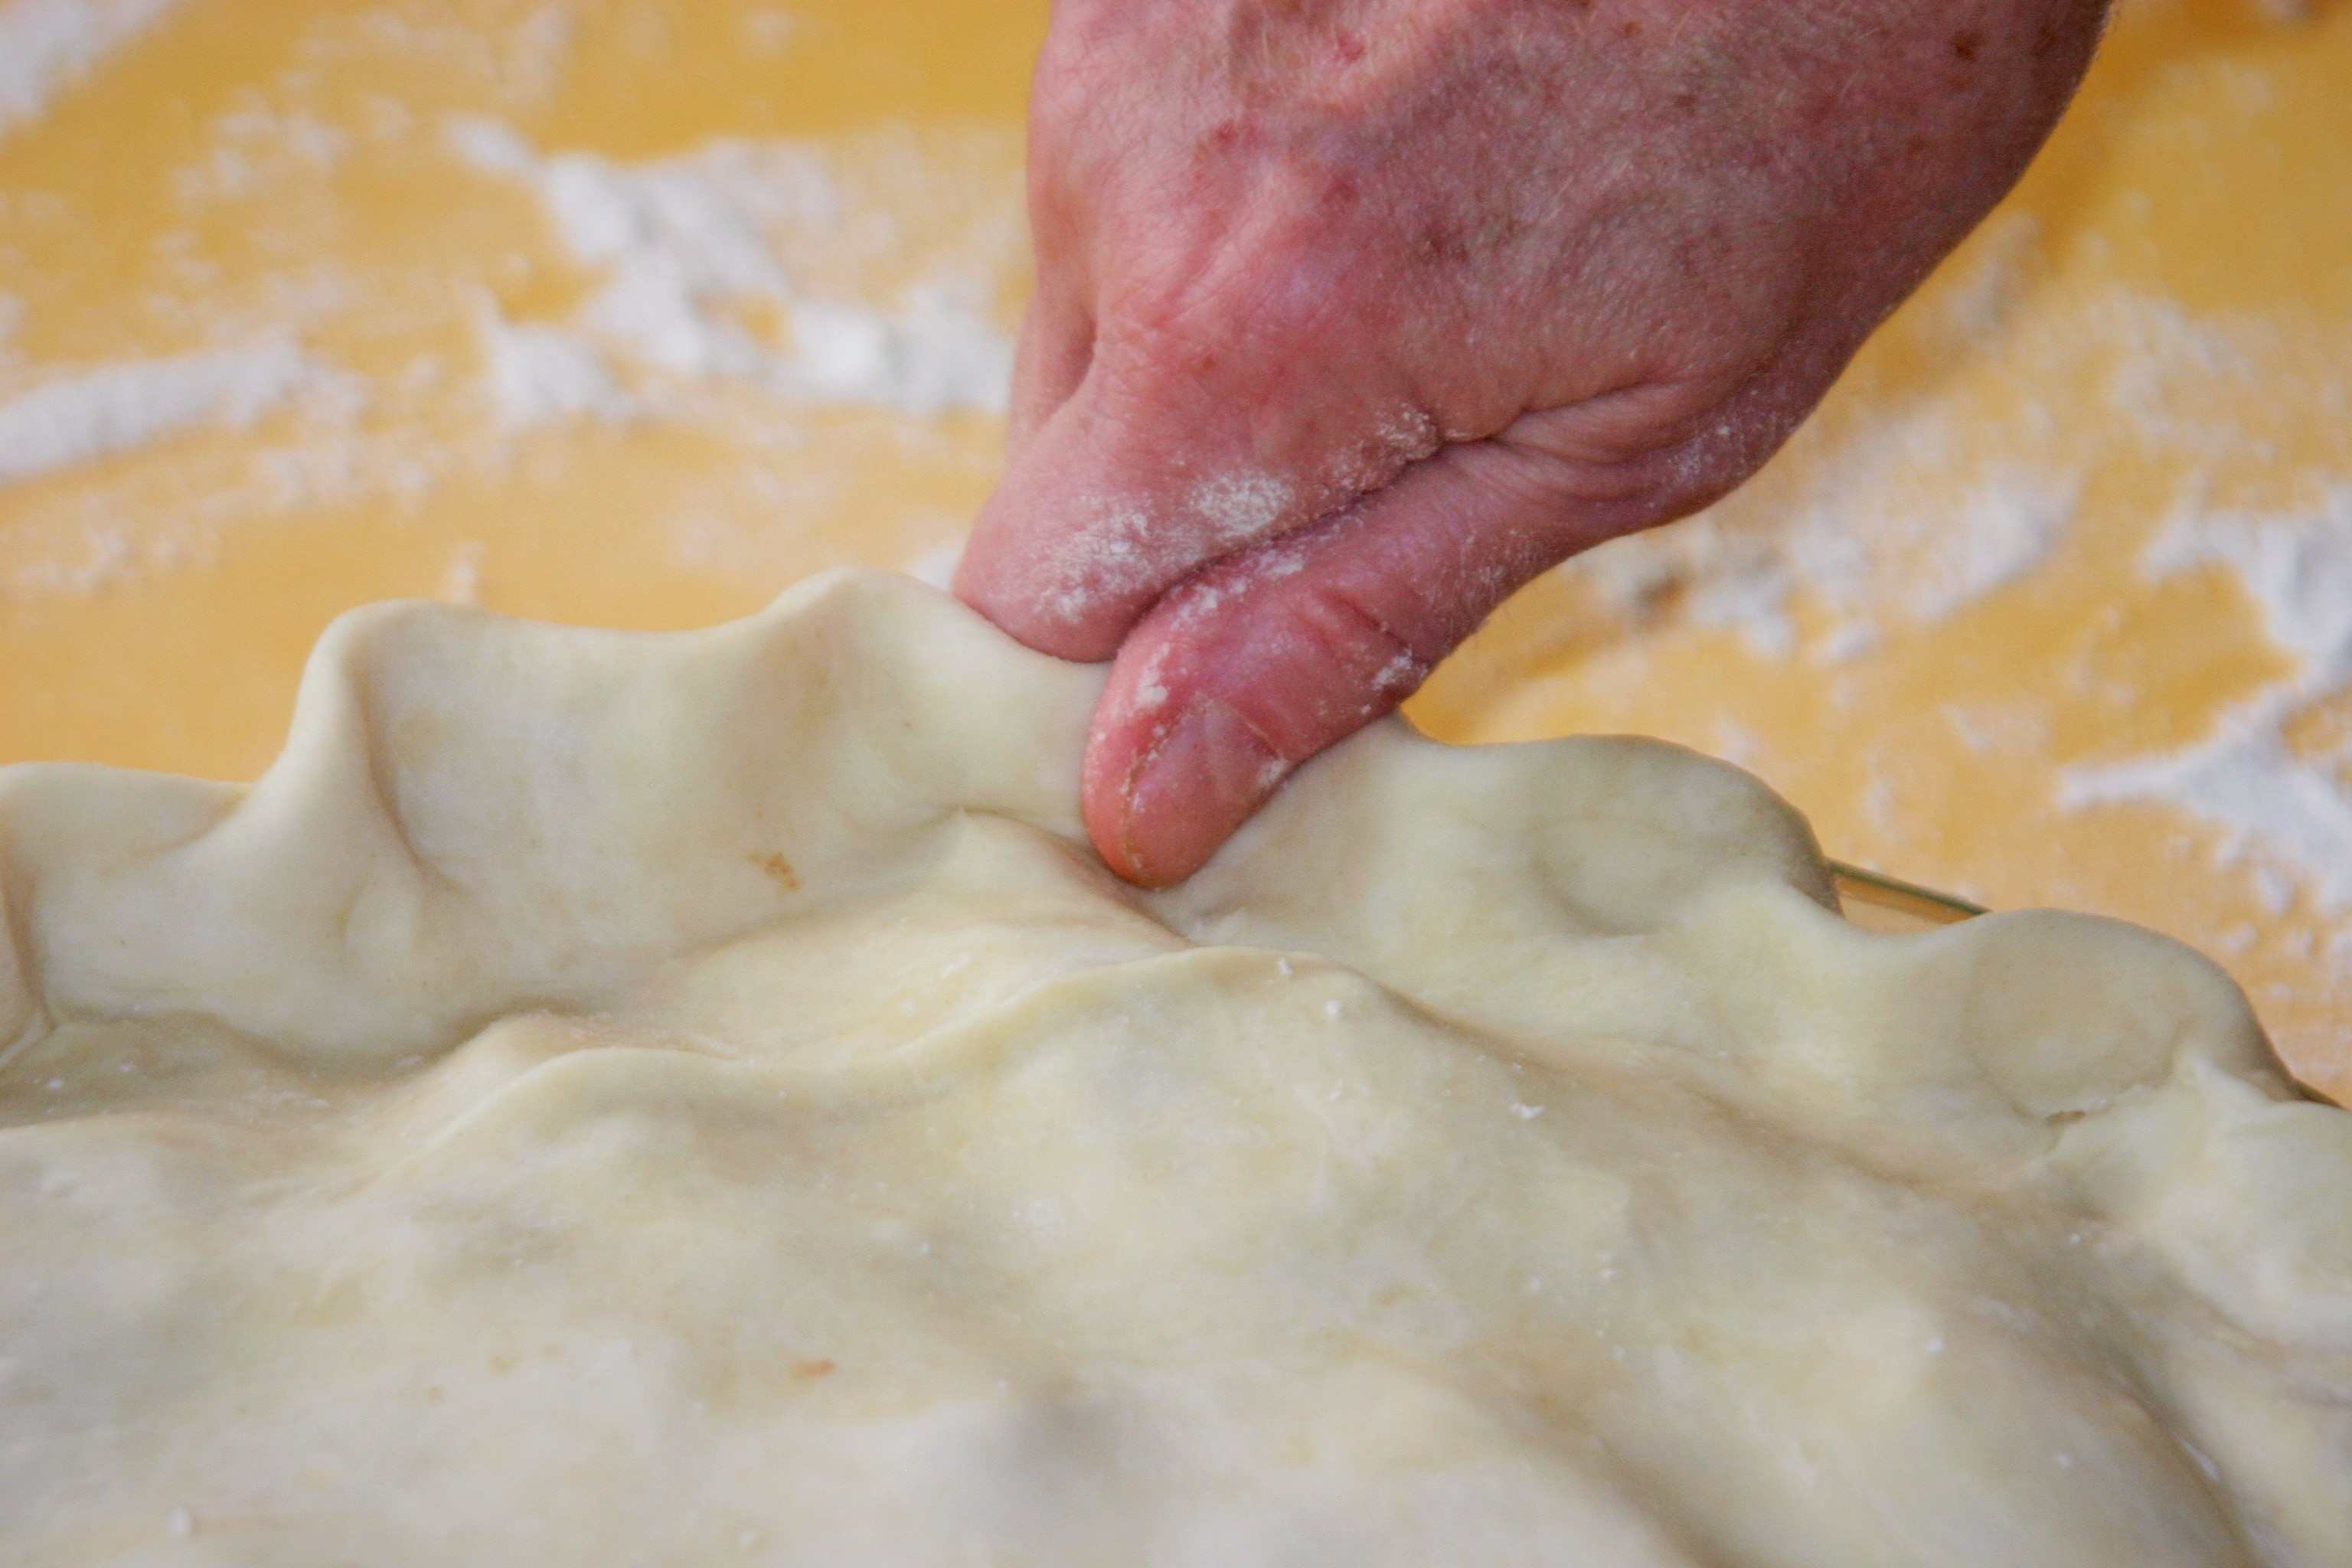
Roll the top crust over the apples, rolling and crimping the edges.
Cut steam vents in top crust.
Place pie in pre-heated 425 degree oven for 15 minutes.
Keeping the pie in the oven, reduce the heat to 350 and continue cooking until the crust is golden, and the juices are oozing out the steam vents, about 40-50 more minutes.
Allow the pie to cool for at least a half hour before serving.
I think this might be the first non-vegan recipe I have posted. It’s kind of scary to open myself to judgement as I switch to a non-vegan point of view. Historically this website has been totally vegan, though with the change a few months ago I decided to open the doors to no-vegan recipes. Personally I have gone through a process to make the decision to eat some animal products again, and it is a decision that works for me and my current lifestyle. When I do eat animal products I try to stay with “happy” animal products. I am working on a post about my food journey that will come soon.
I continue to eat vegan most of the time, though when I do venture out of my vegan ways this is one of my favorites. I think quiche is best when loaded with vegetables and baked in a perfectly flaky crust. Quiche is a dish that I have fond memories of from my childhood. We always had quiche for holiday brunch, and when we had people over for breakfast. It seems an impressive dish, but is actually easier than scrambled eggs!
What I love about quiche now is easy it is to throw together, that it feeds lots of people without slaving over a stove or worrying about timing eggs, and you can put whatever you have in your fridge, making it a delicious way to use up odds and ends. The only “hard” part of quiche is if you are making a homemade crust, and I made this sweet video to take the mystery out of that, so you are all set. I guess you could also buy a crust, it is up to you.
Wicked Easy Quiche
Ingredients
4 Happy Eggs (cage free, local, organic, from happy chickens)
3/4 cup unsweetened, plain, non-dairy milk
OR
3 Happy eggs
1 cup dairy milk
And
salt and pepper to taste
herbs to taste (I used fresh tyme and sage for this quiche)
spices to taste (I used smoked paprika, salt and pepper)
1-2 cups of chopped, cooked vegetables (I used kale, leeks, mushrooms, fennel, and little bit of red bell pepper for this one)
1/2-1 cup shredded happy cheese (I use goat gouda for this quiche)
Add milk, salt, pepper and whatever herbs and spices you are using mixing briefly.
Sprinkle the cheese evenly into the bottom of the prepared, unbaked pie crust.
Spread the cooked vegetables evenly over the cheese.
Pour the egg mixture over the vegetables and cheese.
Bake in the preheated oven for 45-60 minutes until a knife inserted in the center comes out clean.
Cool for at least 10 minutes before serving.
Discussion:
What is important for successful quiche?
Veggies
Cheese
Flavor
The custard (egg and milk mixture)
I I like to think of starting to build the flavor in quiche with the veggies accented by the cheese, herbs and spices, and all held together by the custard. Choose you vegetables based on either what you have, or a specific combination for a taste you are looking for. If it sounds like it would make a good omelette, it would make a good quiche.
How Does It All Work?
The Veggies
Your first layer of flavor.
Reallyany vegetables will work in this recipe; you can use as many or as few as you like. If you only do a little you might need to add more custard to fill the crust. I like mine stuffed with vegetables.
I love using greens such as spinach or kale, onions or something in that family (leeks, shallots, scallions), mushrooms, peppers, broccoli. Really whatever you like in the combination you like it. Somewhere between 1-2 cups of cooked vegetables per quiche.
Vegetables are the first layer of flavor, so choose those that you like together, chop them and cook them before adding them to the quiche. I usually saute mine.
When cooking the veggies you want to make sure they are just cooked as they will cook a little more as the quiche bakes.
You also want to start building flavor here while cooking the veggies. I usually add salt pepper, and finish with some fresh herbs if I have them. Dried are also good, but I add dried herbs while the veggies are cooking rather than at the end.
You can also use leftover cooked vegetables. Let’s say you had fajitas last night, chop up those leftovers and throw them in. Maybe it was steamed broccoli, or roasted asparagus; just toss it in.
Cheese
Adding a bit more flavor.
Almost any cheese you like should work fine here. Shredded is best as it will melt more evenly.
Add the cheese to the crust first and it will help create a barrier so the crust doesn’t get soggy from the filling.
Think about the cheese you might want on an omelette with the vegetables you chose, and use that cheese.
Somewhere between 1/2 and 1 cup of cheese is good. You can also mix types of cheeses here.
Herbs and spices
Keep building flavor
Fresh herbs are great in quiche, but if you don’t have them dried are fine. Don’t forget the salt and pepper!
Season every layer separately (vegetables, custard, even the crust if you are making it homemade).
I used thyme, sage, salt and pepper in my quiche today. Again, think of flavor profiles you like together and build a quiche based off those. Maybe basil and tomato with mozzarella, broccoli cheddar with just a little salt and pepper, mushrooms, spinach and swiss cheese with herbs de provence. Whatever sounds good.
The Custard
Holding it all together
You need something that holds it all together, and makes it, well, a quiche. The custard does this.
If you are using dairy milk 3 eggs to 1 cup milk works well, if you are using non-dairy milk then 4 eggs to 3/4 cup milk.
Sometimes I add too many vegetables and have to whisk another egg and pour it over the top to make sure the veggies are covered in the custard mixture.
Season this layer too; salt and pepper for sure, and a little bit of whatever herbs and spices you are using.
I usually just post a link to my videos in the post that they relate to, but this one is special. My mom came to visit last week and I convinced her to go on camera and make her famous pie crust! Not only is my mom sweet and wonderful, she is also an incredible cook and baker. She is the original “happy food ninja”. The pie crust she makes is basically the one she was taught by her grandmother (we just substitute vegetable shortening for lard). My mom is sharing some super fun tips and letting you in on the secrets to the perfect crust. I hope you enjoy!
My mom always said “you only make homemade pie crust for people you love.” This is a true statement as pie crust is a labor of love. It really isn’t hard, but it does take a little time, effort, and mess to make. My mom always made pretty much everything from scratch and I have many memories of her rolling out the dough for pie crust. Pie was her favorite, and her specialty. Every holiday in our house was celebrated with pie. Thanksgiving was really a time to rejoice as she spent DAYS making pie. We would have apple, pumpkin, pecan, and french silk every Thanksgiving. It was amazing! The heart of her pie started with this simple crust.
The perfect pie crust is light, flaky, a bit salty, and falls in crispy pieces when you take a bite. This crust has always been vegan, the accidental vegan thing, and lives up to the perfect crust. I have added a few tips and tricks from my mom for a perfect crust which I am sharing after the recipe.
I had a lot of fun with this post and I didn’t even have to make the pie! My mom is here for a visit and she joined me for a video and made me an amazing apple pie with her perfect crust. I got to help:) It was a perfect rainy day of baking and hanging out with my mom and filming the video with her while Wolfie took a super long nap. I don’t get much better than that!
Pefect Vegan Pie Crust
Makes 2 crusts, or one two crust pie (Such as apple)
Ingredients
2 1/2 cups all purpose flour-plus extra to roll crust
1 tsp. salt
10 TBL vegetable shortening
4-6 TBL very cold water-add an ice cube while making the recipe
Instructions
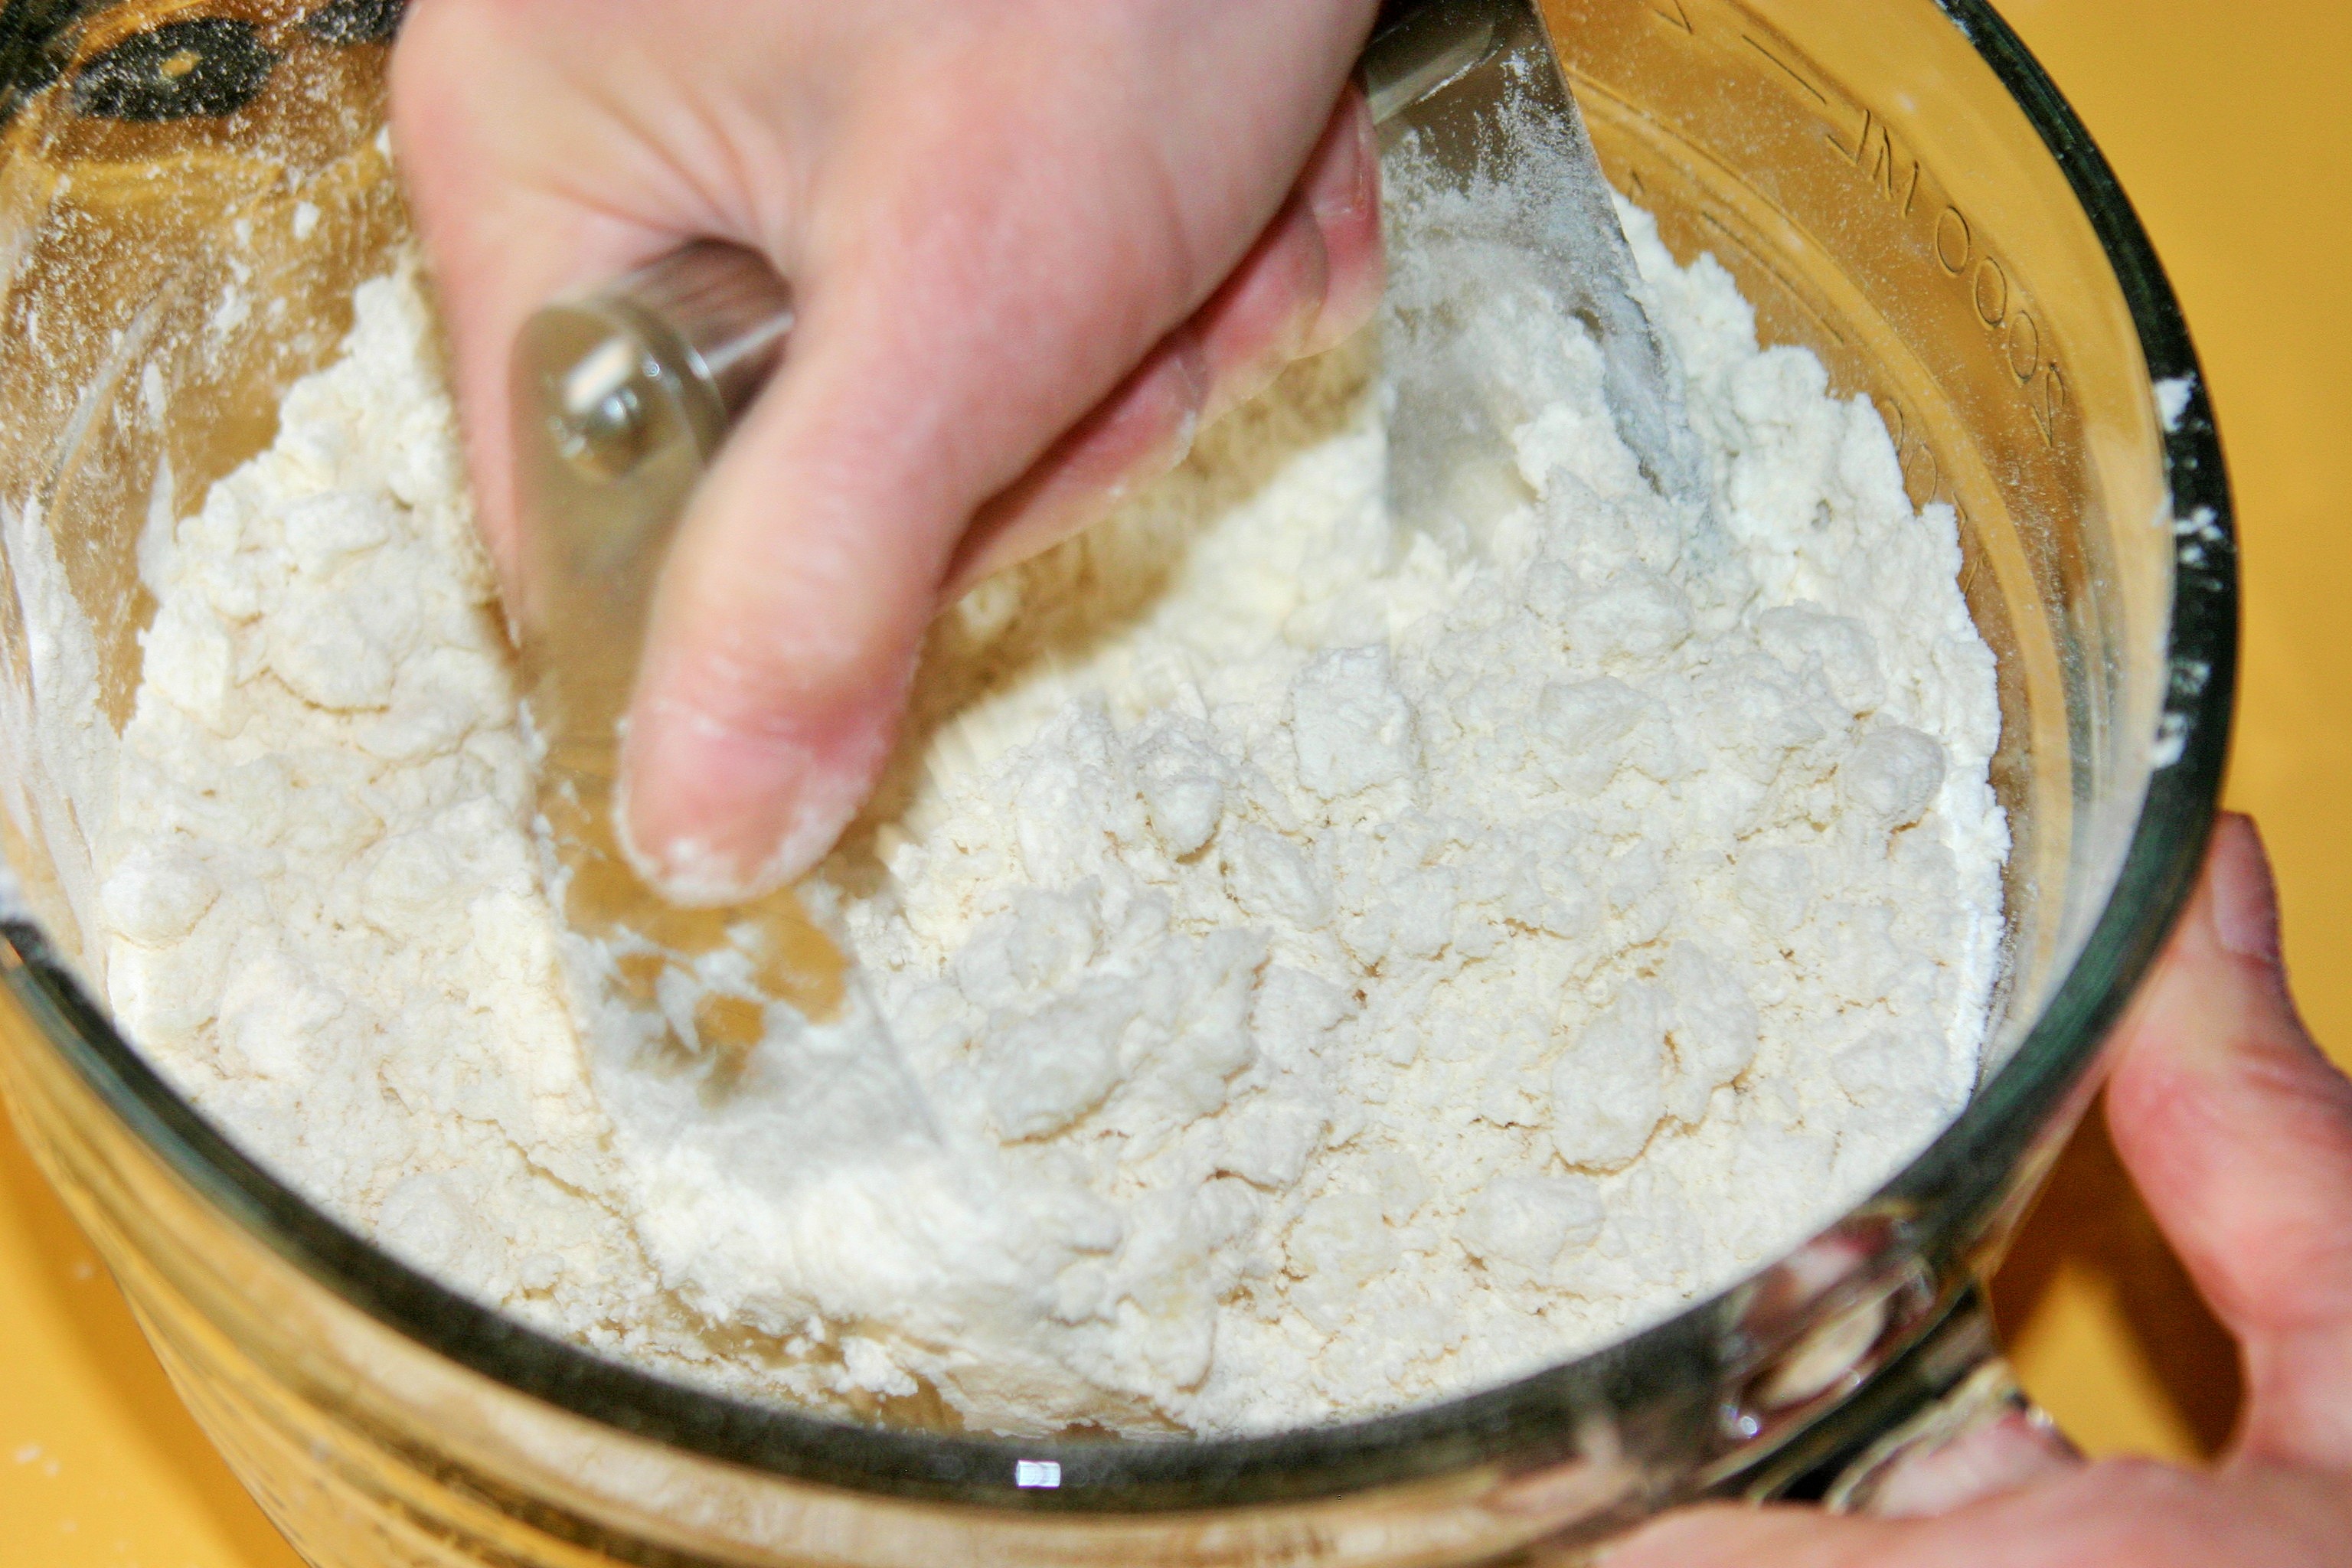
Mix the flour and salt together in a medium bowl, or in your food processor.
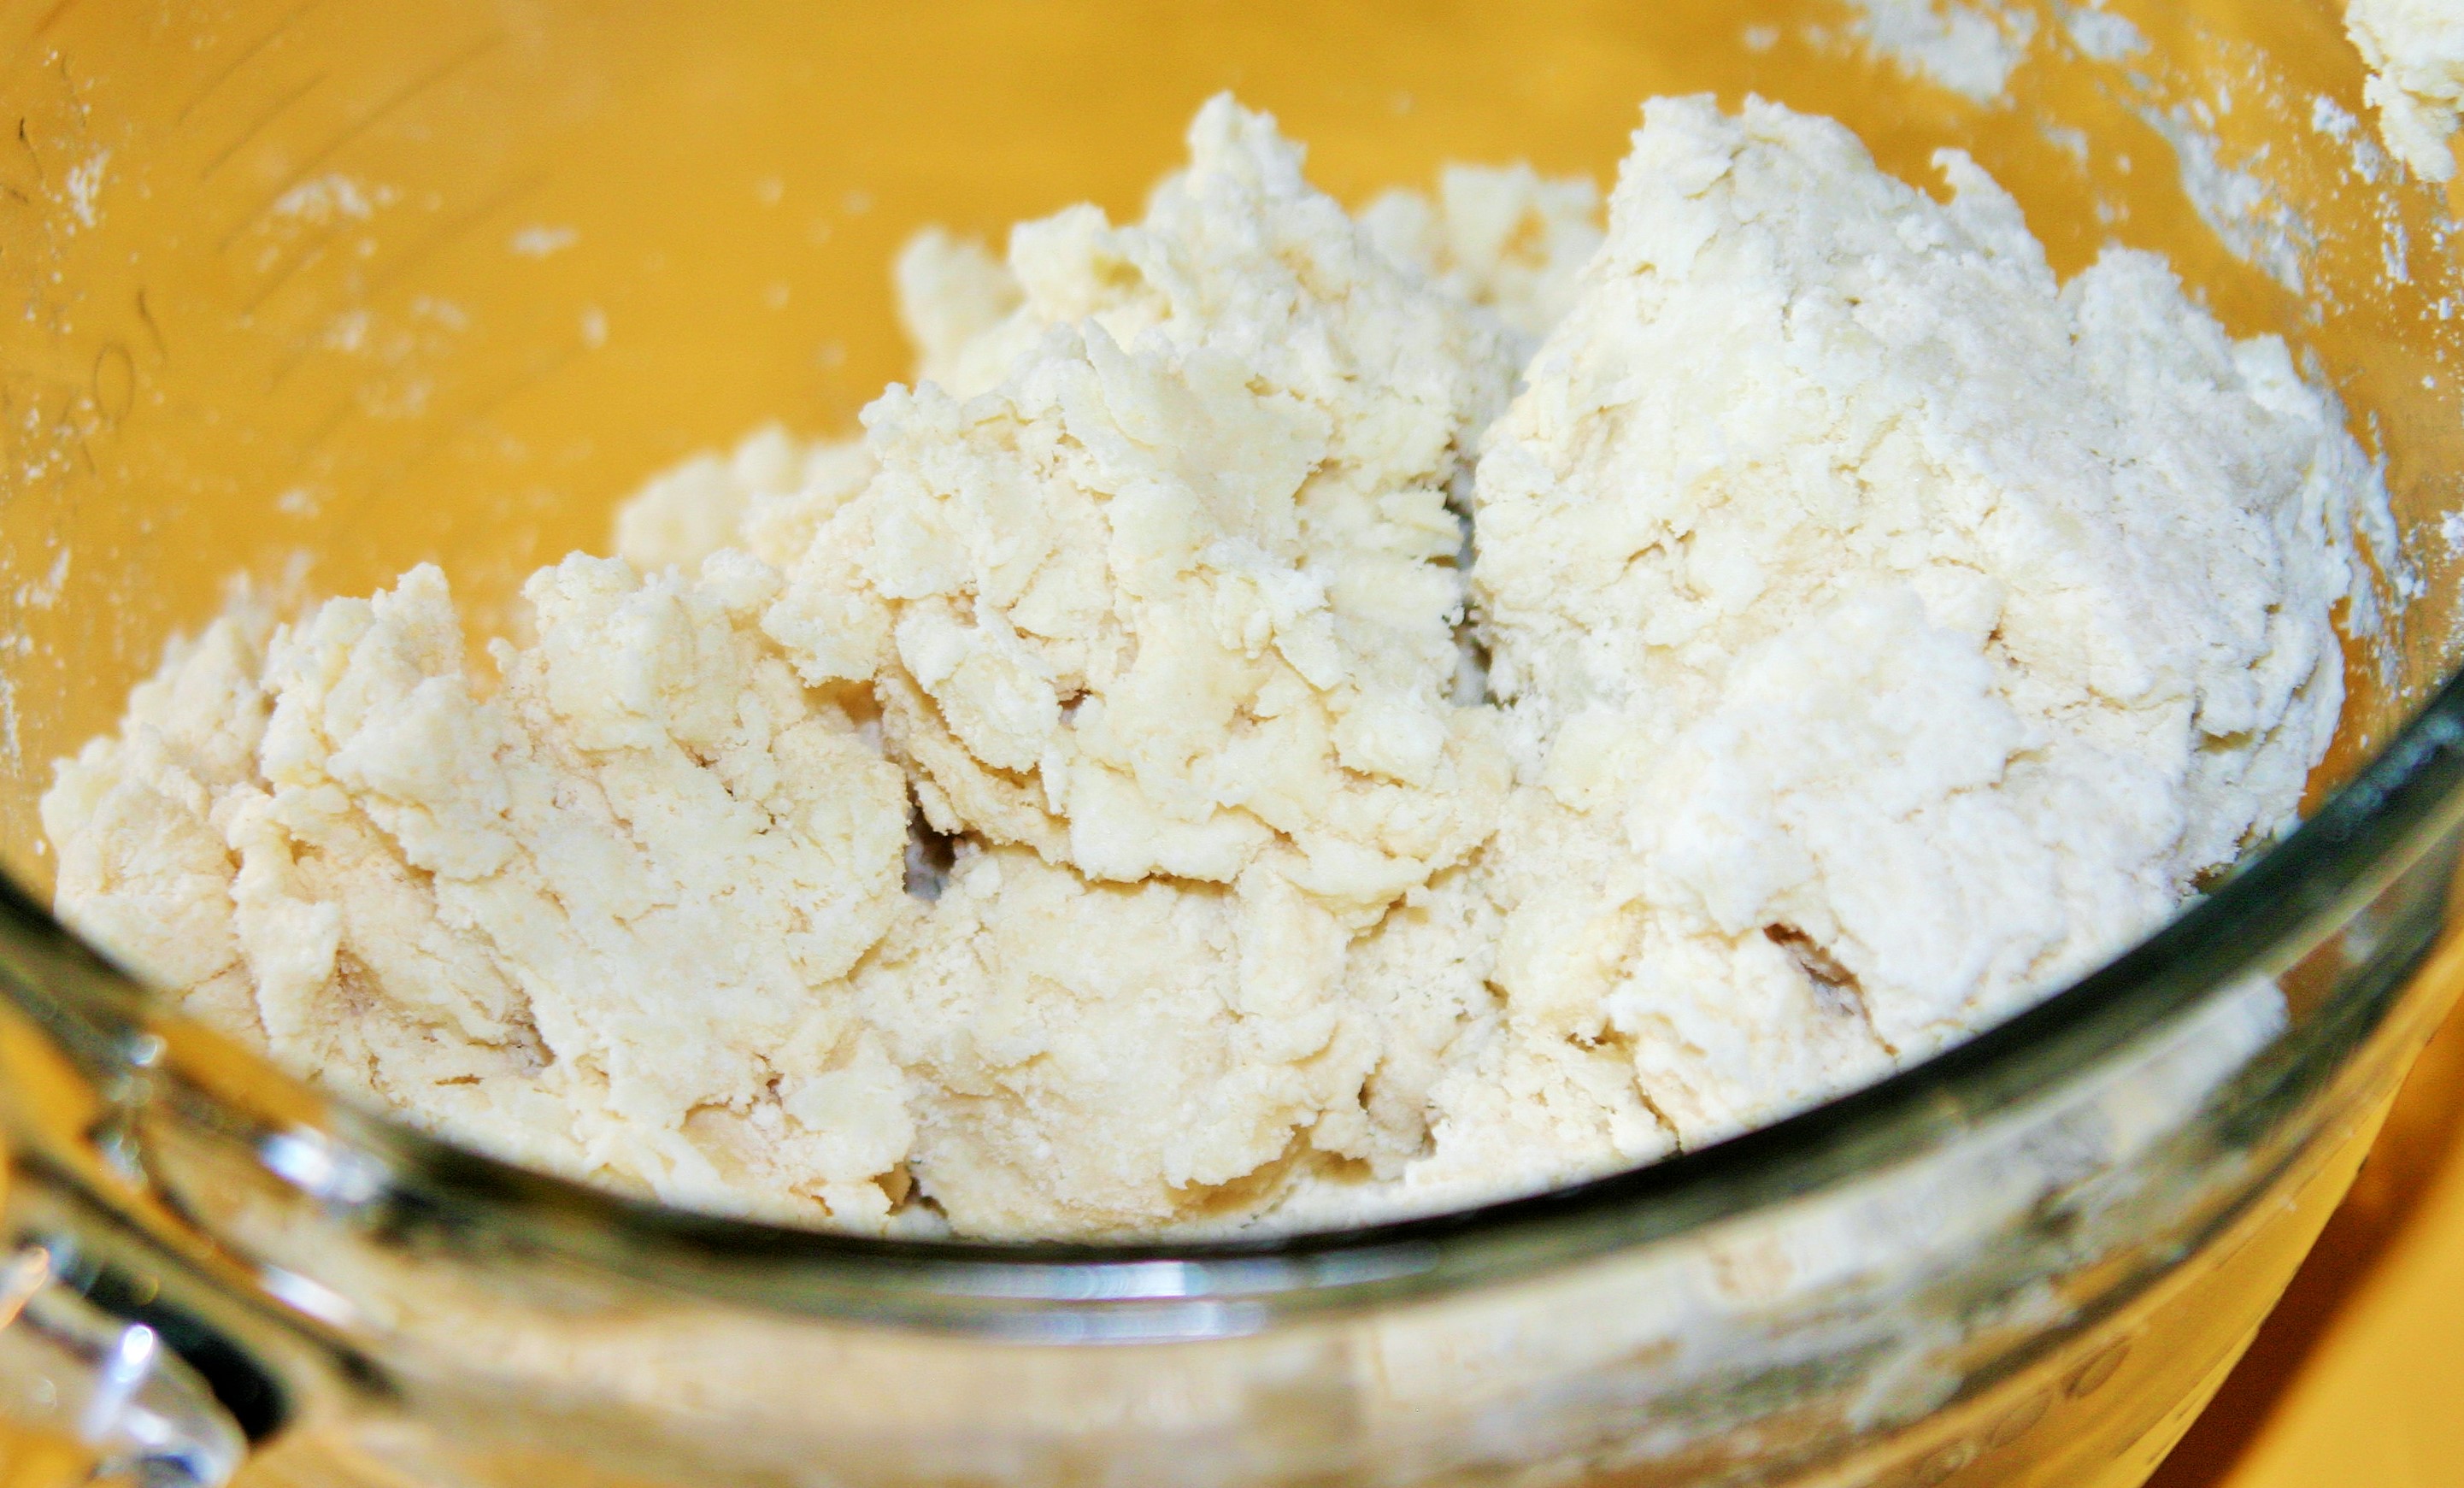
Cut in the shortening with a pastry cutter, fork, or with short pulses in your food processor.
Mixing with a fork, rubber spatula add just enough of the water to hold the crust together in a ball with no large cracks when you press it together with your hands or the spatula.
On a clean dry flat area sprinkle flour in a shape larger than you want your crust.
Split the dough in half and make each half in to a ball.
Place the dough ball in the middle of the floured area and sprinkle more flour on the dough as well as on a rolling pin.
Role the crust starting in the center of the ball and working toward the edges. -touch the dough as little as possible.
When the crust is rolled to the size you desire pick it up using the rolling pin and place in pie plate.
The second half can be used for a top crust or another bottom crust.
Use the crust to make anything that requires a perfect pie crust.
Tips and Tricks:
The less you touch and play with your crust the better it will be.
The more you work with a wheat crust the more the gluten in the wheat develops. When gluten develops it makes the product chewy; perfect for bread, not perfect for pie crust.
A food processor works great, just do quick pulses until it looks right.
Start with cold ingredients.
Cold vegetable shortening can be hard to work with, but it is worth it in the end. Flakes in pie crust occur when the little pieces of fat melt and leave air pockets as the crust bakes. (Check out Food Lab for the real story)
Measuring is not exact, go by look and feel.
The consistency of the crust will change based on the type and brand of flour, and how you measure your ingredients. A scale is much more exact, I don’t use one so my measurements are a place to start. Check out this video to see each stage.
If your crust just isn’t working, put the broken mess on a baking sheet, sprinkle with cinnamon and sugar, bake for about 10 minutes at 375 until the crust is golden brown, and eat them right up. Start a new crust while these are baking
Never make crust when you are in a hurry.
It just won’t work. One of those things. Take your time, at least until you have it down.
You can use fats other than vegetable shortening, but my mom says it’s the best, so why even go there?
Cutting the shortening in. This is how it should look right before adding water.The dough with water, before rolling it out.Vegan Pie CrustPerfect Homemade Pie Crust